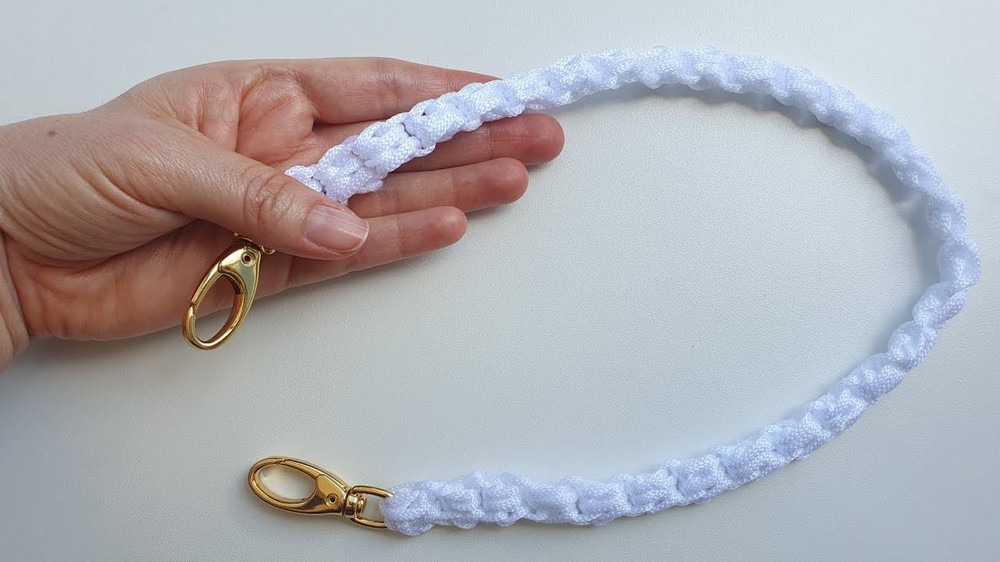
Quick, easy, and totally stylish! Create bold bag handles with this no-sew crochet pattern, designed for crafters who love fresh and fun challenges.
A bag isn’t just for holding your things—it should also be strong, stylish, and practical. The handle is especially important for comfort and looks. One great option is the no-sew crochet bag handle pattern. It’s easy to make, flexible, and can be customized to fit any bag. The flat design feels comfortable to carry, and it’s tough enough for daily use. You can adjust its length to work with big tote bags or smaller purses. Plus, the carabiner clips make it simple to attach to almost any bag, adding a cool and convenient touch.
No-sew Crochet Bag Handle

Round Crochet Bag Tutorial With T-Shirt Yarn
Materials:
- 1 skein of T-shirt yarn (such as "yarn biscuit" with print)
- 9 mm crochet hook
- Two detachable ring connectors
- Scissors
- Tapestry needle
Pattern Steps:
- Magic Loop and Setup:
- Start with a magic loop.
- Chain 1.
- Crochet 5 single crochets into the ring.
- Pull the loop tight and join with a slip stitch to form a circle.
- Perfect Circle (Rows 1-6):
- Row 1: Chain 1. Crochet 2 single crochets in each stitch around. Join with a slip stitch.
- Row 2: Chain 1. Work 1 single crochet in the first stitch, then 2 single crochets in the next stitch, and repeat around. Join with a slip stitch.
- Row 3: Chain 1. Work 2 single crochets in the next stitch, followed by 1 single crochet in the next two stitches, and repeat around. Join with a slip stitch.
- Row 4: Chain 1. Work 2 single crochets in one stitch, then 1 single crochet in the next three stitches, and repeat around. Join with a slip stitch.
- Row 5: Chain 1. Work 2 single crochets in one stitch, then 1 single crochet in the next four stitches, and repeat around. Join with a slip stitch.
- Row 6: Chain 1. Work 2 single crochets in one stitch, then 1 single crochet in the next five stitches, and repeat around. Join with a slip stitch.
- Regular Rounds (Rows 7-10):
- Rows 7-8: Chain 1. Single crochet in each stitch around without increasing. Join with a slip stitch. Your piece will start to form a semicircular shape.
- Row 9-10: Repeat previous round. Join with a slip stitch.
- Finishing Half:
- Cut the yarn, leaving a long tail.
- Weave in the end for a seamless finish.
- You'll have a hemisphere shape at this point.
- Create a second half by repeating steps 1 to 3.
- Connecting Halves:
- Lay both halves together, matching their edges.
- Secure them using a method of your choice, such as seamless joining stitches.
- Ensure the edges are aligned and connect them stitch by stitch.
- Creating the Handle:
- Take the remaining T-shirt yarn (approximately 12-13 meters).
- Sew the two open ends to form a continuous loop.
- Fold the loop in half twice, so you have four strands.
- Twist the strands together tightly, ensuring a uniform twist.
- Secure the twist with one of the detachable rings, threading both ends through it.
- Attaching the Handle:
- Using the detachable rings, attach the twisted handle to each side of the bag.
- Finishing Touches:
- Weave in any remaining loose ends with a tapestry needle.
- Trim any excess yarn.


This completes your round crochet bag! Feel free to add closures like a zipper or clasp if desired. Happy crocheting!