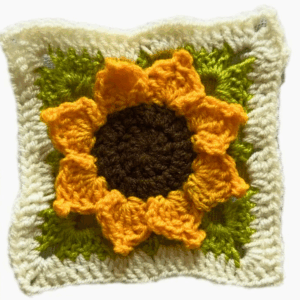
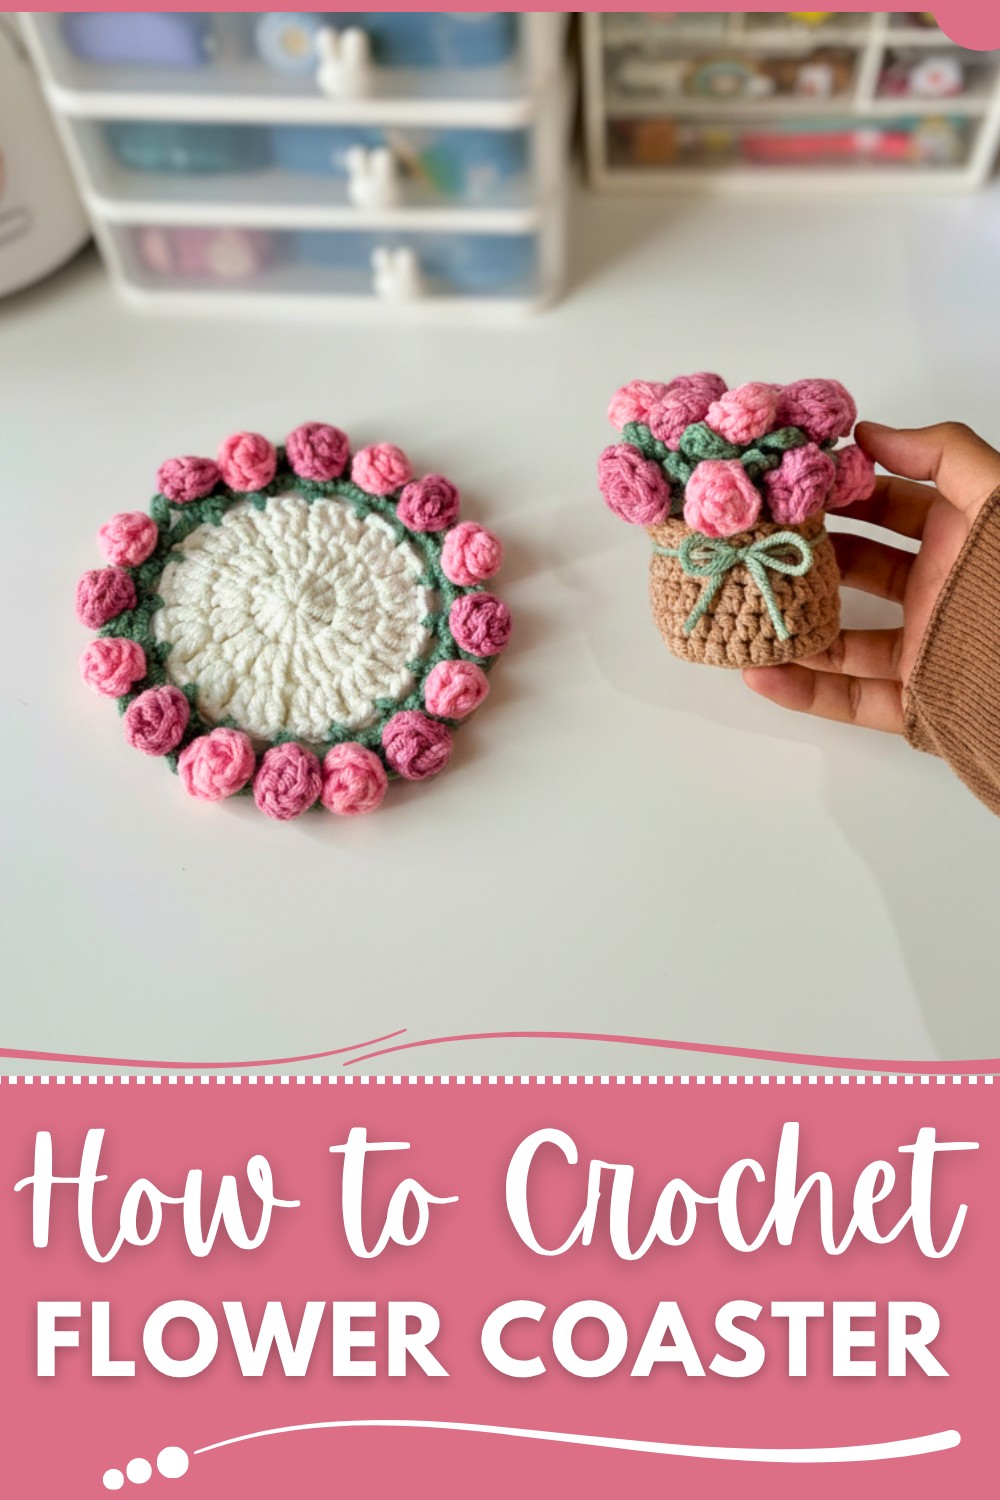
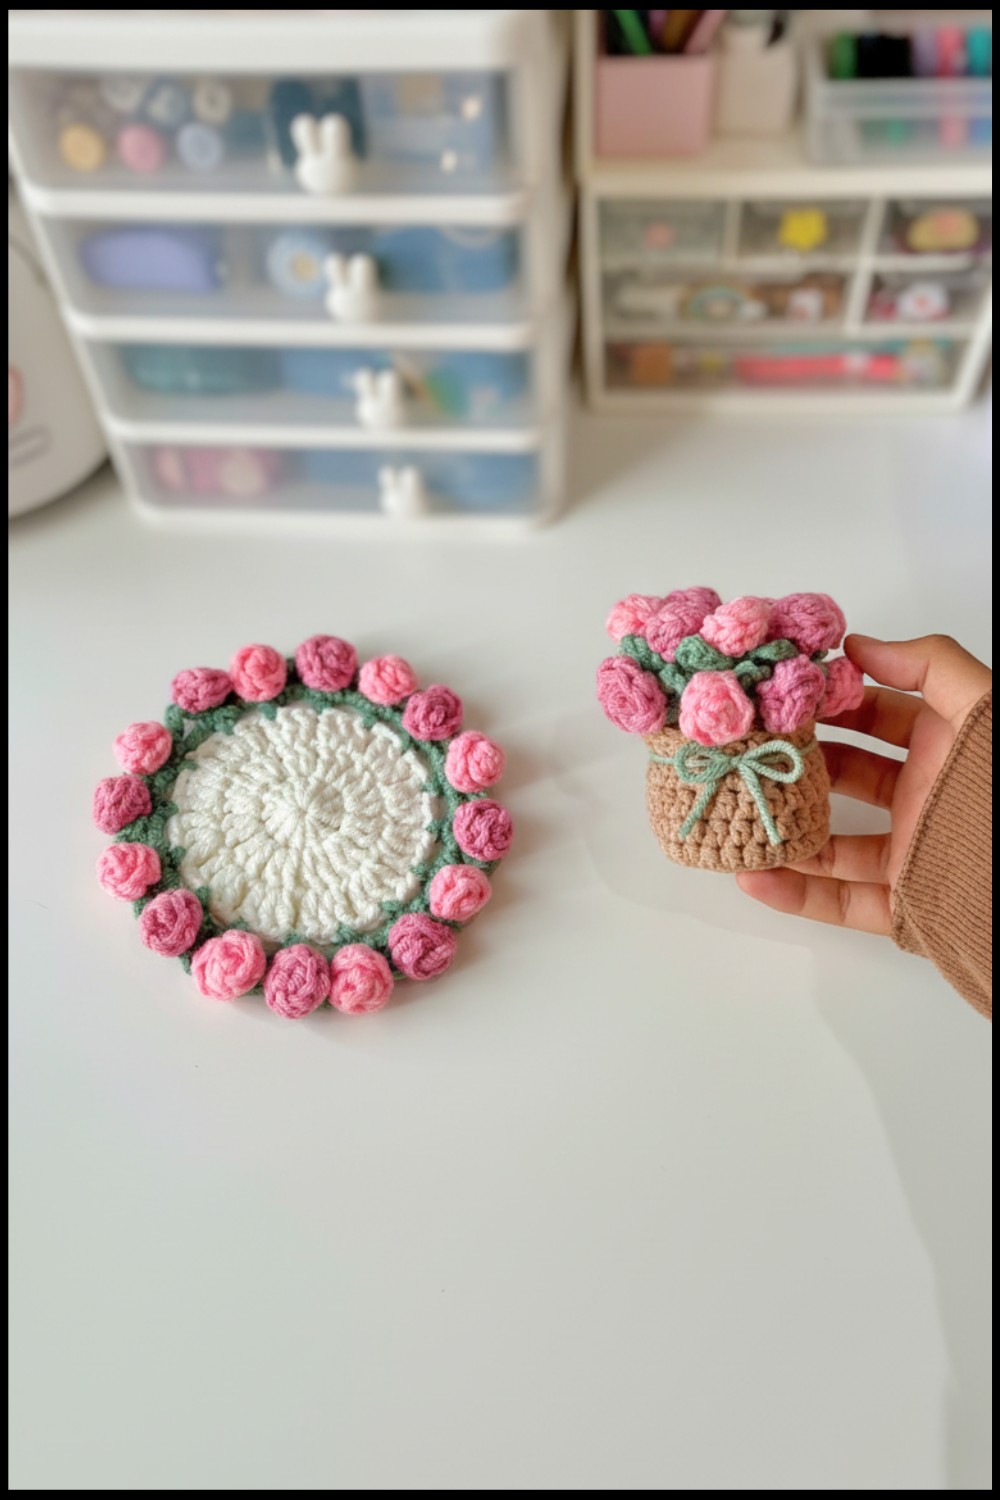
Turn your spaces with this free crochet flower coaster pattern, blending beauty and functionality for everyday use or thoughtful gifting.
Brighten up your table with a charming handmade addition that’s as functional as it is beautiful. This delightful crochet flower coaster pattern is a perfect solution for protecting your surfaces while adding a pop of personality to your home. Whether hosting friends for coffee or simply enjoying a quiet moment with your favorite drink, this pattern brings warmth and character to any setting.
Free Crochet Flower Coaster Pattern for Practical & Stylish Use
With just a few basic stitches, this project becomes an enjoyable and relaxing activity suitable for beginners and seasoned crocheters alike. The floral pattern allows for endless versatility; you can mix and match colors to fit your style, experiment with yarn types, or even size up for larger placements.
Beyond its decorative value, the coaster serves a practical purpose, absorbing moisture from glasses or hot mugs to keep your furniture looking its best. Plus, these unique pieces make thoughtful, handmade gifts for loved ones, perfectly suited for birthdays, housewarmings, or just-because surprises. Lightweight, durable, and customizable, they’re an ideal way to bring a personal touch to your space.

Special Features
- Skill Level: Beginner to Intermediate
- Ideal for: Table décor, handmade gifts, or adding pops of color to your kitchen/desk space
- Special Notes: Fully customizable with your choice of colors and size adjustments
- Tools Required: Yarn (at least 2 colors), a crochet hook, and scissors
Step-by-Step Pattern
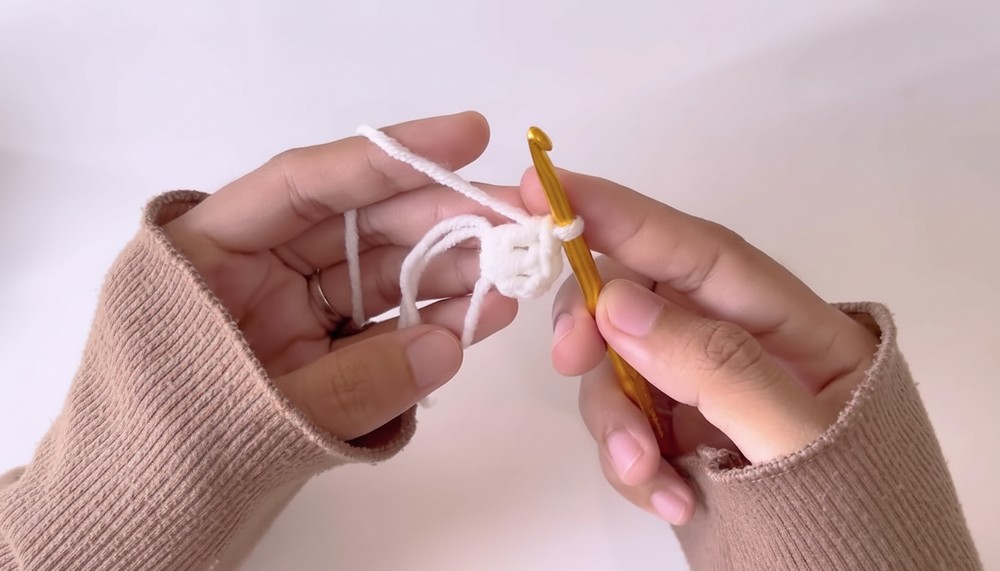
1. Start with the Magic Ring
- Begin by making a magic ring.
- Tip for Beginners: If you’re unfamiliar with the magic ring, refer to the tutor’s video linked in the description box.
- Once the ring is created, chain 2 stitches to build the foundation.
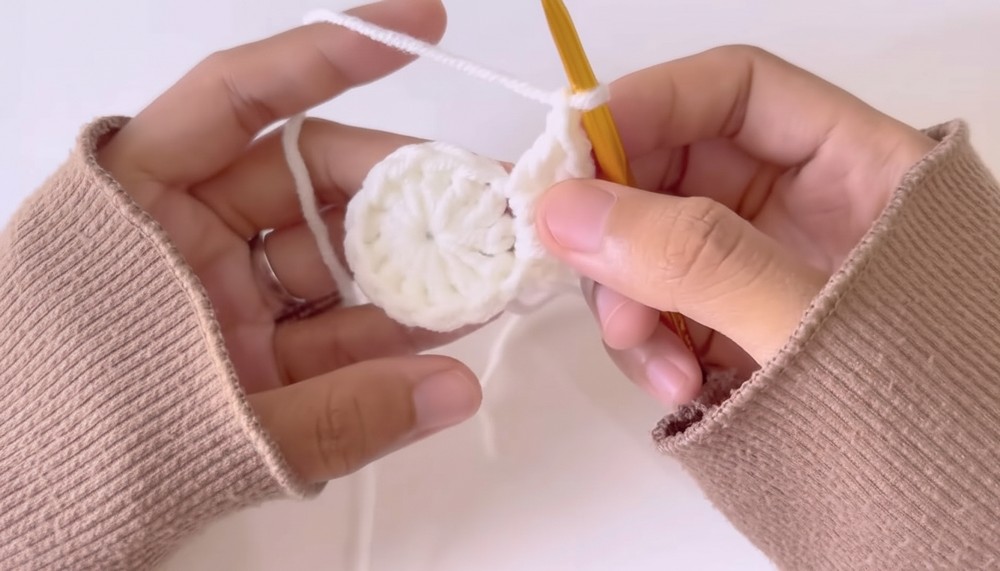
2. Create the First Layer (Round 1)
- Inside the magic ring, create 12 double crochets (DC):
- Yarn over, insert your hook into the ring, and pull through.
- Yarn over again and pull through the first 2 loops on the hook.
- Complete the double crochet by yarn over and pulling through the remaining two loops.
- Repeat this process until there are exactly 12 DCs inside the ring.
- Close the circle by pulling the tail end of the magic ring tightly.
- Make a slip stitch into the top of the first DC to join this round.
3. Add the Second Layer (Round 2 - Increases)
- Chain 2 stitches to start the second round.
- In each of the 12 stitches from Round 1, create a double crochet increase:
- A DC increase means working 2 double crochets into the same stitch.
- After every increase, make 1 chain, then move to the next stitch.
- Repeat this sequence (DC increase + 1 chain) all around the circle.
- Close the round with a slip stitch in the first DC at the top.
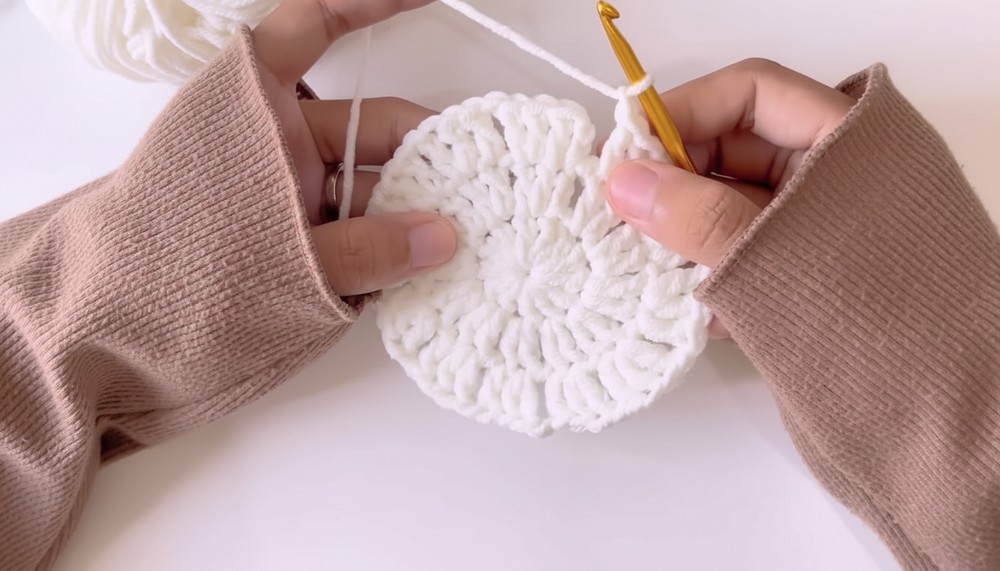
4. Form the Third Layer (Round 3)
- Chain 2 to begin this round.
- Alter the pattern slightly by creating one DC in the next stitch, followed by a DC increase in the following stitch:
- Pattern: 1 DC, 1 DC increase, 1 chain.
- Skip one space from the last round before moving ahead.
- Continue this alternating pattern of DC, DC increase with 1 chain until the last stitch.
- Slip stitch into the top of the first DC to close the third layer.

Optional: If you’d like a bigger flower coaster, follow this pattern for additional rounds:
- Round 4: 2 DC in two different stitches, followed by DC increase.
- Round 5 and beyond: Increase the count of DCs between the increases by 1 per round.
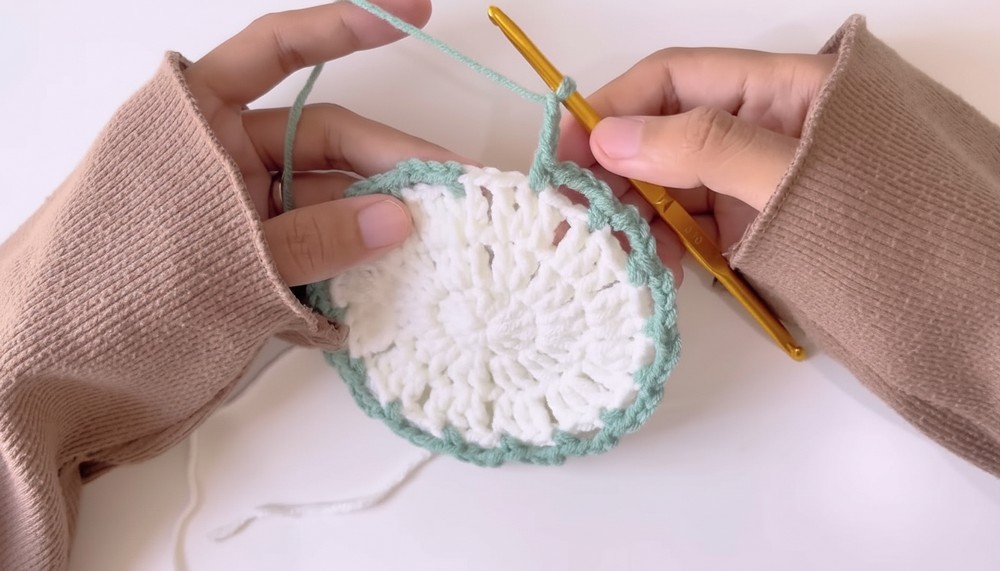
5. Creating a Scalloped Edge (Green Accent Layer)
- Once the desired size is reached, end the white yarn and attach a new color yarn (green in the video) using a slip stitch.
- Work 1 single crochet (SC) in the first space of the previous round:
- Suggestion: Hold the tail end of the new yarn while crocheting over it for a clean finish.
- Chain 3 stitches, then skip 2 spaces of the previous layer and create a single crochet in the next stitch.
- Continue this pattern (SC, 3 chains, skip 2 spaces, SC) all around the coaster.
- Complete the round with a slip stitch into the first SC to close the edge.

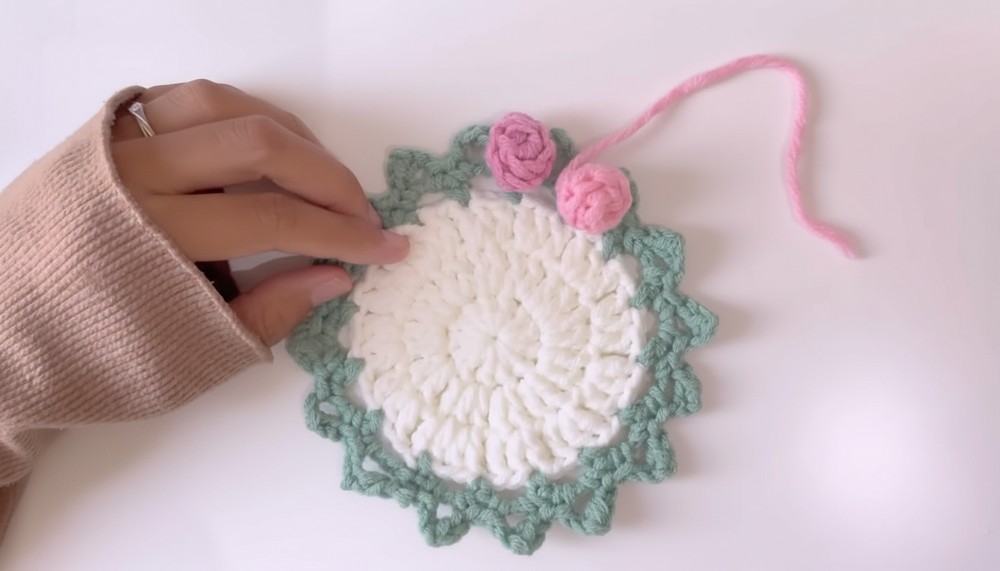
6. Crochet the Mini Flower (Optional Embellishment)
- To make a mini flower, start with a slip knot, leaving a long tail for securing.
- Chain 7 stitches to form the base.
- Begin an HDC increase (2 HDC in one stitch) in the second chain from the hook:
- Yarn over, insert the hook, and pull through; yarn over and pull through all three loops.
- Make another HDC in the same stitch to increase.
- Repeat HDC increases in each chain until the end.
7. Assemble the Flower
- Roll the flower into shape by twisting the crocheted piece.
- Use the tail ends to secure the coils in place by tying or sewing them.
- Attach the flower to the center of the coaster or leave it as a standalone accent.
Final Steps
- Fasten off the yarns and weave in any loose ends for a tidy finish.
- Adjust the coaster size or embellishments as needed.
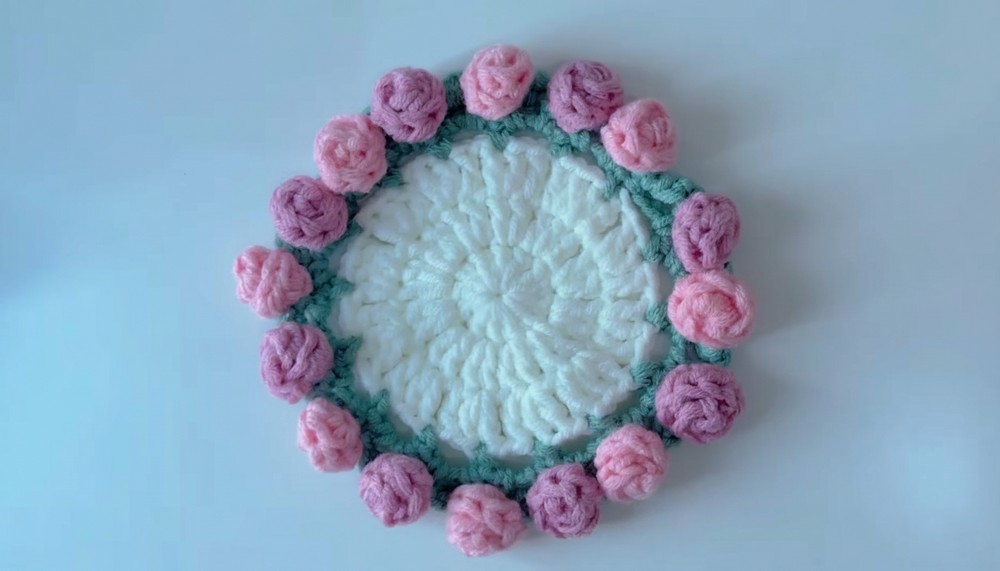
Conclusion
This crochet flower coaster is a fun and versatile project that’s beginner-friendly but packs a stylish punch. Whether you’re crafting it for practical use, decoration, or as a handmade gift, its simplicity and elegance shine through. With room to customize size and colors, it’s a crochet pattern worth mastering.
Tutor’s Suggestions
- Practice the magic ring technique thoroughly to avoid gaps at the center.
- Use contrasting colors for the coaster base and edge to enhance visual appeal.
- If you’re gifting, pair the coaster with a matching mug or cup for a thoughtful touch.
Pro Tip
For a firmer, longer-lasting coaster, consider using 100% cotton yarn as it’s durable, absorbent, and ideal for kitchen items.