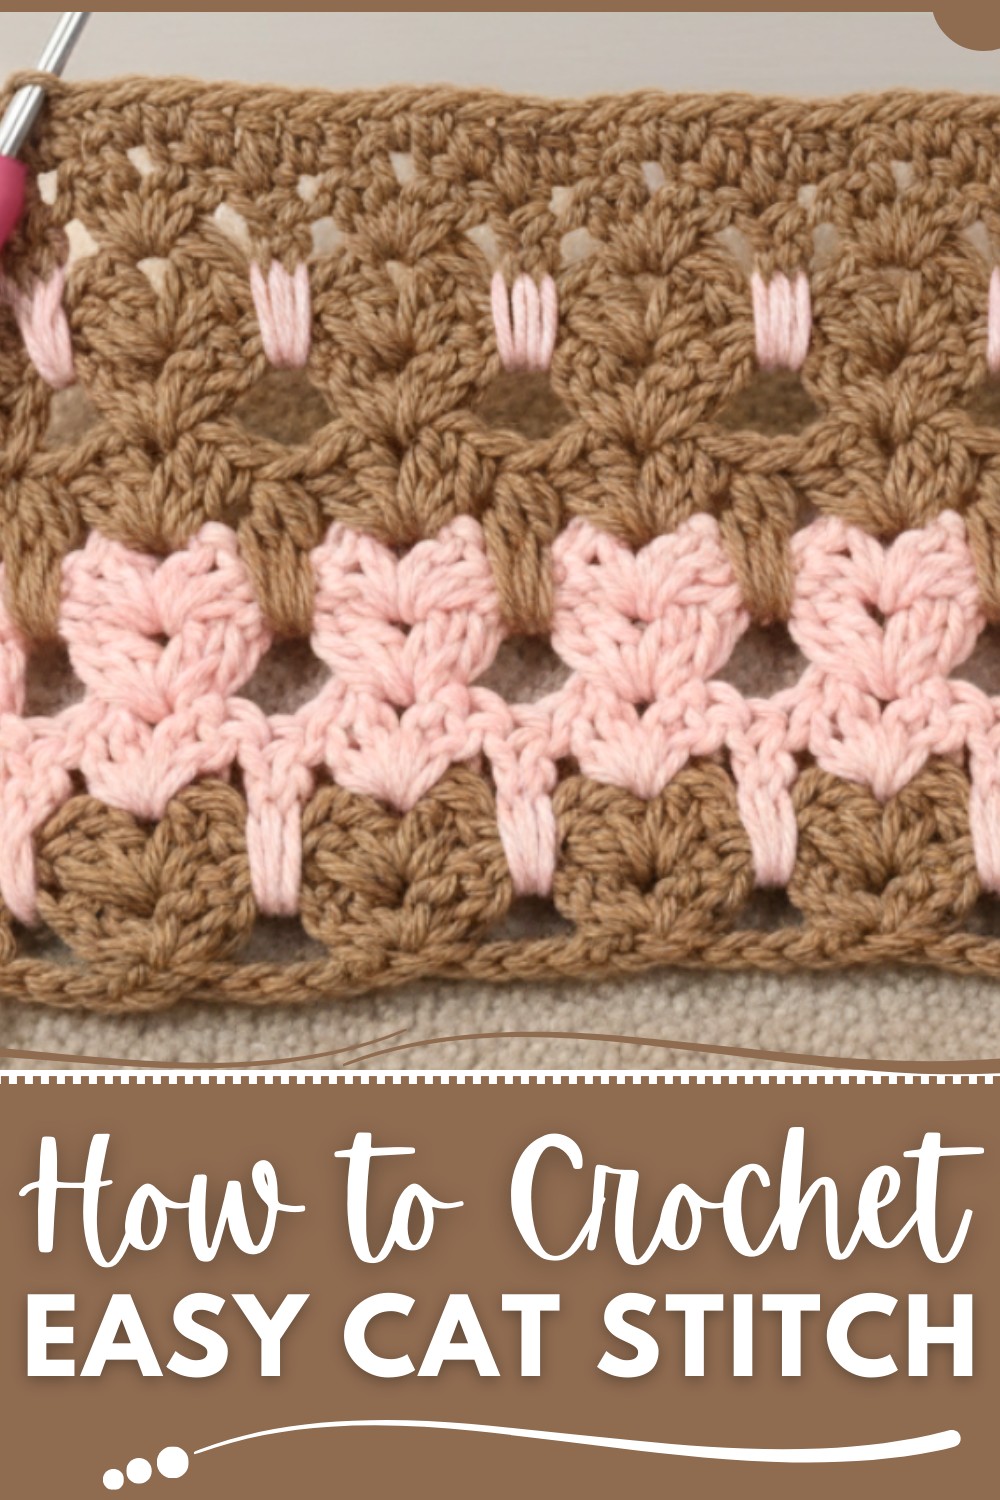
Stylish Crochet Cat Stitch Pattern to Personalize Gifts
Skill Level
Intermediate to Advanced
Requires familiarity with shell stitches, extended stitches (e.g., extended two double crochet together), color changes, and basic border techniques.
Materials List
- Yarn:
- Weight: Worsted weight cotton yarn (or preferred yarn type).
- Colors: At least two contrasting colors are recommended for the "cat illusion."
- Tools:
- Hook Size: 4 mm crochet hook (or size suitable for the chosen yarn).
- Stitch Markers: Optional, to keep track of rows and edges.
- Scissors: For cutting yarn.
- Tapestry Needle: For weaving in ends.
- Optional Supplies:
- Blocking mat or pins (for aligning finished work).
Cat Stitch Crochet Pattern: Step-by-Step Guide
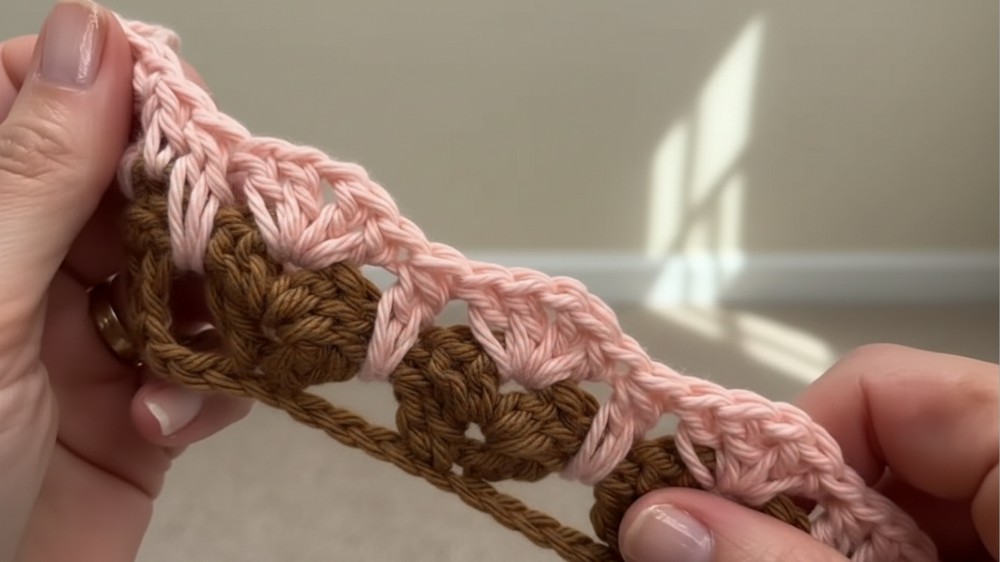
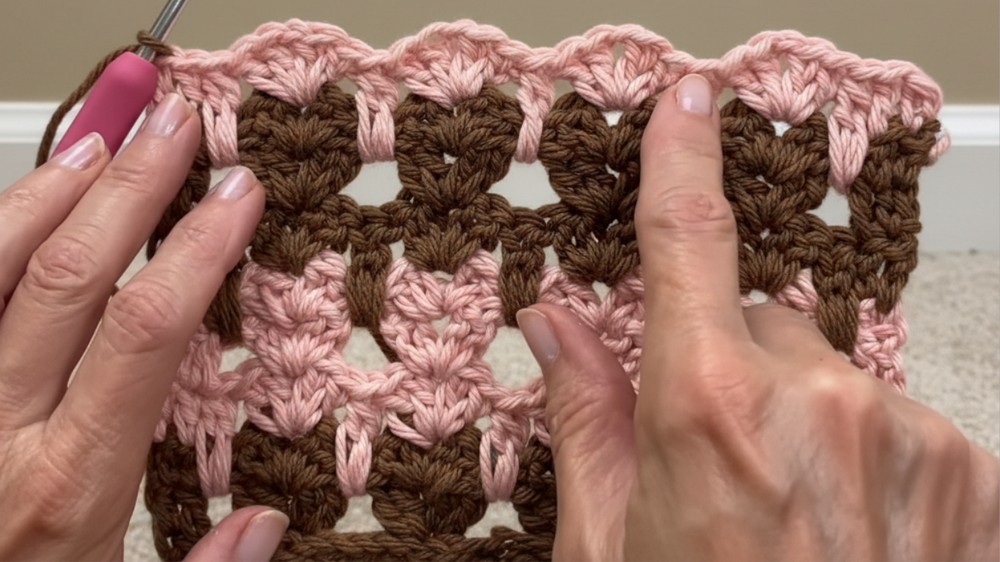
This fun and unique Cat Stitch creates an adorable pattern where cat heads, bodies, and paws come to life in your work. Featuring a repeating stitch sequence and color changes, this project is perfect for intermediate and advanced crocheters looking for charming texture and playful designs.
Key Abbreviations (US Terminology)
- Ch = Chain
- St = Stitch
- Slst = Slip Stitch
- Sc = Single Crochet
- Hdc = Half Double Crochet
- Dc = Double Crochet
- Inc = Increase
- Dec = Decrease
- Ext 2 DC Tog = Extended Two Double Crochet Together
Special Notes
- Row Repeat: This stitch pattern works on a 3-row sequence after the setup rows.
- Foundation Chain Multiple: Always create your foundation chain in multiples of five (5) to maintain pattern symmetry.
- Tension: Ensure consistent tension throughout, and stretch your chain slightly if it tightens, to avoid missed stitches.
- Color Changes: Switch colors every third row for the best visual effect.
The Cat Stitch Pattern
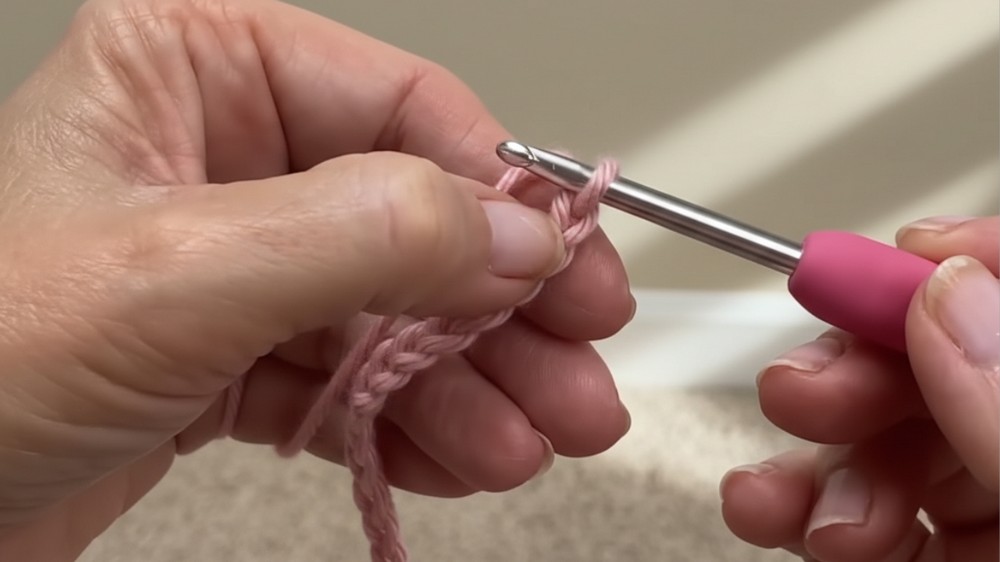
Foundation Chain and Row 1
- Chain Foundation (Ch):
- Create a foundation chain in a multiple of 5 (e.g., 30 chains).
- Row 1 Setup:
- Skip the first 3 chains (counts as 1 Dc), then make 1 Dc into the 4th Ch.
- This forms two double crochets (2 Dc) at the start, which creates the side edges.
- Shell Stitch:
- Skip 4 chains and work (2 Dc, Ch 1, 2 Dc) into the 5th chain.
- Repeat this sequence (skip 4 ch, then work a shell stitch) across the row until 6 chains remain.
- Final Edges:
- Dc into each of the last 2 chains to form a 2-Dc edge on the opposite side.
- Turn Work.
- Skip the first 3 chains (counts as 1 Dc), then make 1 Dc into the 4th Ch.
Row 2: Setup Row
This row introduces the shell structure in alignment with the first row.
- Start Edge:
- Chain 2 (serves as the first Dc) or create a stacked single crochet.
- Dc into the very next stitch.
- Shell Stitch Placement:
- Work (2 Dc, Ch 1, 2 Dc) into the Ch-1 space of each shell stitch below.
- Final Edges:
- Dc into the last 2 stitches of the row.
- Turn Work.
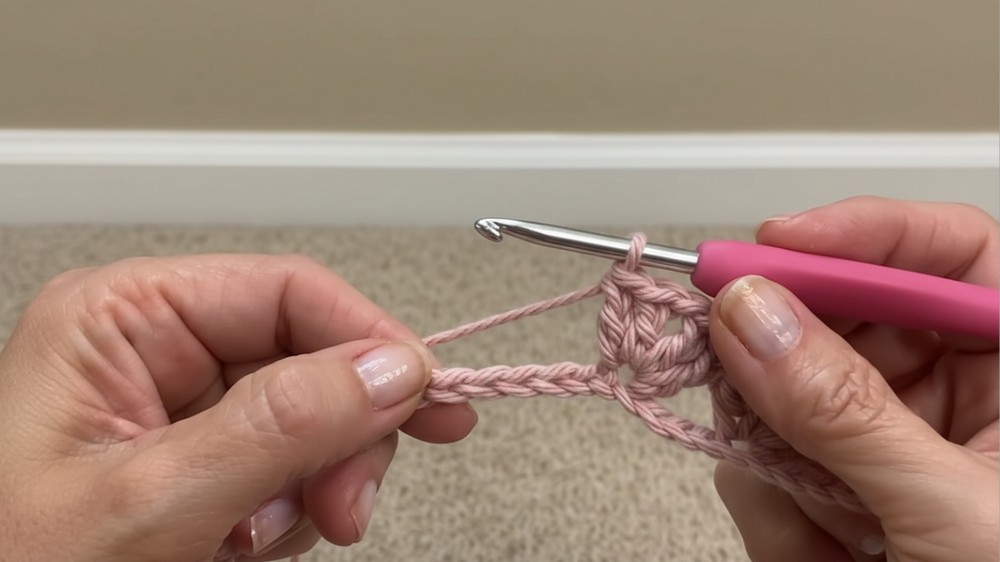
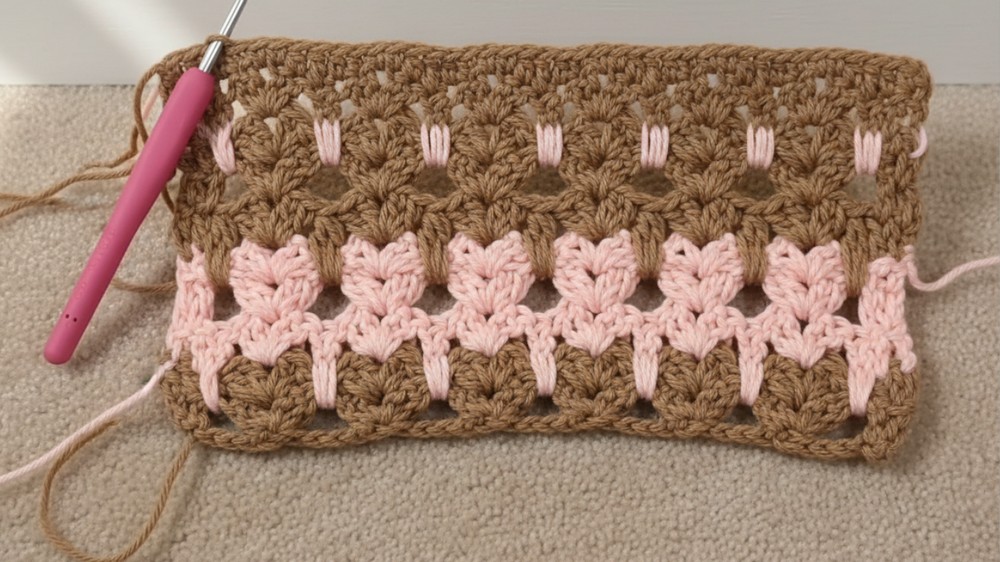
Row 3: Start of 3-Row Repeat
This row incorporates the "paw" effect using the Extended Two Double Crochet Together (Ext 2 Dc Tog).
- Start Edge:
- Chain 2 (or stacked Sc), then Dc into the next stitch.
- Extended Two Double Crochet Together (Paw):
- Yarn over, insert hook into 2 rows below the current row, and pull yarn up with a slight extension.
- Yarn over, pull through the first 2 loops.
- Yarn over, repeat the process in the same location.
- Pull through all 3 loops.
- Shell Stitches:
- Work (2 Dc, Ch 1, 2 Dc) into each Ch-1 space of the shell stitches below.
- Alternate Paws and Shells:
- Alternate the Ext 2 Dc Tog and shell stitches across the row until the end.
- Final Edges:
- End with 2 Dc into the last 2 stitches.
- Turn Work.
Row 4: Continuation Row
This row creates symmetry by emphasizing shells.
- Start Edge:
- Chain 2 (or stacked Sc), then Dc into the next stitch.
- Shell Stitches Only:
- Work (2 Dc, Ch 1, 2 Dc) into each Ch-1 space across.
- Final Edges:
- End with 2 Dc in the final 2 stitches.
- Turn Work.
Row 5: Continued Shell Rows
- Repeat Row 4: Follow the pattern by working shell stitches into the previous rows’ shell stitches.
- Final Edges:
- Continue adding 2 Dc into the final stitches for a clean edge.
Color Change and Repeating Rows
- Change Colors: After completing the 3-row repeat (Row 3-5), switch to a contrasting color.
- Repeat the Pattern:
- Begin again from Row 3 to maintain the design of paws and shells. Continue until the project reaches your desired dimensions.
- Last Row: For your final row, end on Row 3 with the paw stitches.
Finishing and Border
Once you’ve completed the main body of your work:
- Straighten Edges (Optional):
- Work to smooth and straighten the sides by alternating stitches:
- Start with Hdc, then Dc over extended stitches, repeating the sequence as needed.
- Add a single crochet stitch (Sc) in tighter areas (e.g., shell chain spaces).
- Work to smooth and straighten the sides by alternating stitches:
- Border:
- Add a single crochet border around the entire project, working 3 Sc in each corner to create neat right angles.
- Fasten Off:
- Weave in all yarn ends securely for a polished finish.
Customization Ideas
- Change Yarn Weight and Hook Size:
- Use thinner yarn and smaller hooks for delicate projects like scarves or shawls.
- Opt for bulky yarn for cozy blankets or larger pieces.
- Color Variations:
- Use gradient yarn or variegated yarn for a smooth, colorful appearance.
- Alternate more than two colors for a rainbow of cats!
Conclusion
The Cat Stitch is a whimsical and creative crochet technique that’s bound to delight cat lovers and add visual interest to any project. Whether you're creating a blanket, scarf, or pillow, this stitch is a joy to work up, with its playful alternating rows of paw and shell stitches.
Tips for Success
- Take Time to Master the Paw Stitch:
- Practice the Extended Two Double Crochet Together (Ext 2 Dc Tog) stitch if you’re unfamiliar with the technique. Stretch your yarn slightly when pulling through to achieve smooth, even paws.
- Consistent Color Changes:
- Always change colors at the start of a Row 3 for cohesive design placement.
- Blocking:
- Finish your work with light blocking to smooth out edges and emphasize the cat shapes.
Corrections/Adjustments
- Foundation Chain Tightness:
- If your starting chain feels too tight, move up to a larger hook size for the foundation chain, then switch back for the remaining rows.
- Edge Curling:
- Excessive tension may cause curling. Add optional chain spaces (Ch 1) between segments if needed for extra stretch