Elevate your wardrobe with this Crochet Granny Square Top pattern, adding colorful charm, textured detail, and breezy style for sunny days.
On leisurely afternoons, vintage textiles often spark admiration for their textures and colors, reflecting both skill and personality. A crochet granny square top brings that timeless charm into wearable form, offering a piece that combines comfort, versatility, and visual appeal. Ideal for layering over casual outfits, pairing with skirts or shorts, or even gifting as a thoughtful handmade garment, it transforms everyday attire into something special.
Breezy Crochet Granny Square Top for Effortless Summer Style
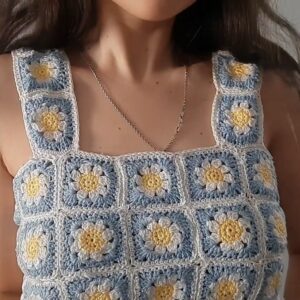
The process begins with creating individual granny squares, each worked with repeated stitches to form geometric motifs full of texture and rhythm. These squares are then carefully joined, maintaining symmetry and alignment for a flattering fit. Attention to stitch tension and proportion ensures the top drapes naturally, while the choice of yarn—soft or lightweight—adds to both comfort and movement. Color combinations can reflect subtle tones for understated elegance or vibrant contrasts for playful energy, making each piece unique.
Its charm extends beyond appearance, offering a satisfying project that enhances crochet skills while producing a functional garment. Lightweight, breathable, and durable, the finished granny square top merges artistry and practicality. Each stitch contributes to a wearable piece that radiates warmth, individuality, and timeless style, making it a delightful addition to any wardrobe.
Materials Needed
- Yarn: Two or more colors of yarn for the granny squares (choose contrasting shades for a lively appearance).
- Crochet Hook: A hook that matches your yarn’s weight (commonly 4 mm for this type of project).
- Other Tools:
- Scissors.
- Darning needle for joining squares and weaving in ends.
Special Features
- Granny Square Design: The classic granny square is reimagined into a fashionable top, giving it a timeless yet trendy look.
- Color Variations: The ability to use multiple colors allows for endless creative combinations.
- Customizable Fit: The pattern is designed to be adaptable, ensuring the top fits perfectly.
- Comprehensive Structure: Includes detailed instructions for granny square assembly, strap creation, and bottom edging.
Level of Difficulty
The project is beginner to intermediate-friendly. While the granny square itself requires only knowledge of basic stitches such as the double crochet, joining the squares and creating even straps may be slightly challenging for an absolute novice. However, the clear instructions provided in the video make it manageable for most crocheters.
Tutor’s Suggestions
- Color Coordination: Use complementary colors for a balanced look or bold contrasts for a fun, dynamic design.
- Tighten the Magic Circle: Always pull the magic circle tightly to avoid gaps in the center of your squares.
- Uniform Square Size: Use consistent tension and the same number of rows for all your squares to ensure an even final assembly.
- Customize Strap Length: Depending on your body size, adjust the length of the straps for a better fit.
Step-by-Step Instructions
Part 1: Crochet the Granny Squares
Step 1: Create the First Row (Magic Circle)
- Begin with a magic circle.
- Chain 3, then make 3 double crochets into the circle.
- Chain 2, create another group of 3 double crochets into the circle; repeat two more times (you should have four groups of 3 double crochets separated by chain-2 spaces).
- Pull the magic circle tight, slip stitch into the first stitch to close the row, and chain 1 before cutting the yarn.
2: Create the Second Row
- Attach a new color of yarn in any corner (chain-2 space).
- Chain 3, then create 3 double crochets into the corner. Chain 2 and make another group of 3 double crochets.
- Chain 1, move to the next corner, and repeat the group of granny clusters: (3 double crochets, chain 2, 3 double crochets).
- Continue this pattern around the square, ending with a slip stitch in the starting stitch.
3: Create the Remaining Rows
For rows 3 and 4, repeat the same pattern:
- In each corner: (3 double crochets, chain 2, 3 double crochets).
- In each chain-1 space from the previous row: (3 double crochets, chain 1).
After finishing the fourth row, fasten off. Complete a total of 16 granny squares for the entire top.
2: Connect the Granny Squares
- Complete Row 3 of your second granny square.
- For Row 4, work partially while connecting it to the first square using slip stitches:
- Make 3 double crochets in the corner of the new square.
- Match the corner of the previously finished square (back side to back side) and slip stitch through the chain-2 space of the first square.
- Return to the second square, make another group of 3 double crochets, and continue alternating between the squares until they are connected.
- Follow the same process to join all 16 squares in a 4 x 4 layout.
3: Create the Straps
- Attach yarn to the top corners of the front of the top and begin crocheting the straps.
- First row of the strap: Make 3 double crochets + chain 1, and continue for about 4 repetitions.
- Second row: Repeat the same pattern but reduce repetitions to 3 double crochets per group.
- Adjust the rows until you achieve the desired strap length.
- For the back straps, follow the same pattern until the front and the back straps meet. Join the straps together securely using slip stitches.
4: Add the Bottom Decorative Edging
- Attach yarn to the bottom of the connected granny squares.
- Make 1 single crochet in the first chain space, then 6 double crochets in the next chain space.
- Alternate between single crochet and 6 double crochets to complete the bottom edge.
- Fasten off and weave in any remaining yarn tails.
Uses for the Granny Square Top
- Stylish Summer Wear: This lightweight, breathable top is perfect for warm weather.
- Layered Fashion Piece: Pair it with a tank top or shirt underneath for a versatile look.
- Gifts and Handmade Fashion: Makes a unique and thoughtful gift for friends and family.
Tip for Best Results
When assembling the granny squares, stretch and flatten each square to ensure a polished and uniform final design. Blocking your finished squares can make this step easier.
Conclusion
The granny square top is a fun and practical project that combines a classic crochet motif with a modern, wearable design. With clear instructions and minimal materials, this pattern allows you to create a customizable and stylish piece of crochet fashion. Whether you're a seasoned crocheter or just beginning, this project is perfect for exploring your creativity and expanding your skills. So grab your yarn and enjoy knitting this timeless yet trendy top.


