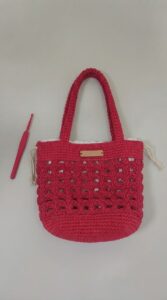
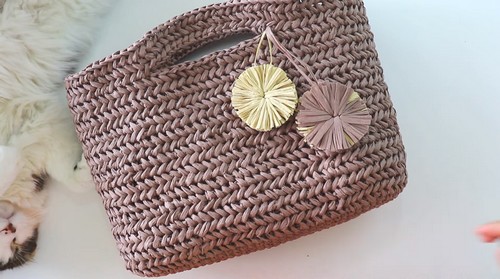
Make your outings more effortless and stylish by crocheting the crochet Herringbone Bag, a perfect fusion of fashion and function. The crochet bag features an adjustable size using ethical raffia yarn for durability and aesthetics. Using two strands for thickness, the design shows a unique herringbone stitch, enhancing its look while giving it strength. The bag also features sturdy handles for easy lifting and can be further personalized with optional pom-poms. Perfect for everyday grocery goings, picnic parties, or special beach parties, this useful crochet bag merges the elegance of bygone days with the versatility of modern design.
Making Your Herringbone Bag Crochet
Materials Needed:
- Raffia yarn (approximately 300 grams, 250 meters per 150 grams) - Thicker yarn is recommended for better results. Use two strands together for crocheting.
- 5 millimeter crochet hook
Pattern Overview (Summary)
The bag is worked in rounds, starting from the base, transitioning to the body with a herringbone stitch pattern, and finishing with handles. You can adjust the size by altering the starting chains or rows.
Getting Started:
- Make a slipknot, then chain 30 (or more for a larger bag size). Turn your work.
- Starting from the second chain from the hook, make a single crochet in each chain across until the last chain.
- In the last chain, work 3 single crochets to turn the corner smoothly and continue single crocheting along the other side of the foundation chain.
- At the end of the round, join with a slip stitch to the first single crochet. This completes the base of the bag.
Building the Base:
- Chain 1, and in the same space make 2 single crochets. Continue making single crochets in each stitch around.
- Work increases at each corner by placing 3 single crochets in the corner stitches to maintain a rectangular shape.
- Repeat this process for several rounds until you achieve the desired base size for your bag.
Body of the Bag (Herringbone Stitch Pattern):
- Switch to the herringbone stitch pattern: Chain 1 and turn your work at the end of each row to keep the pattern consistent.
- To create the herringbone effect, modify your single crochet stitches:
- Insert your hook from back to front between the legs of the stitch (not into the top of the stitch as usual).
- Yarn over (from back to front) and pull through, completing the stitch as you might with a standard single crochet.
- Continue this pattern around the bag, maintaining the rectangular shape by not increasing or decreasing.
- Work as many rows as needed to reach the desired height of your bag.
Handles:
- Determine the placement of the handles and use stitch markers to mark the beginning and end points of each handle.
- Chain a number of stitches for the handle's length (for example, 20 chains), then skip the marked stitches on the bag and reattach the chain to the opposite side of the marker with a single crochet. This creates a loop for the handle.
- Work around the chain with single crochets for stability and repeat for the second handle on the other side.
Finishing Touches:
- Create pom-poms in contrasting or complementary colors and attach them to your bag for added flair.
- Consider using an iron to carefully shape and flatten the pom-poms and the bag itself for a crisp finish.
Additional Tips:
- Keep your stitches consistent for a uniform look.
- Adjust the size by altering the starting chain count and the number of rounds for both the base and body.
- For the herringbone pattern, ensure you pull the yarn from back to front to achieve a distinctive look.

It is necessary to watch the complete video tutorial given below to get a visual guide:
Designer: @SirinsCrochet