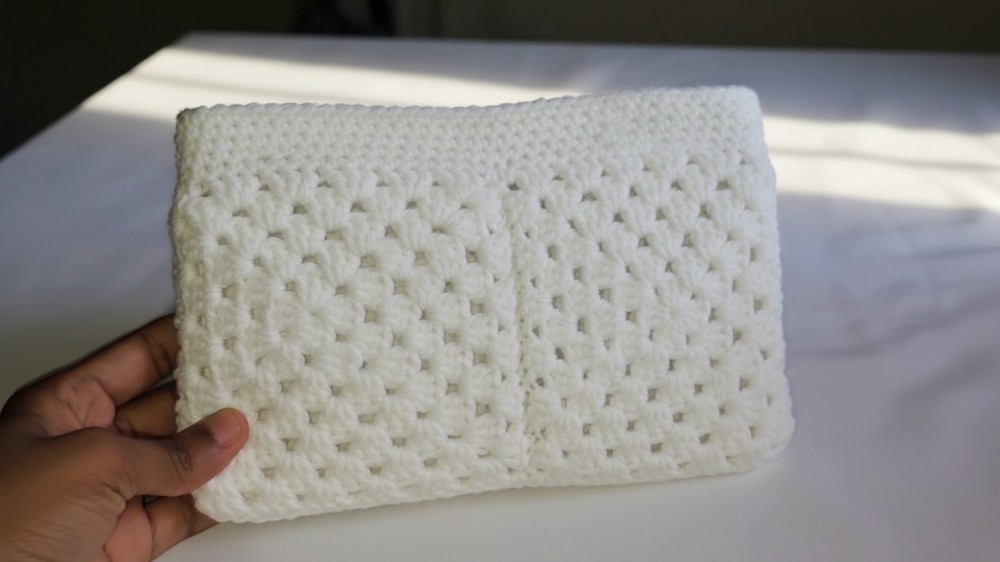
Protecting your favorite book while on the go doesn’t have to be boring—turn your passion for crochet into something both stylish and functional. A crochet booksleeve pattern lets you create a snug, padded sleeve to keep your novel or notebook safe from spills, scratches, and bent pages. This sleeve is perfect for tossing in a bag, carrying to the library, or gifting to a book-loving friend.
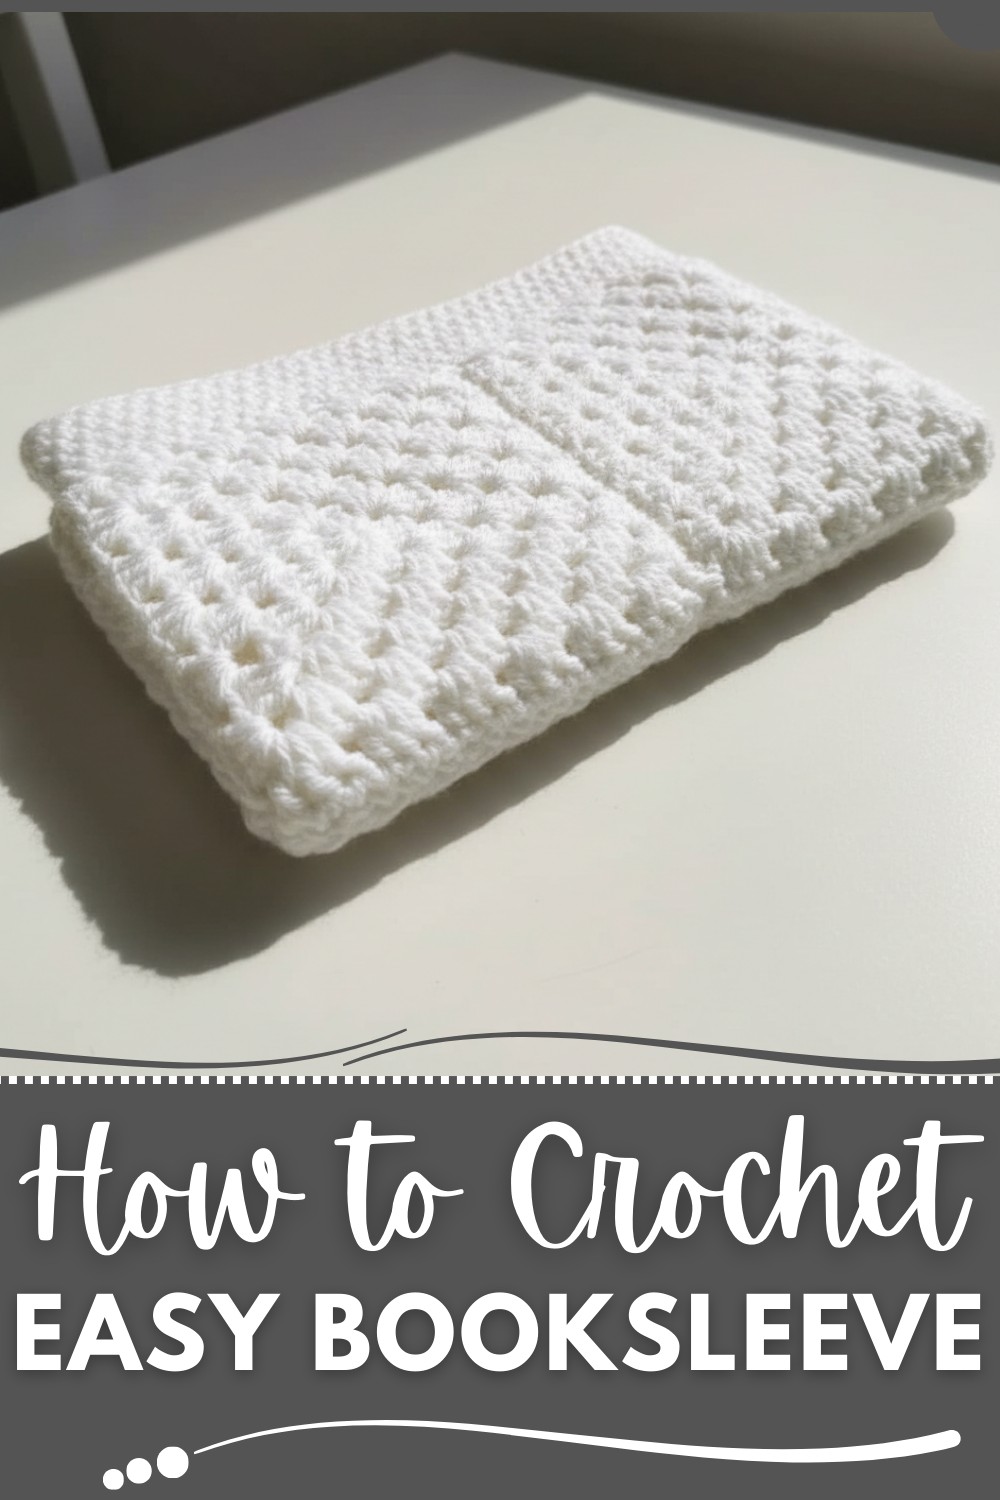
You can style it with textured stitches, vibrant colors, or even add buttons for a personalized touch. Using soft but sturdy yarn ensures it’s durable and lightweight, making it perfect for everyday use. Beyond practicality, a handmade booksleeve adds a cozy, unique charm to your reading habit while keeping your book in pristine condition.
Crochet Booksleeve Pattern for Every Reader
Materials Needed
- Yarn:
- Medium-weight yarn (Tex 200) — Around 150–200g. Choose durable yarn for strength and longevity.
- Suggested yarn: Classic White Baby Yarn or equivalent soft acrylic yarn.
- Crochet Hook:
- 5mm crochet hook (recommended for medium-weight yarn).
- Additional Tools:
- Tapestry Needle: For joining and weaving in ends.
- Scissors: To cut yarn.
- Stitch Marker (optional): To mark important stitches while working.
Gauge
Gauge is approximate for this project as the exact fit can vary depending on the book dimensions:
- 10 stitches x 10 rows in double crochet = 4 cm x 4 cm.
Ensure your stitches are tight enough to form a sturdy fabric that retains its protective function.
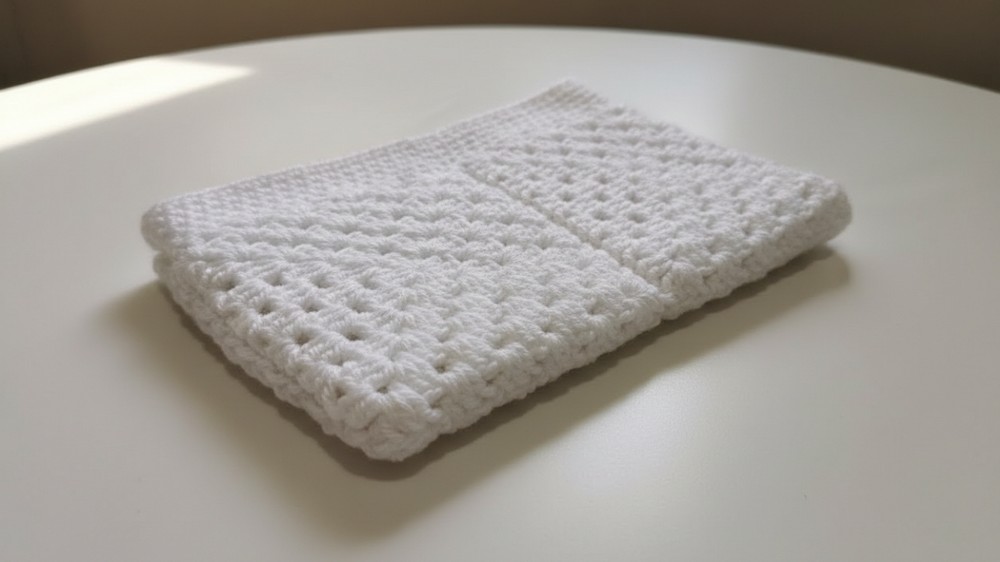
Crochet Book Sleeve Pattern
This crochet book sleeve is a versatile and functional project that can be customized to fit books, tablets, and other items. Based on the video transcription, this guide outlines clear instructions, techniques, customization suggestions, and additional tips to make the crafting experience enjoyable and fulfilling.
Finished Size
- Flat (before joining): Approximately 18 cm x 25 cm.
- Final size (after joining): Approximately fits a standard A5-sized book or tablet.
Special Techniques
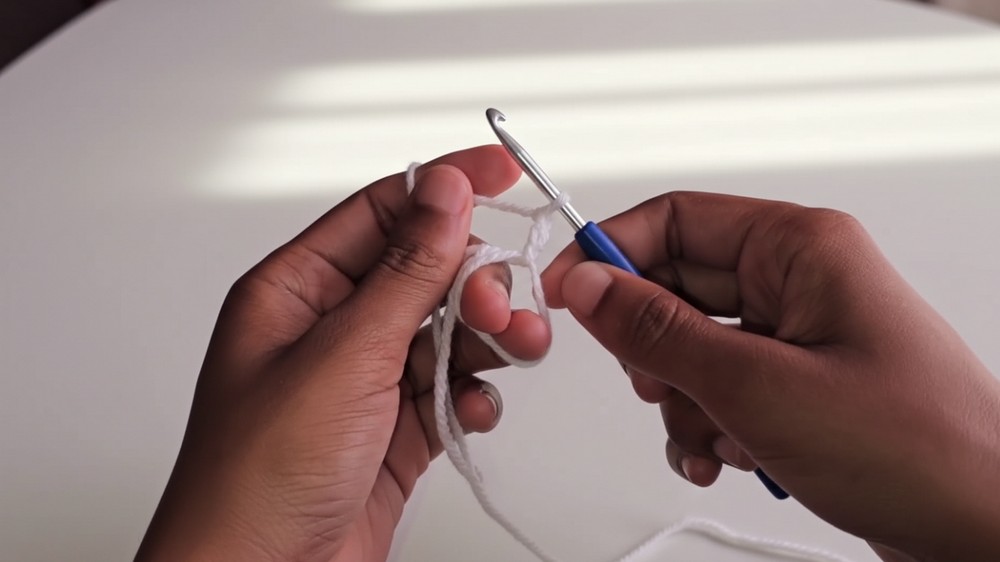
- Magic Circle:
- This creates a tightly closed center for the granny square base at the start.
- Invisible Stitch:
- Used for seamless finishing by working into the back loop of a stitch.
- Slip Stitch Join:
- Used to join multiple granny squares smoothly.
- Single Crochet Edging:
- Creates a solid, uniform edge around the sleeve.
Pattern Instructions
Step 1: Granny Square Creation (Make 4 Squares)
Round 1 (Magic Circle Base):
- Create a magic circle.
- Chain 3 (counts as the first double crochet).
- Work 2 double crochet stitches into the magic circle.
- Mark the first double crochet and chain 1.
- Repeat the sequence: (3 double crochet, chain 1) three more times, resulting in 4 clusters of 3 double crochets with chain 1 spaces between each cluster.
- Pull the magic circle tight and slip stitch into the marked double crochet to close the round.
Round 2:
- Chain 3 (counts as first double crochet).
- In the first chain space, work 2 double crochets (this is half of the corner).
- Move to the next chain space and work 3 double crochets, chain 1, 3 double crochets (corner).
- Continue working in each chain space: (3 double crochets, chain 1, 3 double crochets).
- At the last chain space, work 3 double crochets and chain 1.
- Slip stitch into the first double crochet to close the round.
Rounds 3–6:
- Chain 3 to start each round.
- For each corner: (3 double crochets, chain 1, 3 double crochets).
- For each space between corners: (3 double crochets).
- Complete each round by slip stitching into the first double crochet.
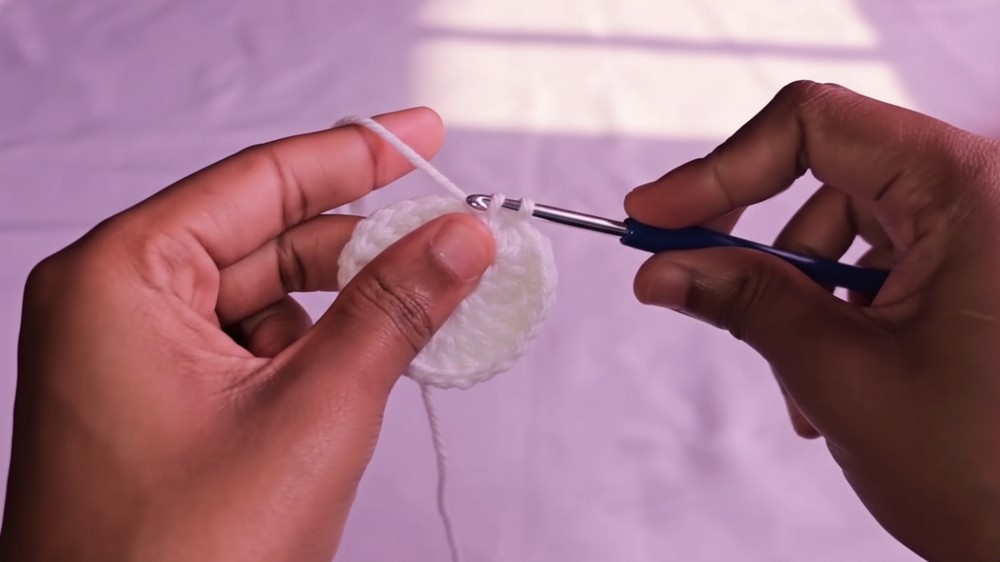
Finish Each Square:
- After completing 6 rounds, cut the yarn leaving a tail.
- Use the tapestry needle to weave in ends securely.
Repeat the same instructions for 4 granny squares.
Step 2: Joining the Squares
- Align Squares: Ensure the wrong sides of the granny squares are facing outward.
- Join yarn with a slip knot into the chain 1 space of the first square’s corner.
- Slip stitch through the double crochets and chain spaces between clusters, ensuring alignment with the neighboring square.
- At each corner, slip stitch through chain 1 spaces of both squares to form smooth joins.
- Once squares are joined, cut yarn and weave in ends securely.
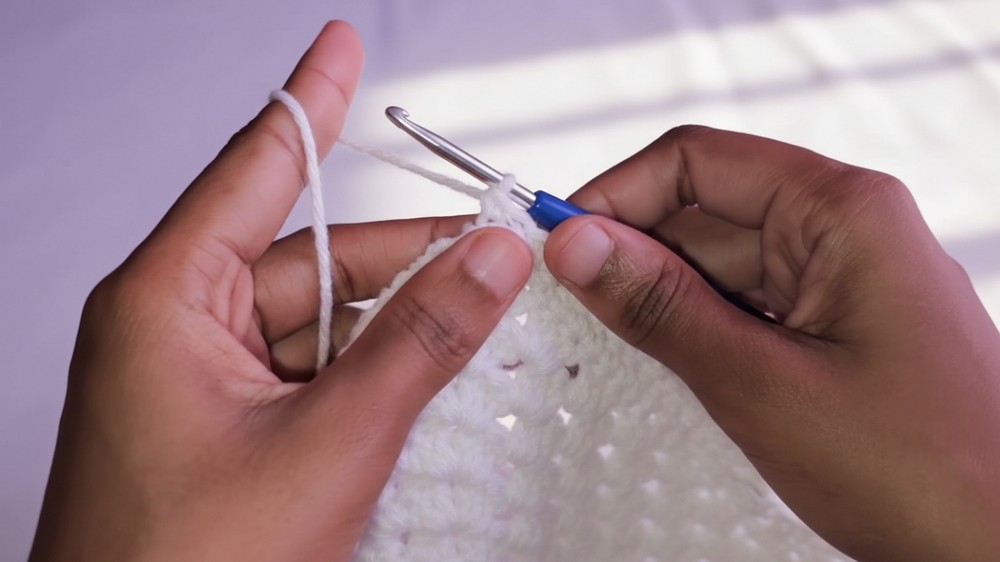
Step 3: Single Crochet Border for Additional Rows
- Attach yarn into a chain 1 space along the joined edges.
- For each single crochet (SC) row:
- Work SC stitches across each stitch along the edges of the granny squares.
- Ensure the corners are neat by placing 1 SC into each chain 1 space at the corners.
- Repeat for three more rows to reinforce durability.
- Cut yarn after completing the rows, leaving a long tail for sewing.
- Thread the long tail onto the tapestry needle and sew the row securely to neighboring sections.
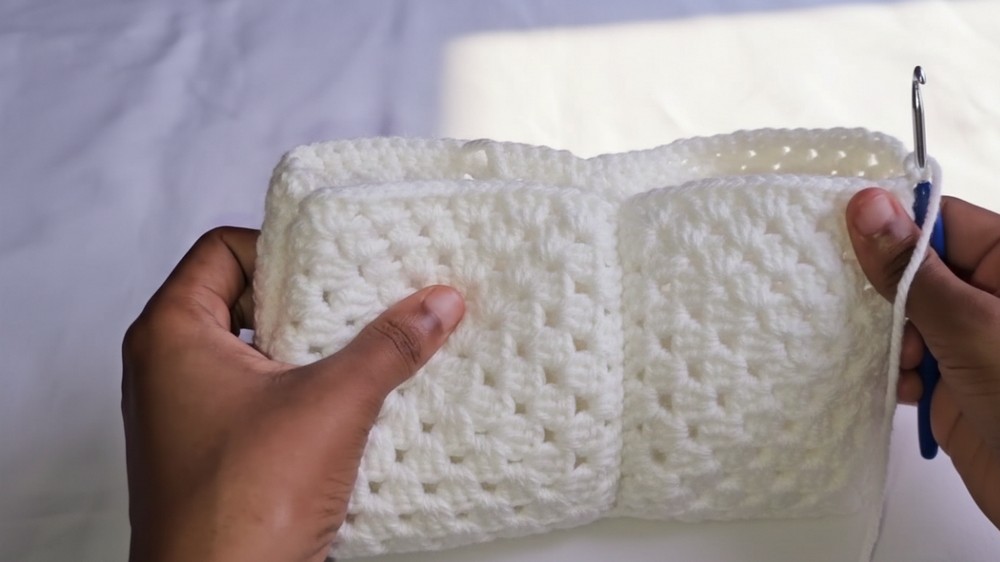
Step 4: Sewing the Sleeve Together
- Align Edges: Line up the two joined granny square sections with the wrong sides facing outward.
- Thread the long tail onto a tapestry needle and sew along the perimeter of the sleeve using whip stitch or backstitch for security.
- Leave one edge open for inserting the book or tablet.
- After sewing, weave in the yarn tail securely.
Step 5: Final Edging
- To finish the opening edge, attach yarn with a slip knot into a corner.
- Work single crochet stitches evenly around the open edge for 5 rows, following these steps:
- Place SC stitches into each stitch across the top.
- At corners, work 1 SC into each chain 1 space for a smooth turn.
- Slip stitch to join each row.
- Weave in all remaining yarn tails securely.
Tips for Success
- Measure Your Book: Adjust the number of granny square rounds or SC rows depending on the size of the book.
- Yarn Choice: For added texture or warmth, consider using wool blends or thicker yarn.
- Colors: Combine multiple colors for playful granny squares or keep it monochromatic for sophistication.
- Durability: Reinforce top edges with extra rows for extended use.
Conclusion
This crochet book sleeve is both beautiful and functional, offering endless customization possibilities. The use of granny squares adds charm, while the single crochet edging ensures durability. Whether you’re creating it for yourself, gifting, or pursuing a decorative craft, this project combines practicality with artistry.
This sleeve can house more than just books; consider using it for tablets, notebooks, or as an organizer pouch. Explore various yarn colors and patterns to create unique designs.
Optional Add-ons:
- Add a button and loop closure to the open edge for extra security.
- Embroider initials or designs for a personal touch.