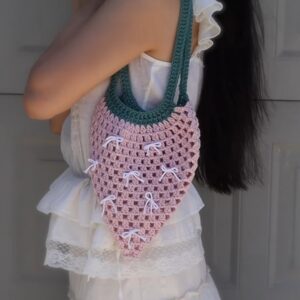
Make delightful little crochet mini net bag, perfect for holding your summertime treasures! This charming bag is handmade with love, using colorful threads woven together in a beautiful, open-net design. It's lightweight and just the right size for carrying small items like seashells from the beach, a handful of fresh picked flowers, or your favorite little toys.
Crochet Mini Net Bag

The mini net bag is not just useful; it's also a cute accessory that adds a pop of color and fun to your day. Whether you're heading to the park or going on an adventure, this crochet mini net bag is the perfect companion to bring along, making every outing a bit more magical.
Materials:
- Colorful cotton yarn
- 4.5 mm crochet hook
Base:

Start with a slip knot.
- Crochet 26 chains (or 32 for a larger bag).
- Skip 2 chains, then make a double crochet in the 3rd chain from the hook.
- Create one double crochet in each chain to the end. In the last chain, make 3 double crochets together.
- Work on the other side of the chains by turning your work and double crocheting into each stitch to the last one.
- Connect the end by making a slip stitch into the second chain of the beginning two chains.
Sides:

- For each new round, start with 2 chains.
- Make a double crochet into the first stitch.
- Chain one, skip one stitch, and double crochet into the next stitch.
- Repeat this mesh pattern (chain one, skip one, double crochet) around.
- Slip stitch into the second chain to end each round.
- Repeat these steps for 10 more rounds, adding more if you're making a bigger bag.
Straps:

- Determine where you want the straps and mark these stitches with stitch markers.
- Attach yarn with a slip knot where you placed the first marker.
- Make four chains, create a mesh pattern for the straps (chain one, double crochet), and repeat until desired strap length.
- Sew the strap ends to the opposite marked points on your bag, ensuring they're not twisted.
Decorative Elements:

Flower:
- Chain 9, skip 1 chain, start with a single crochet in the 2nd chain and increase to half-double crochets, then double crochets, until the last chain.
- In the last chain, make three half-double crochets.
- Continue the same pattern on the other side of the chains, and seal the flower with a slip stitch.
- Sew the petals together if necessary.

Starfish:
- Create a magic ring and slip stitch into it, followed by 5 single crochets.
- Close the ring and work on creating the arms with chains and a variety of single, half-double, and double crochets.
- Slip stitch to begin the next arm and repeat this process for a total of five arms.
Jellyfish:
- Start with a magic ring and add 6 single crochets inside it.
- Close the ring and gradually expand over a few rounds by increasing the stitch count as described.
- Once the jellyfish body reaches the desired size, you can either add ruffles or proceed to add tentacles.
- To attach tentacles, cut yarn to the desired length and attach them to the underside of the jellyfish body. You can also create a small loop for attaching the jellyfish to the bag.

Finishing Touches:
- After completing these elements, sew or glue them onto the bag as desired. Don't forget to weave in all loose ends to give your bag a finished look.