Bring style and comfort to your wardrobe with a crochet summer top pattern that blends breathable stitches, creative flair, and perfect warm-weather vibes.
A breezy summer wardrobe calls for light, stylish clothing, and that’s where the crochet summer top pattern shines. This versatile project is perfect for creating chic and breathable tops that balance comfort and elegance. Using airy stitches and lightweight yarn, it results in a garment that feels cool on the skin while showcasing intricate textures.
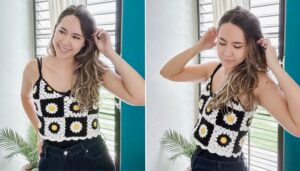
Free Crochet Summer Top Pattern for Stylish Comfort

Beyond being a delightful way to elevate warm-weather outfits, it’s an excellent opportunity for crocheters to explore new techniques, such as lacework or shaping, without the commitment of a large-scale project. For added creativity, you can incorporate playful details like scalloped edges, colorful embroidery, or open-back designs. Whether you’re dressing up for a casual outing or layering for a beach day, a crochet summer top becomes a go-to staple. Plus, gifting handmade summer tops adds a personal touch, making your crochet hobby just as rewarding for loved ones as it is for yourself.

Sea Wheat Crochet Top Pattern
Materials Needed
- Yarn: Cotton yarn, light worsted weight.
- Crochet Hook: 3.5mm.
- Stitch Markers: Recommended for tracking critical stitches (e.g., the beginning of the row).
- Measuring Tape: For dimensions and stitch adjustments.
- Scissors: For cutting yarn.
- Optional: Notebook or row counter to track pattern repetitions.
Skill Level
Intermediate to Advanced Crochet Skills Required: You should be familiar with working flat, making increases and decreases, reading patterns, and working with complex stitch groupings.
Key Abbreviations (US Terminology)
| Abbreviation | Meaning |
|---|---|
| ch | Chain |
| st | Stitch |
| sc | Single Crochet |
| dc | Double Crochet |
| incomplete dc | Partial Double Crochet (not fully closed) |
| cluster | Group of stitches closed together |
| sl st | Slip Stitch |
Pattern Notes
- The chains at the start of rows, unless specified, count as the first stitch of the row.
- The pattern is designed in multiples of 31 stitches + 3 additional chains.
- Stitch tension is critical. Keep your yarn tension loose for stretchability and comfort.
- Dimensions: Front and back panels are worked separately. The pattern width for an adult-sized top is 54 cm (21 inches).
Sea Wheat Top Crochet Pattern Step-by-Step
Foundation Row
- Create the foundation chain:
- Measure the chest width, and calculate the required stitches. Chain multiples of 31, and add 3 chains to the total.
- For example: For a 54 cm (21 in) width, chain 93 and add 3 extra chains for a total of 96 chains.
- Measure the chain:
- Keep the chains loose and flat. For reference, 10 chains = 5 cm (2 inches) in foundation length.
- The final chain should measure approximately 52–54 cm (20.5–21.5 in).

Row 1 (Single Crochet Base)
- Skip the first chain and insert the hook into the second chain from the hook.
- Work 1 sc into each chain across, inserting the hook into the diagonal thread of each chain for a neater edge.
- Use a stitch marker to mark the first stitch if you are a beginner.
- Total stitches after this row: 95 sc.
- Measure the row: It should contract slightly. The initial chain (53 cm/21 in) may now measure approximately 48 cm (19 in) due to the stretchable nature of the fabric.

Row 2 (Start Pattern)
- Ch 3 (counts as the first dc), and mark the third chain with a stitch marker.
- Skip the first stitch and work as follows:
- 2 dc in the second st (increase cluster).
- 1 dc in each of the next 2 sts.
- Repeat clusters and single dc, alternating according to the sea wheat pattern as follows:
- Work cluster stitches in groups of 3 incomplete dc closed together.
- Work chain spaces (ch 5) to skip parts of the row and form airy holes.

Row 3 (Introduce Sea Wheat Flower)
- Chain 3 to start the row (counts as a dc). Place a marker on the third chain.
- Work 3 incomplete dc in clusters, and chain spaces for creating the decorative sea wheat flower.
- To make a sea wheat flower:
- Insert the hook into the designated st, yarn over and pull through, yarn over, and pull through two loops. Repeat this until 3 incomplete dc are worked.
- Yarn over and pull through all loops on the hook.
- Leave chain spaces around the flower for light texture.
- To make a sea wheat flower:
- Alternate between dc clusters, sc stitches, and chain spaces to maintain the row’s structure.
Row 4 (Continue Pattern with Adjustments)
- This row creates texture by layering flowers and combining stitches:
- Work sea wheat flowers on top of previous rows’ flowers.
- Introduce 5 chains and alternate with 1 dc clusters to add detail.
- Key sections:
- Where you skipped stitches in the previous row, create clusters of dc or flowers.

Row 5-6 (Increase and Decrease Stitches)
- Use increasing stitches (2 dc in one st) to widen the fabric at specific points in the row.
- Use decreasing stitches (combine 2-3 dc together) for tapering and shaping.
- After the increases, repeat the flower placement patterns, ensuring alignment.

General Repetition
- Work a total of 7–8 rows, repeating patterns of clusters, sea wheat flowers, and chain spaces.
- Ensure the edges are symmetrical by always matching the starting and ending stitch types.

Measurements for Individual Panels
- If making a front and back, crochet two identical rectangular pieces.
- Approximate panel dimensions: 54 cm width x desired length.
Conclusion
The Sea Wheat Crochet Top blends texture, elegance, and functionality. Use the steps above for creating a single panel of the top. For the finished wearable, repeat the process for the second panel and seam the sides using slip stitches or whipstitch. Adjust chain counts or row repetitions for your desired customization, such as making a sleeveless tunic or crop top.

Pattern Corrections
- Be precise with the multiples of the foundation chain. Any miscount early on will cause uneven flowers and stitch mismatches.
- Always use stitch markers to maintain symmetry.
Tips for Success
- Measure frequently: Crochet fabric can shrink or stretch. Adjust accordingly for a well-fitted top.
- Loose tension: Keeping stitches relaxed ensures a soft, flowy texture ideal for lightweight tops.
- Customization: Add rows if you prefer a longer top, or experiment with color changes for a striking design.