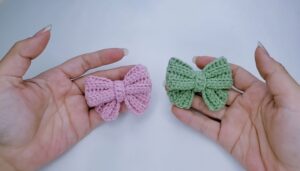
Whip up a cute ribbon keychain in no time with our fun, step-by-step crochet guide. Perfect for a quick, crafty project!
Want a fun and quick crochet project? This Easy Ribbon Keychain Crochet Tutorial is perfect for you. It offers clear, step-by-step instructions that make the process simple and enjoyable. With every loop and stitch, you’ll see your keychain come to life, adorned with lovely ribbons. Whether you're a crochet pro or just starting out, this guide ensures you can make a beautiful and practical accessory. In no time, you’ll have a charming ribbon keychain to showcase or give as a thoughtful gift.

Crochet Ribbon Keychain Pattern
Materials Needed:
- Yarn of your choice
- Crochet hook suitable for your yarn
- Scissors
- Yarn needle

Instructions:
- Start with a Slip Knot:
- Wrap the yarn around your fingers.
- Flip it, creating two lines of yarn.
- Place the hook under the first line and over the second.
- Let go of your fingers and pull both sides to tighten the knot.
- Chain 27:
- Yarn over and pull through the loop on the hook repeatedly 27 times.
- Row 1:
- Skip the first chain.
- 2nd chain: Slip Stitch (insert hook, yarn over, pull through all loops).
- Next chain: Single Crochet (insert hook, yarn over, pull up loop, yarn over, pull through both loops).
- Next chain: Half Double Crochet (yarn over, insert hook, pull up loop, 3 loops on hook, yarn over, pull through all 3 loops).
- Next chains (7 times): Double Crochet (yarn over, insert hook, pull up loop, yarn over, pull through 2 loops twice).
- Repeat the following:
- Next chain: Half Double Crochet.
- Next chain: Single Crochet.
- Next chain: Slip Stitch.
- Repeat the above pattern:
- Slip Stitch.
- Single Crochet.
- Half Double Crochet.
- 7 Double Crochets.
- Half Double Crochet.
- Single Crochet.
- Slip Stitch.
- At the end of this row, you should have three chains left.
- Finishing the First Side:
- In the last chain, make a Slip Stitch, finishing the top part of the bow.
- Move to the Other Side:
- In the same stitch as the last slip stitch, make another slip stitch to turn your work.
- Repeat the pattern from Row 1 going back in the opposite direction:
- Single Crochet.
- Half Double Crochet.
- 7 Double Crochets.
- Half Double Crochet.
- Single Crochet.
- Slip Stitch.
- Repeat Pattern Along the Chain:
- Slip Stitch.
- Single Crochet.
- Half Double Crochet.
- 7 Double Crochets.
- Half Double Crochet.
- Single Crochet.
- Slip Stitch.
- Finishing the Bow:
- Cut the yarn, leaving a long tail for sewing.
- Weave in the ends to secure your work.
- Lower Part of the Bow:
- Start with a Slip Knot.
- Chain 21.
- Skip the first chain.
- 2nd chain: Slip Stitch.
- Next chain: Single Crochet.
- Next chain: Half Double Crochet.
- Next 14 chains: Double Crochet.
- Next chains: Half Double Crochet -> Single Crochet -> Slip Stitch.
- Cut yarn and leave a short tail.
- Tie the yarn ends together and weave in the remaining ends.
- Assembling the Bow:
- Fold the bow in half and stitch the two edges together.
- Attach the lower part of the bow behind the main bow, stitching them together. Fold the bow into a V shape.
- Wrap yarn around the center of the bow 5-6 times, pulling tightly to form the bow shape.
- Hide the excess yarn and cut off any remaining.


And that's it! Your bow keychain is complete. Enjoy your cute and simple crochet project.