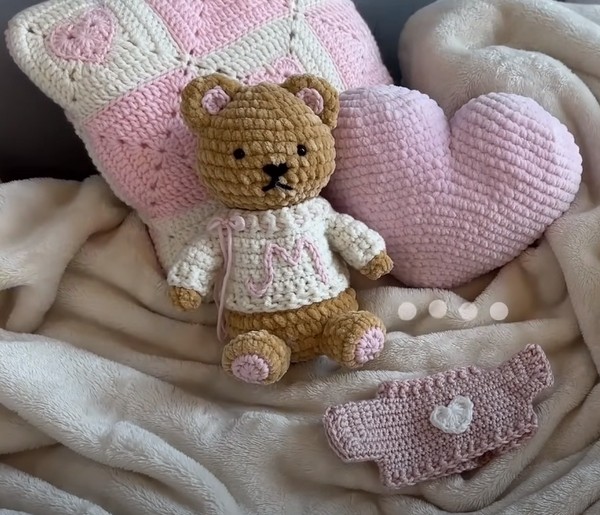
Making a crochet teddy bear with its sweater is like crafting a tiny, cuddly friend. First, you use some cozy yarn and a crochet hook to create the parts of the bear: its head, body, arms, and legs, like putting together a soft puzzle. Each piece follows simple steps that involve making loops and knots. Once all the bear parts are ready, you stitch them together to give it shape. Then, to make your teddy bear extra special, you can crochet a little sweater in whatever color you like. This sweater isn't just for looks; it can be made to fit your bear perfectly, no matter if it's big or small. With some patience and creativity, you end up with a unique teddy bear all dressed up and ready for cuddles!
How To Crochet A Cute Teddy Bear + Sweater
Materials:
- The yarns and materials used for this project are listed on the original poster's Amazon storefront.
- Crochet Hook (size according to the yarn chosen)
- Stuffing material
- Scissors
- Tapestry needle
Terminology & Abbreviations:
- ss: slip stitch
- sc: single crochet
- increase: 2 sc in the same stitch
- decrease: 1 sc through 2 stitches
- Numbers in brackets () indicate the stitch counts for each round.
Starting:
You can begin the pieces with either a regular or "fake" magic ring. For a "fake" magic ring, make a slipknot, chain 3, slip stitch into the 1st chain, chain 1, and then work the stitches for the first round into the circle formed between the chains.
Crochet Bear Pattern:
1. Head:
- Round 1: 6 sc
- Round 2: Increase in each stitch (12)
- Round 3: 1 sc, increase repeat (18)
- Round 4: 2 sc, increase repeat (24)
- Round 5: 3 sc, increase repeat (30)
- Round 6: 4 sc, increase repeat (36)
- Rounds 7-11: 1 sc in every stitch (36)
- Round 12: 4 sc, decrease repeat (30)
- Round 13: 3 sc, decrease repeat (24)
- Round 14: 2 sc, decrease repeat (18)
- Round 15: 1 sc, decrease repeat (12)
- Slip stitch into the marked stitch & fasten off, leaving a long tail for sewing.
2. Body:
- Round 1: 6 sc
- Round 2: Increase in each stitch (12)
- Round 3: 1 sc, increase repeat (18)
- Round 4: 2 sc, increase repeat (24)
- Round 5: 3 sc, increase repeat (30)
- Round 6: 4 sc, increase repeat (36)
- Rounds 7-9: 1 sc in every stitch (36)
- Round 10: 4 sc, decrease repeat (30)
- Rounds 11 and 12: 1 sc in every stitch (30)
- Round 13: 3 sc, decrease repeat (24)
- Round 14: 1 sc in every stitch (24)
- Round 15: 2 sc, decrease repeat (18)
- Round 16: 1 sc in every stitch (18)
- Round 17: 1 sc, decrease repeat (12)
- Slip stitch into the marked stitch & fasten off, leaving a long tail for sewing.
3. Legs (Make 2):
- Note: For changing colors, watch the video demonstration.
- Round 1: 8 sc
- Round 2: 2 sc in the same stitch (16)
- Rounds 3 and 4: 1 sc in every stitch (16)
- Round 5: 7 sc, 2 decreases, 5 sc (14)
- Round 6: 5 sc, 2 decreases, 5 sc (12)
- Slip stitch into the marked stitch & fasten off, leaving a long tail for sewing.
4. Arms (Make 2):
- Round 1: 8 sc
- Rounds 2-7: 1 sc in every stitch (8 stitches in each round)
- 2 sc across the top of the arm to close, then slip stitch & fasten off, leaving a long tail for sewing.
5. Ears (Make 2):
- Round 1: 8 sc
- Round 2: 2 sc in the same stitch (16)
- Round 3: 1 sc in every stitch (16)
- Slip stitch into the marked stitch & fasten off, leaving a long tail for sewing.
- Inner ear (in a different color): 6 sc into a magic ring, chain 1 then fasten off (leave a long tail for sewing).
Finishing Touches:
- Assemble the bear by sewing the parts together using the long tails left for each part.
- Embroider the eyes, nose, and any other features you'd like your bear to have.