
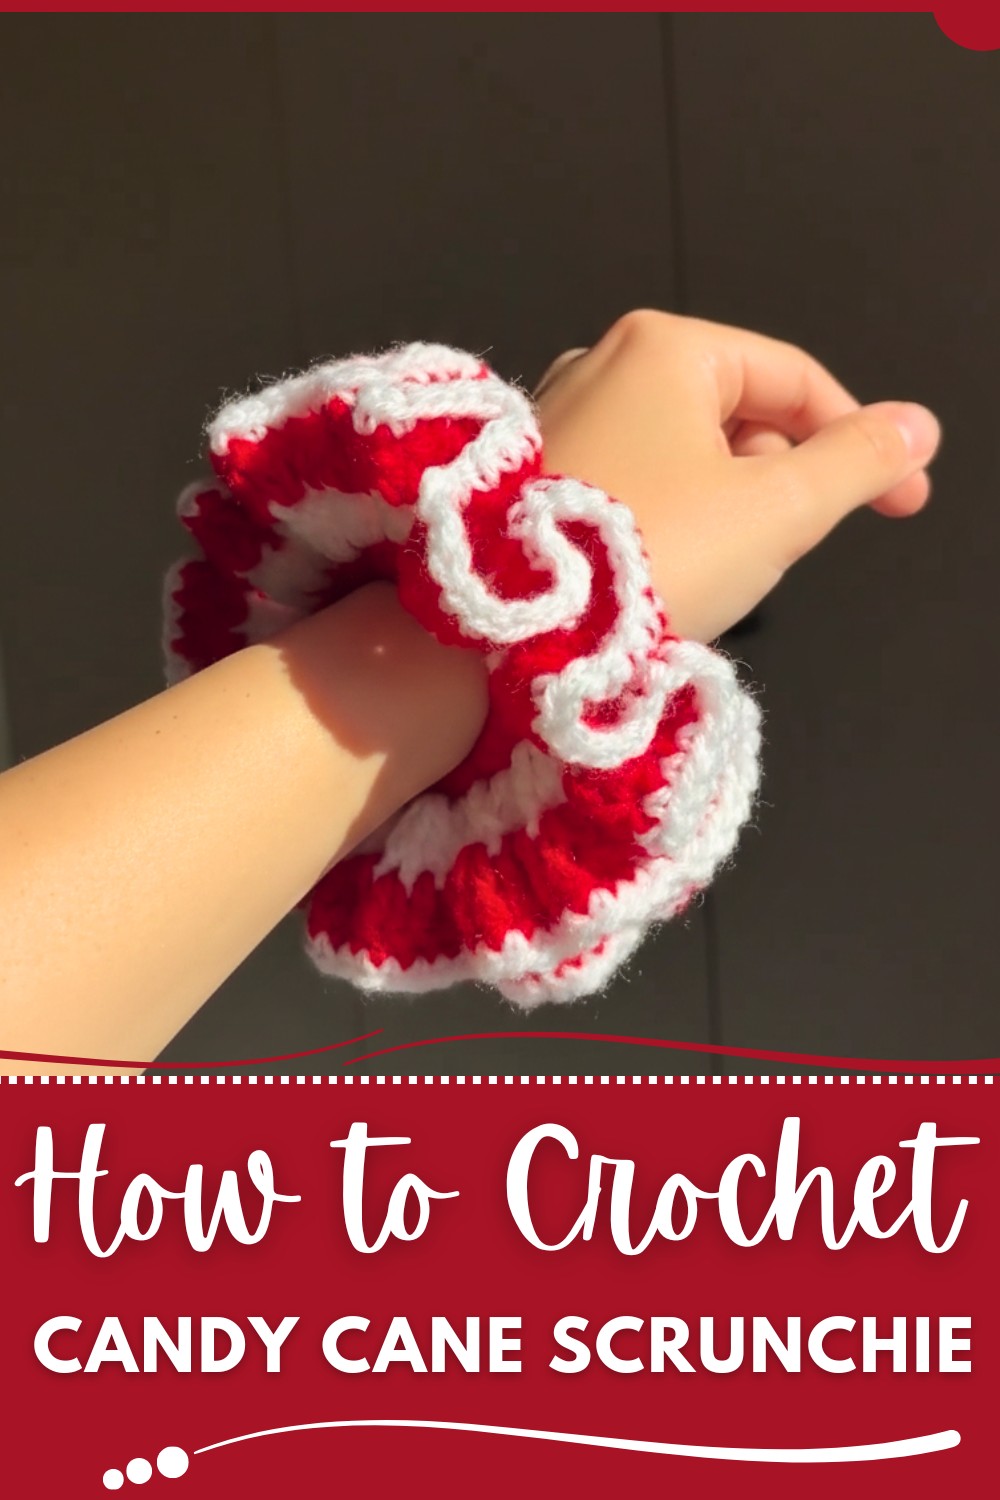
Brighten your look with a fun and easy-to-follow free crochet candy cane scrunchie pattern that’s great for holiday styling or presents.
Looking for a fun way to combine holiday spirit with everyday style? A candy cane-themed scrunchie pattern is the cheerful accessory your wardrobe needs this festive season. This crochet project combines functionality and charm, letting you accessorize with a playful splash of red and white stripes reminiscent of classic candy canes. Perfect for keeping hair secure during holiday parties or lazy afternoons by the fireplace, this pattern makes a statement in both casual and celebratory looks.
Free Crochet Candy Cane Scrunchie Pattern for Holiday Gifting
This pattern isn’t just about fashion—it’s also a thoughtful gift option. Lightweight, compact, and quick to follow, it’s ideal for gifting to friends, family, or even as stocking stuffers. Plus, it’s a great use for leftover yarn, making it a budget-friendly way to celebrate the holidays creatively.
Beyond aesthetics, this candy cane scrunchie pattern offers practical benefits. It’s soft and stretchy, ensuring comfort while protecting hair from breakage. Whether you’re making it for yourself, loved ones, or even to sell at holiday crochet fairs, it’s the perfect seasonal project that’s simple yet satisfying. Add a touch of festive flair to your hairstyle or gifting game with this fun and practical accessory.
Special Features
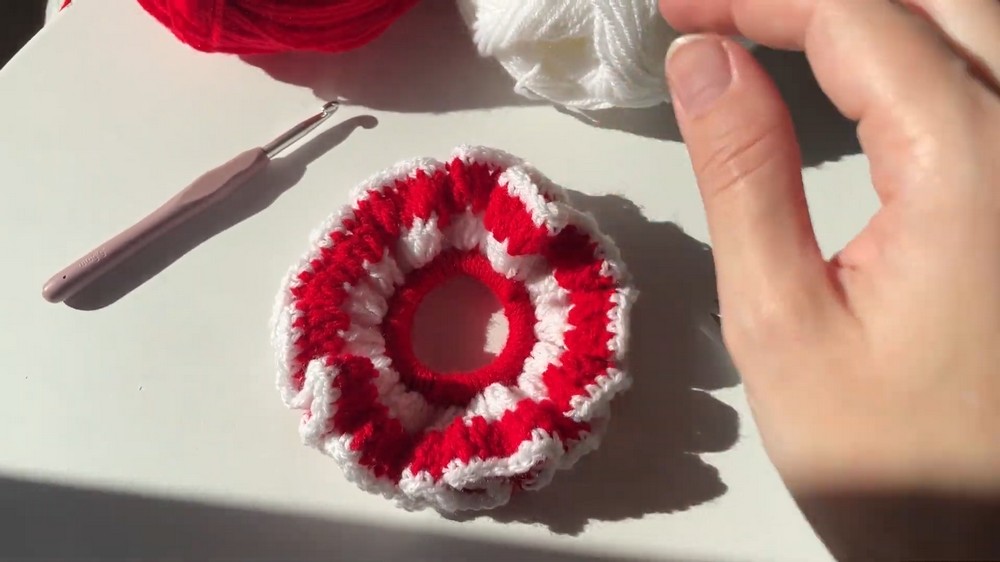
- Candy cane look created with red and white color changes
- Ruffled edge from working multiple double crochets into each stitch
- Sturdy because it’s crocheted around a regular elastic hair tie
- Customizable: adjust fullness, colors, and yarn type
Skill Level
Beginner to Advanced Beginner
You should be comfortable with:
- Making a slip knot
- Single crochet (sc)
- Double crochet (dc)
- Working around an object (the hair tie)
- Simple color changes and weaving in ends
The stitches themselves are basic; the only slightly advanced part is joining new colors neatly.
Materials
- Yarn: Worsted weight (Category 4) in:
- Color A: Red
- Color B: White
- (Optional Color C if you want a third round in another shade)
- Hook: 5.5 mm crochet hook (as used in the video)
- 1 elastic hair tie
- Yarn needle for weaving in ends
- Scissors
Abbreviations (US Terms)
- sl st – slip stitch
- ch – chain
- sc – single crochet
- dc – double crochet
- st(s) – stitch(es)
- yo – yarn over
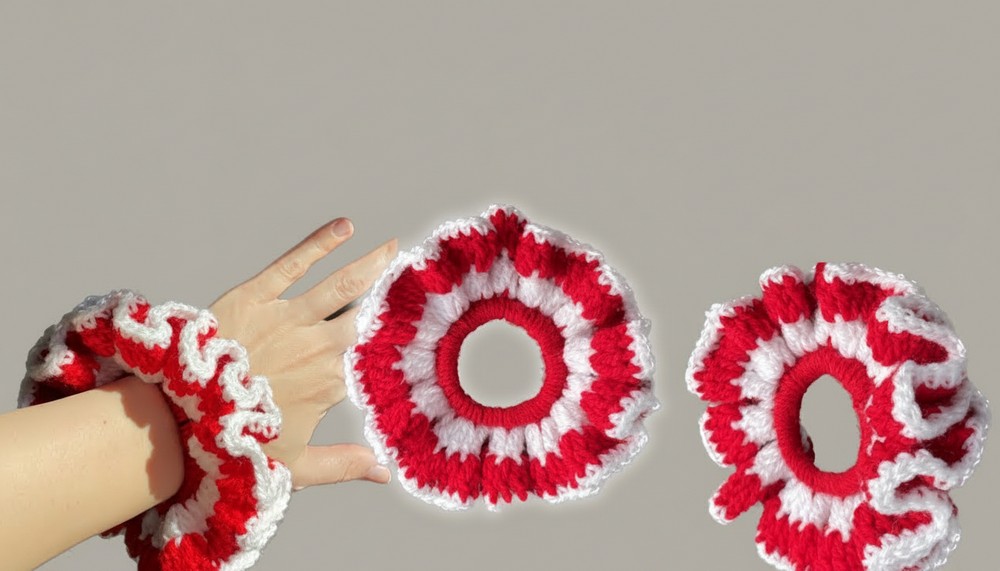
Finished Structure Overview
The scrunchie is worked in three main rounds:
- Round 1: Single crochets worked around the hair tie.
- Round 2: First ruffle row: 3 dc in each stitch.
- Round 3: Second ruffle row: 2 dc in each stitch.
- Final Round: A top finishing round of single crochets (no increases).
Color changes are made between these rounds to create a candy cane effect.
Pattern Instructions
Step 1: Attach Yarn to Hair Tie (Color A)
- Make a slip knot with your red yarn (Color A).
- Insert your hook through the hair tie.
- Place the slip knot on the hook.
- Pull the slip knot through the hair tie and tighten.
- Join with a sl st around the hair tie to secure the yarn.
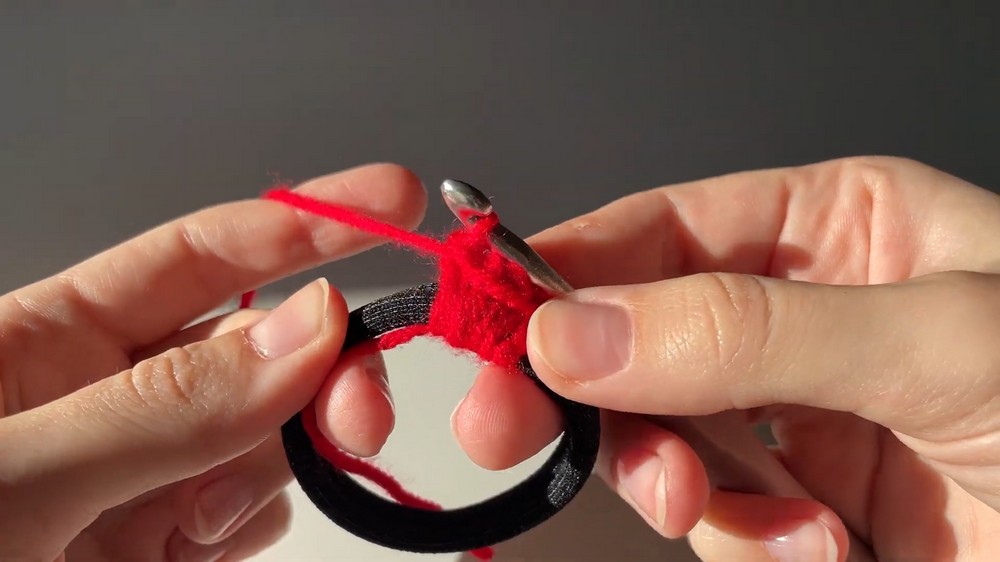
Tip: Hold the yarn tail along the hair tie so you crochet over it and hide it as you work.
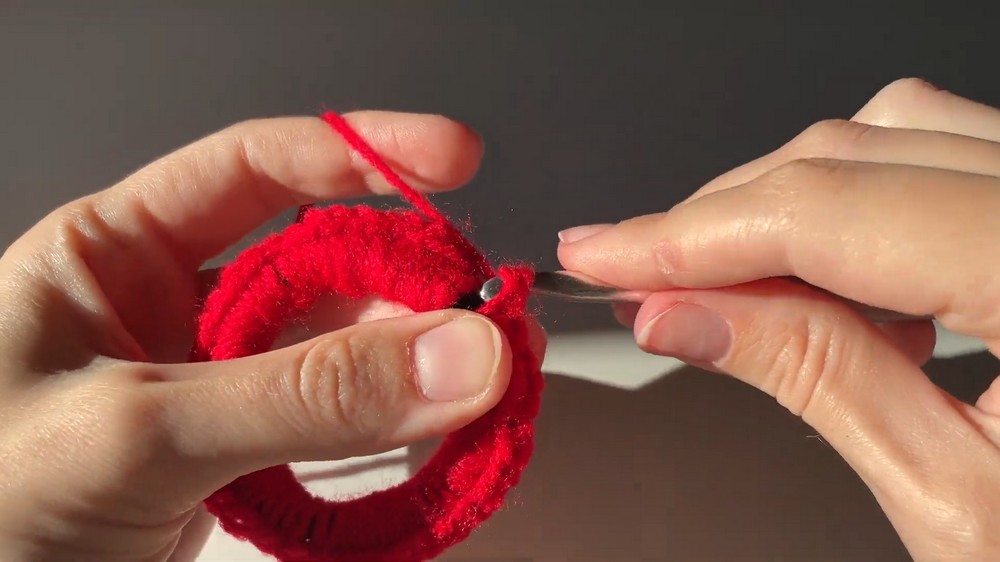
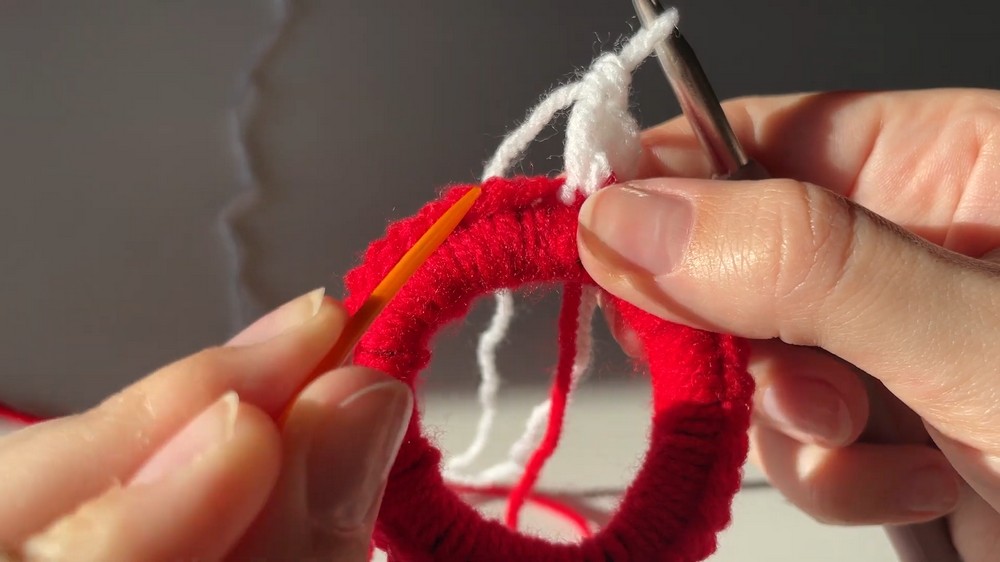
Round 1: Single Crochets Around the Hair Tie
- Insert your hook under the hair tie, yarn over, and pull up a loop.
- Yo and pull through both loops on the hook – this is 1 sc.
- Repeat around the hair tie:
- Insert hook under the hair tie
- Yo, pull up a loop (2 loops on hook)
- Yo, pull through both loops (sc)
- Continue making single crochets all the way around the hair tie.
- As you go, push the stitches closer together along the hair tie to pack them tightly.
- In the pattern, about 40 sc were made, but:
- There is no fixed number – it depends on your hair tie size.
- Just make enough sc so the hair tie is fully covered and the stitches are close together.
When you’ve fully covered the hair tie and stitches are snug, stop. Do not fasten off yet if you plan to change color.
2: Change to Color B (White) for Round 2
- Make a slip knot with your white yarn (Color B).
- Find the first single crochet you made in Round 1.
- Insert your hook into that first sc.
- Place the white slip knot on your hook and pull it through the stitch.
- Pull through again to complete a slip stitch join with the new color.
- Tighten the new color, and you can cut the red yarn (Color A), leaving a tail to weave in later.
Round 2: First Ruffle Row – 3 dc in Each Stitch (Color B)
- Ch 2 – this counts as your first dc of the round.
- In the same stitch:
- Yo, insert hook into the same st
- Yo, pull up a loop (3 loops on hook)
- Yo, pull through 2 loops
- Yo, pull through remaining 2 loops → 1 dc
- Repeat one more time in the same stitch → you should now have:
- ch 2 (counts as 1 dc)
- 2 dc
= 3 dc total in that first stitch
- Now work around:
- In each sc from Round 1, make 3 dc in the same stitch.
Continue:
3 dc in every stitch all the way around until you reach the starting point.
Your work should begin to ruffle and wave—this is what creates the fuller scrunchie shape.
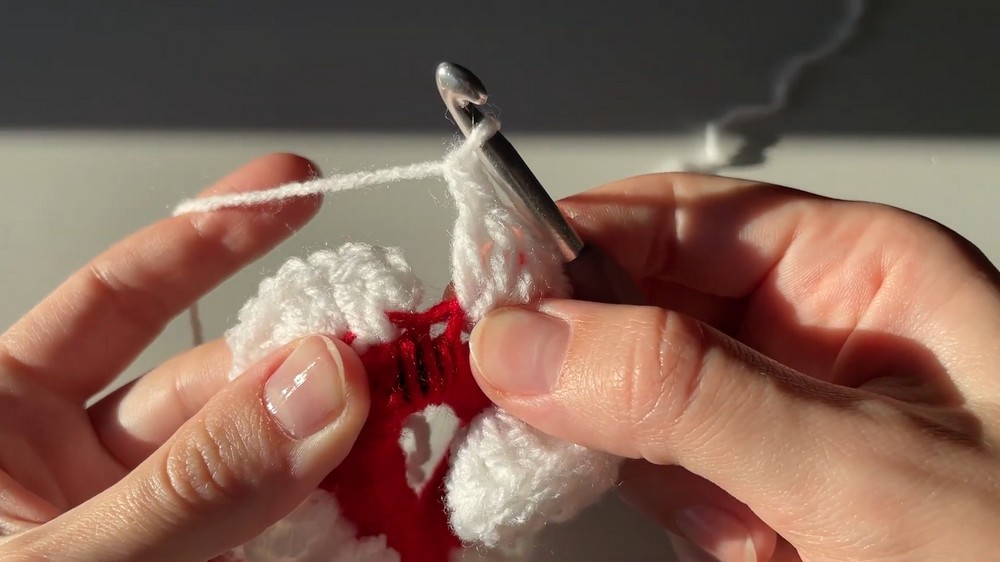
At the end of the round, locate the top of the initial ch-2 (the second chain) for joining.
3: Change Back to Red (Color A) for Round 3
- Find the second chain of your starting ch-2 from Round 2.
- Insert your hook into that chain.
- Make a slip knot with red yarn again (or your next chosen color).
- Place the slip knot on the hook.
- Pull it through the stitch, then pull through completely to make a sl st join.
- Cut the white yarn (Color B), leaving a tail to weave in later.

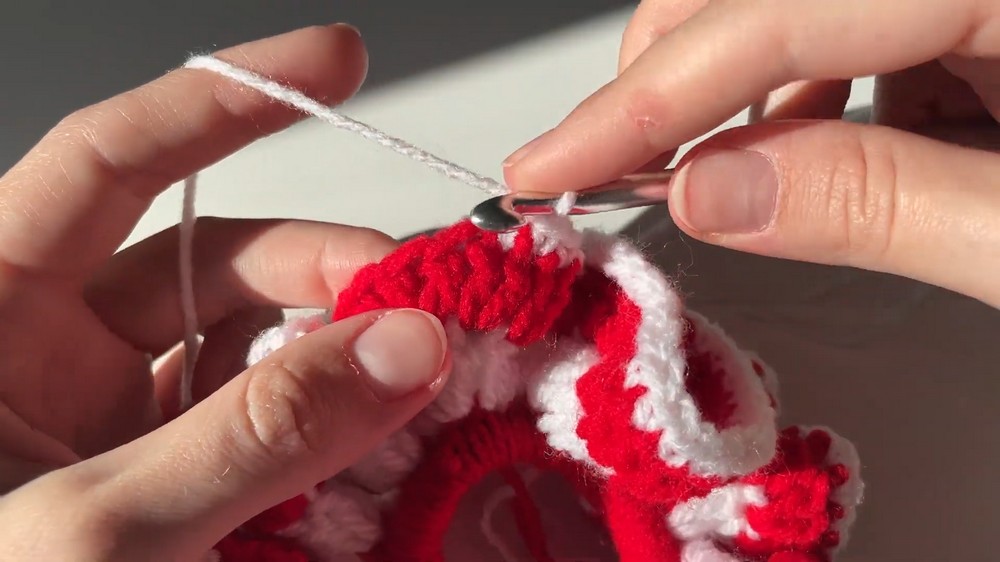
Round 3: Second Ruffle Row – 2 dc in Each Stitch (Color A)
- Ch 2 – counts as the first dc.
- In the same stitch, make 1 dc.
- You now have 2 dc in this stitch (ch-2 = 1 dc + 1 dc).
- Move to the next stitch:
- 2 dc in the same stitch.
- Repeat all the way around:
- 2 dc in each stitch from the previous round.
This round adds more fullness and deepens the ruffle, but slightly less intense than the 3-dc round.
At the end of the round, again find the second chain of your starting ch-2 to join.
4: Change to Final Color for the Border (Color B / White Again)
The transcription indicates this is the last color change.
- Insert your hook into the second chain of the starting ch-2 of Round 3.
- Make a slip knot with your final color (white in the tutorial).
- Place the slip knot on your hook.
- Pull through the stitch and pull through again to make a sl st join.
- Cut the red yarn (Color A) and leave a tail to weave in.
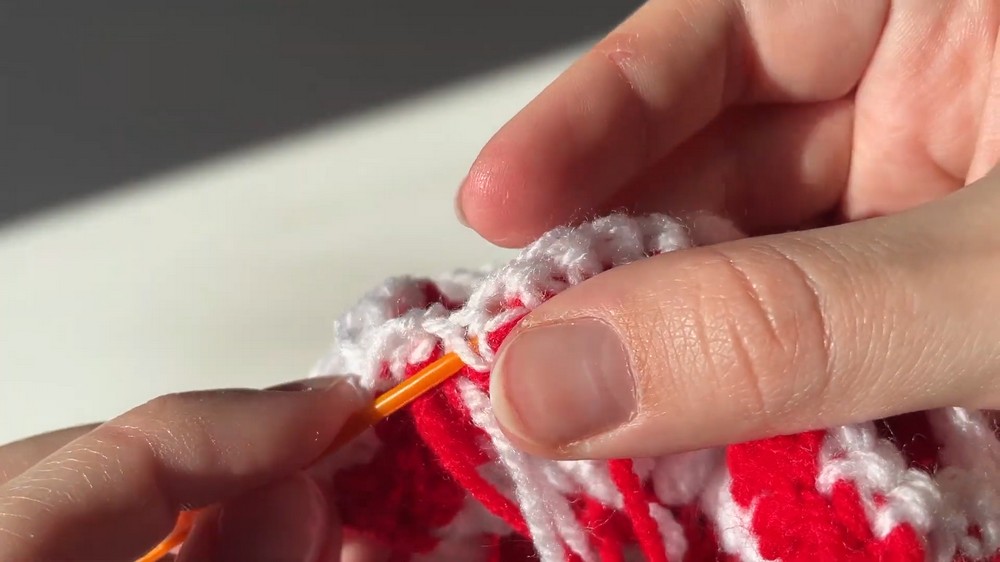
Final Round: Single Crochet Border (No Increases)
This round neatens the edge and stabilizes the ruffle.
- Ch 1.
- Start in the next stitch (not the one you just joined in):
- Insert hook into the next st
- Yo, pull up a loop
- Yo, pull through both loops → 1 sc
- Continue 1 sc in each stitch all the way around:
- No increases, just one sc per stitch.
This smooth, even round defines the edge and gives the scrunchie a finished look.
5: Join and Fasten Off
- After your final sc, find the first sc of this round.
- Insert your hook into that first sc.
- Yo and pull through the stitch and through the loop on your hook to make a slip stitch.
- Ch 1, cut the yarn, and pull the tail all the way through to secure.
6: Weave In Ends
- Thread a yarn tail onto your yarn needle.
- Turn your scrunchie so you’re looking at the back side.
- Weave the yarn tail through the back loops of stitches in the matching color section:
- For white tails, weave through white stitches.
- Pull snugly but not too tight, so it doesn’t distort the shape.
- Weave back in the opposite direction through a few stitches to secure (as shown: start from the second stitch, not the one you just exited).
- Once secure, trim off the excess yarn.
- Repeat for all remaining yarn tails.
Your candy cane scrunchie is now complete.
Tutor’s Suggestions
- No strict stitch count: The number of sc in Round 1 depends on your hair tie size—just make enough to cover it fully.
- Push stitches along the hair tie as you go in Round 1 to ensure a tight, even base.
- Cut previous color after joins and weave in later to avoid bulky corners.
- The last round with single crochets only (no increases) helps tidy the edge and keeps the ruffle defined but not floppy.
Uses
- Festive Christmas hair accessory
- Stocking stuffers and small gifts
- Crochet fair items
- Cute add-on for gift wrapping (tie it around a present)
- Matching mom & child sets
Tip for Best Results
To avoid gaps and make the scrunchie look full and professional:
Pack your Round 1 single crochets tightly around the hair tie.
If the hair tie peeks through or the scrunchie looks loose, add more sc before starting your double crochet rounds. A dense first round gives the ruffles better structure and fullness.
Conclusion
This crochet candy cane scrunchie pattern is a simple but charming holiday project that’s great for beginners wanting to practice basic stitches and color changes. With just a few rounds of single crochet, double crochet, and thoughtful color placement, you get a festive accessory that looks much more complex than it is—and it works up quickly enough for last‑minute gifts.


