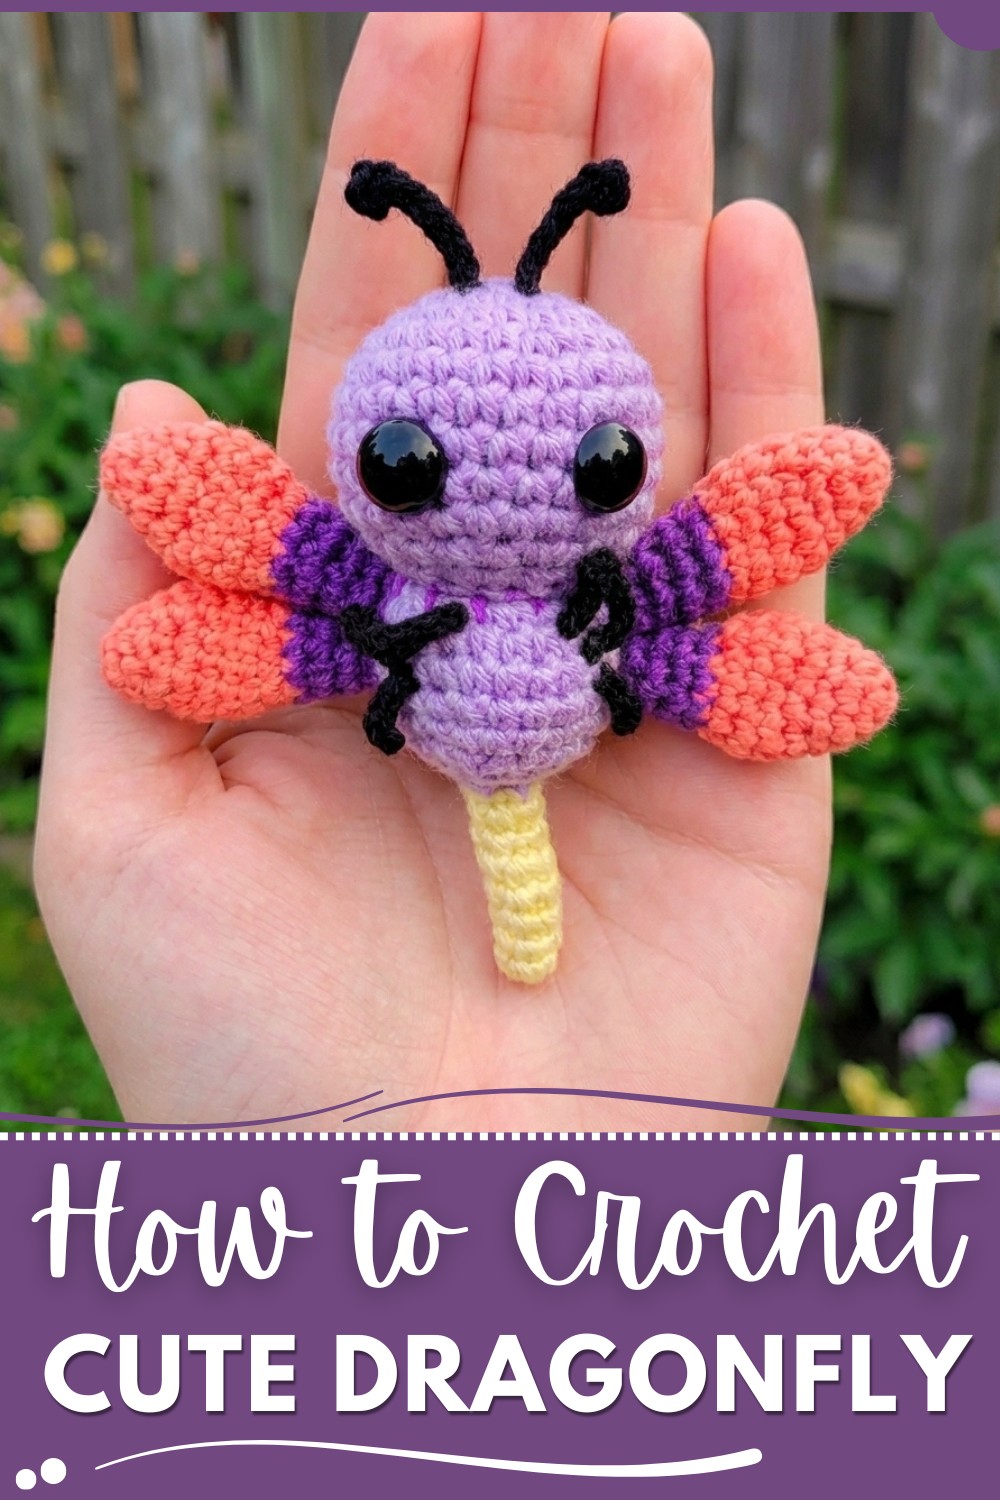
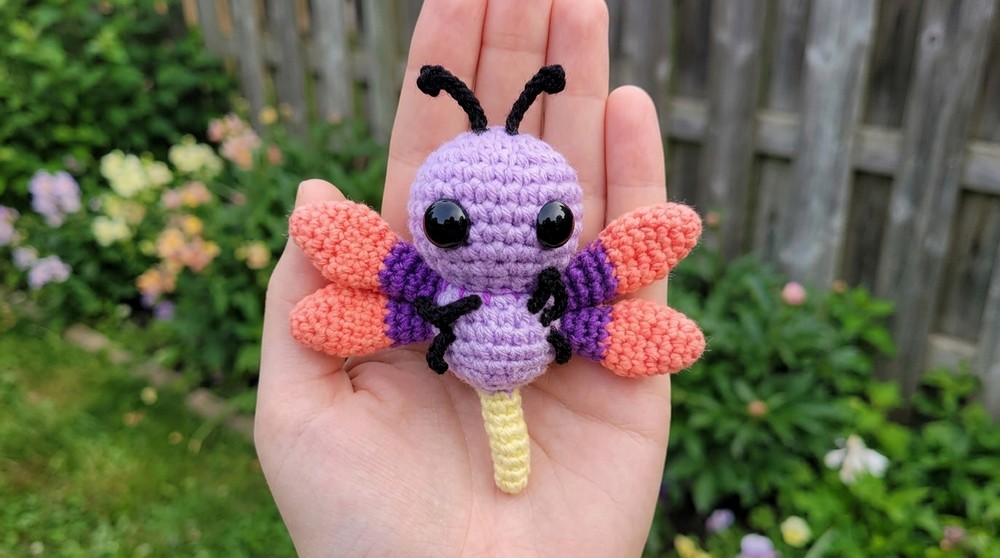
Bring elegance to life with the free crochet Amigurumi Dragonfly, a delicate and enchanting design perfect for your collection of handmade treasures.
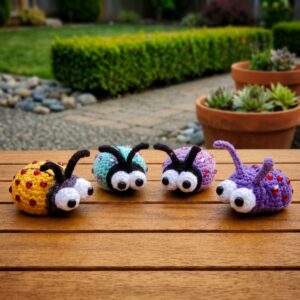
One of my favorite crochet projects to date has been making small, charming creatures that brighten up any space. Recently, I tried the Free Crochet Amigurumi Dragonfly Pattern, and it quickly became a beloved project. This pattern creates a soft, little dragonfly toy that can easily be changed into other flying insects like butterflies or bees with just small tweaks in color and wing shape. It’s a versatile and fun way to explore amigurumi crochet.
Free Crochet Dragonfly Pattern – Amigurumi Soft Bug Toy
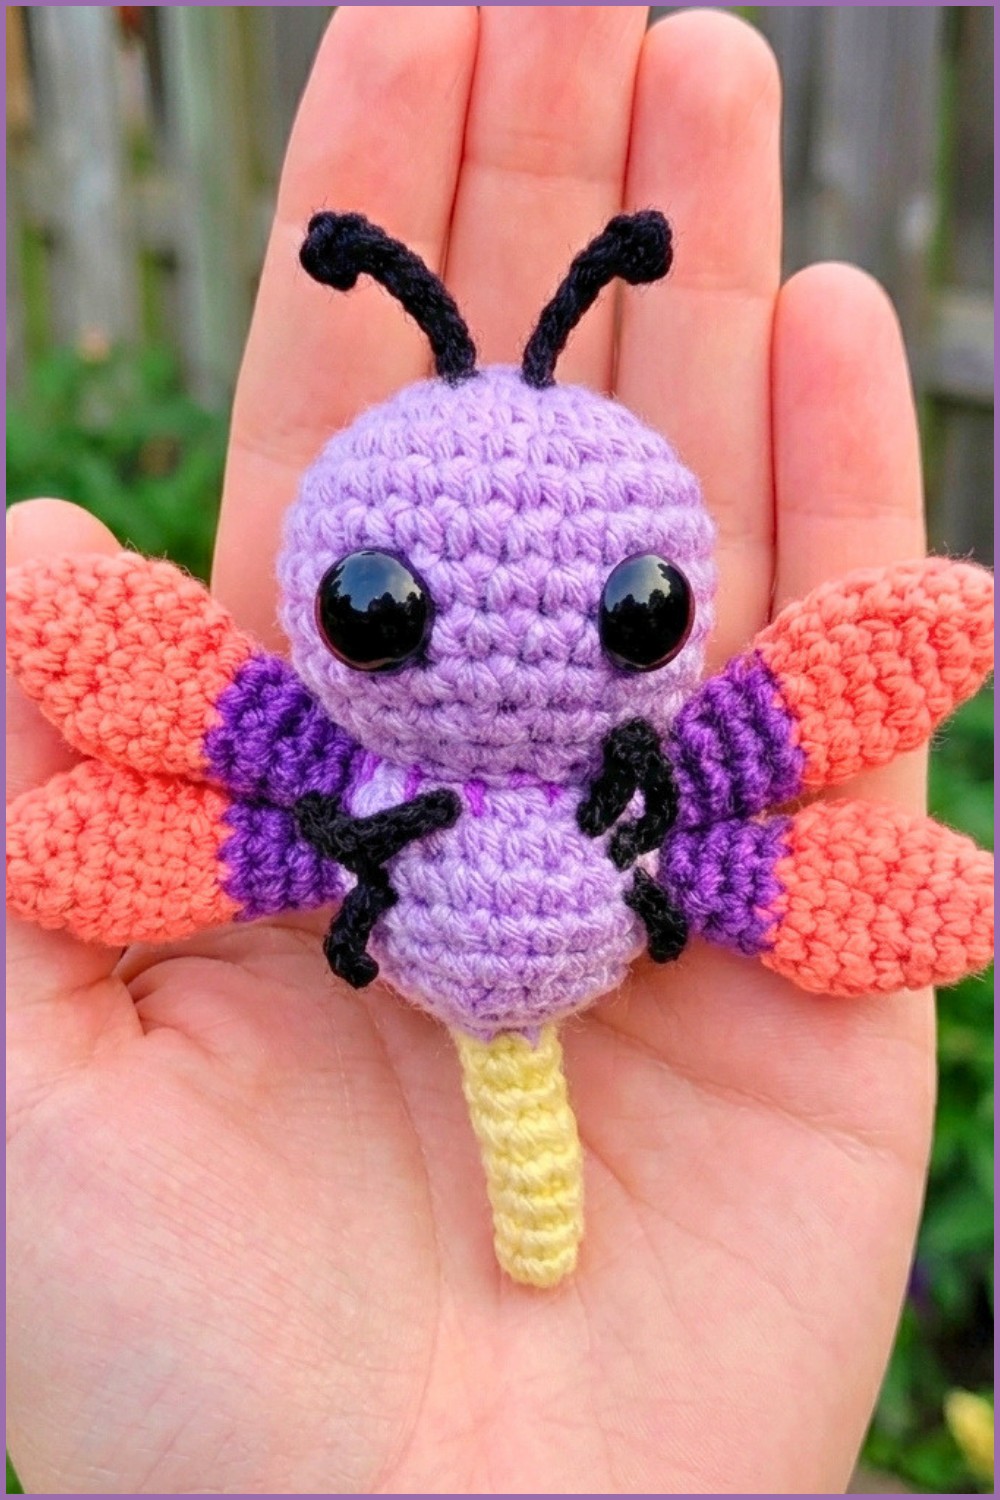
The dragonfly made with this pattern is truly beautiful. It has delicate wings that look light and airy, a smooth, rounded body, and a tiny tail that gives it a graceful shape. The texture is soft and cuddly, perfect for a toy or a cute decoration. Its style is playful and sweet, making it stand out as a charming addition to any collection. The bright colors and detailed wings add to its magical feel, making it a cheerful and eye-catching piece.
This crochet project is built by creating small parts like the body, wings, and tail separately, then carefully sewing them together. The technique is simple but effective, designed for beginners and those with some crochet experience. The main stitch used here is the single crochet, which helps keep the stitches tight and neat, perfect for shaping a small animal. This makes the project enjoyable without being too difficult or time-consuming.
The Free Crochet Amigurumi Dragonfly Pattern is a wonderful choice for making gifts, decorations, or even wearable accessories like brooches. It can also be a lovely collectible for anyone who enjoys cute handmade creatures. If you’re looking for a project that’s fun, creative, and not too hard, this dragonfly is just right to add a little magic to your crochet world.
Rainbow Dragonfly Crochet Pattern
Before You Start
- Read the entire pattern before you start.
- Prepare all your yarn and notions in advance.
- Use tight stitches and small hook sizes for a neat finish.
- This project is perfect for scrap yarns and color play.
Pattern Notes
- The dragonfly body and head are crocheted as one piece.
- This pattern works in both rounds and rows; use a stitch marker to keep track of the beginning of rounds.
- Color changes are made in the last “pull through” of the previous color’s final stitch.
- The project is modular—crochet, then assemble the wings, legs, and antennae.
- Safety eyes and keychain hardware are optional.
How I Made the Crochet Pattern
- Designed the head, thorax, and abdomen as one shape with diminishing rounds and smooth color transitions.
- Created a simple oval wing shape with straightforward increases, quick color changes for visual interest.
- Used slip-stitched chains for flexible but firm legs and antennae.
- Emphasized easy sewing techniques suitable for all levels.
Skill Level
Beginner to Confident Beginner (know basic stitches, how to change color, and work in the round)
Finished Size
Approx. 6" (15 cm) long (antenna to tail) and 6" wide (wingtip to wingtip)
Materials
- Red Heart Super Saver (or similar) worsted weight yarn in:
- Purple, Orange, Yellow, Black
- 3.25 mm crochet hook (body, wings)
- 2.25 mm crochet hook (antennae, legs)
- 2 large safety eyes
- Polyfill stuffing
- Stitch marker
- Yarn needle
- Scissors
Measurements / Sizing
- Full length: approx. 15 cm (6")
- Wingspan: approx. 15 cm (6")
- Wing (each): approx. 2.5" x 1.5"
- Body thickness: approx. 1"
Gauge
Gauge is not critical. Use tight, even stitches so stuffing does not show through.
Stitch Abbreviations
- ch = chain
- sc = single crochet
- inc = increase (2 sc in same st)
- dec = decrease (see Special Stitches)
- sl st = slip stitch
- st(s) = stitch(es)
- MR = magic ring
Special Stitches
Invisible Decrease (dec):
Insert hook into the front loop only of the next two stitches, yarn over and pull through both front loops, yarn over and pull through both remaining loops.
The Pattern!
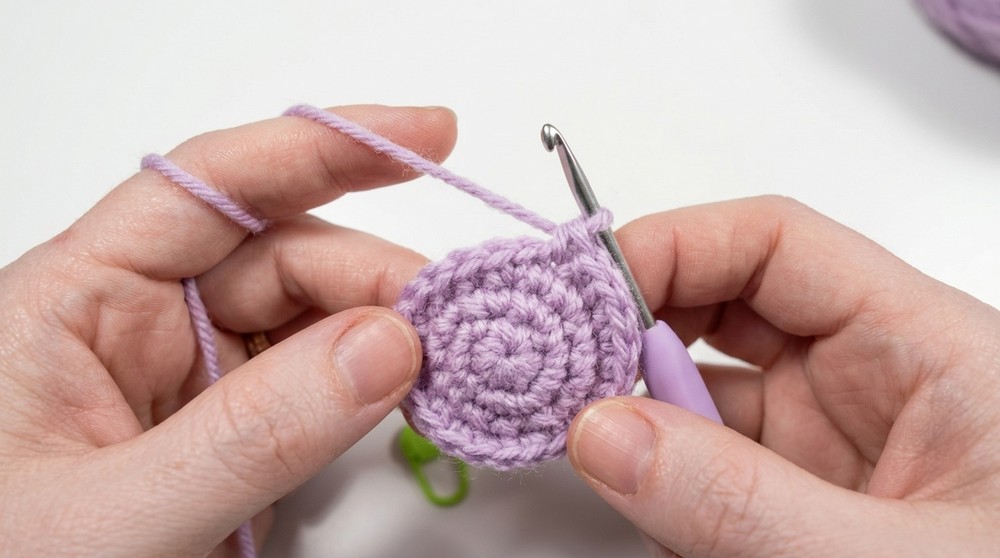
Body & Head (Worked in One Piece)
With 3.25 mm hook and Red:
- Round 1: MR, 6 sc in ring (6)
- Round 2: 2 sc in each st (12)
- Round 3: [Inc, sc] around (18)
- Round 4: [Inc, sc, sc] around (24)
- Round 5: [Inc, sc, sc, sc] around (30)
- Rounds 6–10: Sc in each st (30)
Your dragonfly’s head and upper segment (thorax) are now complete.
- Round 11: [Dec, sc 3] around (24)
- Round 12: [Dec, sc 2] around (18)
Insert safety eyes between rounds 8 and 9, 6 stitches apart.
- Round 13: [Dec, sc] around (12)
- Round 14 (FL only): 2 sc in each st around (24)
- Rounds 15–18: Sc in each st (24)
- Round 19: [Dec, sc 2] around (18)
- Stuff head and thorax moderately now.
- Round 20: [Dec, sc] around (12)
- Round 21: Dec around (6)
- Rounds 22–29: Sc in each st (6).
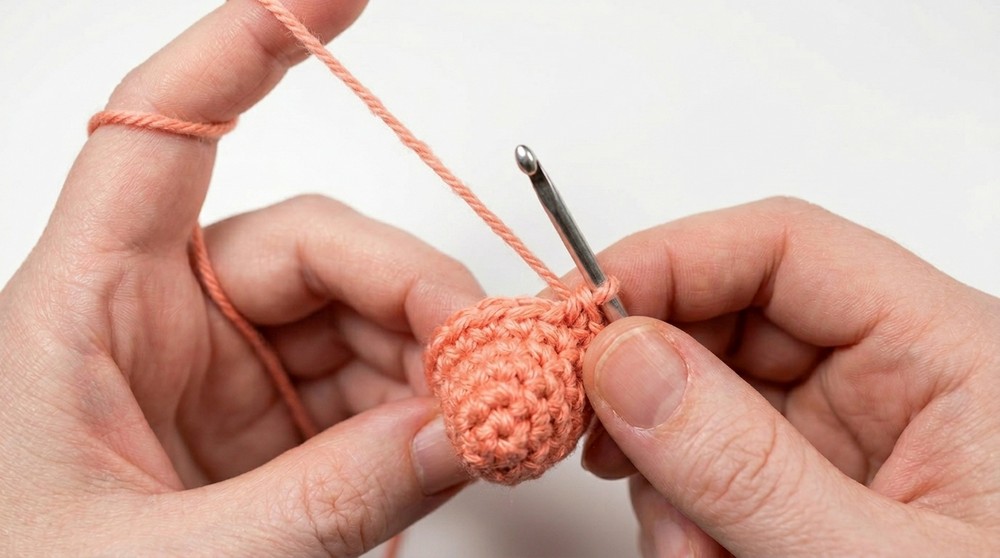
- Finish: Sl st, leave a tail, finish stuffing tail end if desired.
- Use a needle to weave tail through front loops of last round, pull to close, and weave in end.
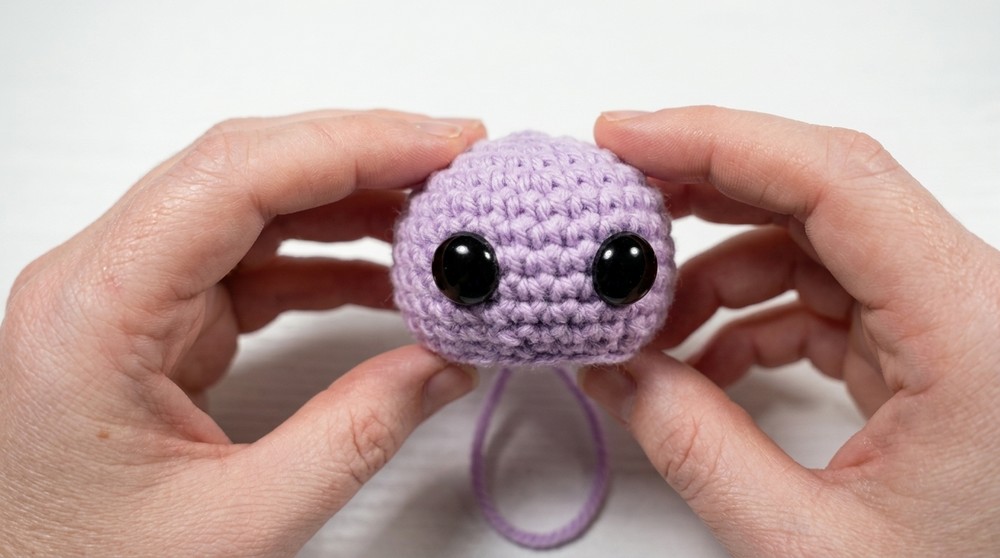
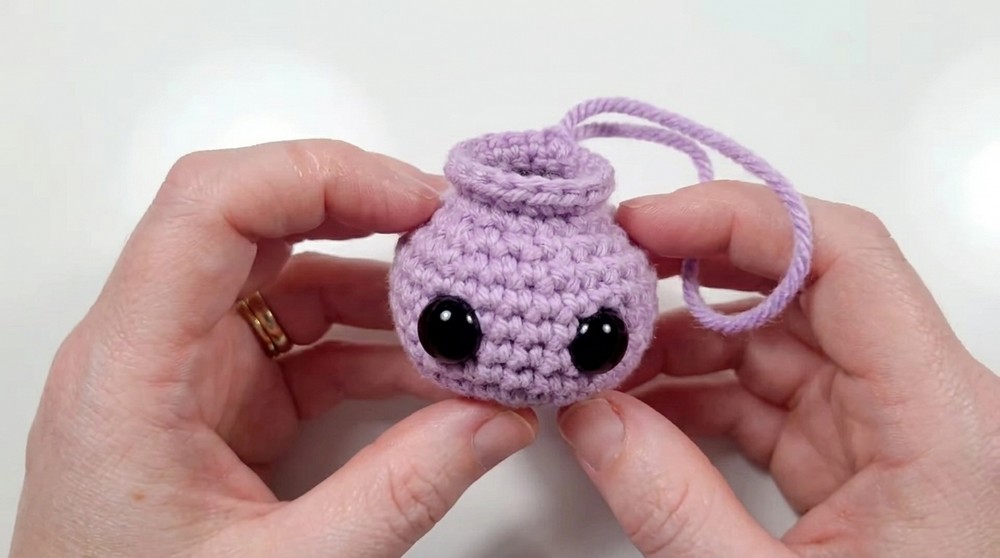
You have a neatly tapered dragonfly body and a bright, firm head ready for face and appendages.
If you don’t read classic patterns:
You start with a magic ring, increase in circles to make the head, then work “straight” rows for the upper body, decreasing and changing colors (red → orange → yellow) as you go. The final rounds are just six single crochets to form a thin tail, which you close with a tapestry needle.
Wings (Make Four)
(switch to Orange, then Purple):
- Round 1: MR, 4 sc in ring (4)
- Round 2: [Inc, sc] twice (6)
- Round 3: [Inc, sc, sc] twice (8)
- Round 4: Sc in each st (8)
- Round 5 (Color change to Blue at end): [Inc, sc] around (12)
- Rounds 6–8 (Blue): Sc in each st (12)
- Round 9 (Color change to Purple at end): [Dec, sc] around (8)
- Rounds 10–11 (Purple): Sc in each st (8)
- Round 12: [Dec, sc 2] twice (6)
- Round 13: Sc in each st (6), sl st to join, leave a tail for sewing.
Repeat for a total of 4 wings.
Legs (Make 6)
With Black (use 2.25 mm hook):
- Ch 6 (not too tight).
- Working in back bumps, sl st in 2nd ch and in each across (5).
- Leave tails on both ends for sewing.
Antennae (Make 2)
With Black (2.25 mm hook):
- Ch 9 (not too tight).
- Sc 3 into the 2nd ch from hook for a “ball” tip, then sl st in each back bump along remaining ch (7).
- Fasten off, leave a tail for sewing.
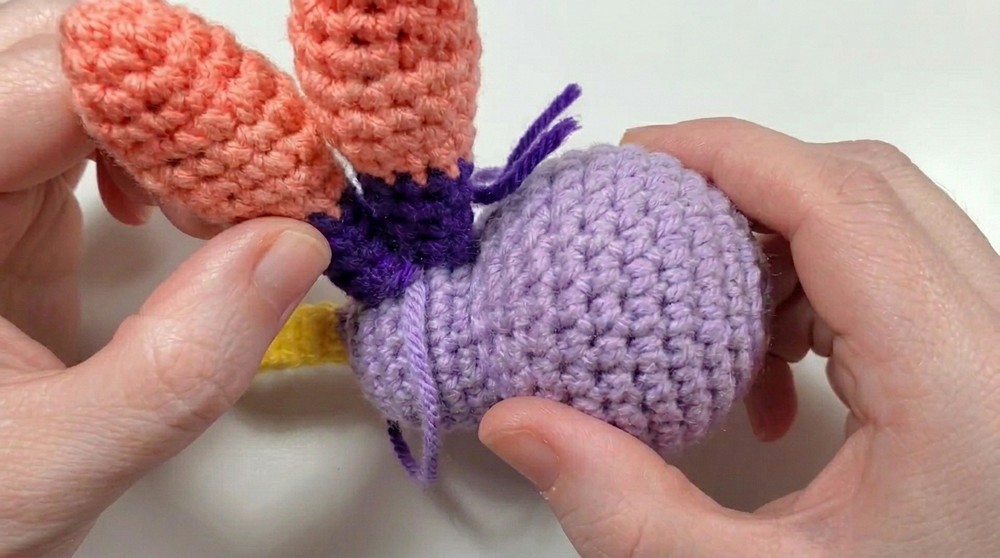
At this point, you will have a bold dragonfly body, 4 wings in rainbow stripes, 6 slip-stitched legs, and 2 antennae.
Assembly & Finishing
- Place and sew wings on either side of the dragonfly’s thorax, slightly overlapping, with two wings per side, just behind the head.
- Sew three legs in a line on each side of the lower thorax, spacing evenly.
- Attach antennae above eyes on the head, shaping the “bubble” tips outwards.
- Weave in all excess yarn ends using a yarn needle.
- Add a keychain ring or sew on a pinback if wanted.
- Fluff the dragonfly and adjust wing/leg positions as desired.
Solution to Common Problems
Color changes look rough: Make color changes on the last yarn-over of a stitch for smoother edges and crochet over the previous color’s tail.
Wings flop: Use tightly crocheted stitches and consider blocking wings lightly.
Stuffing pokes out: Work firmly with a small hook size as recommended.
What you can make by using these stitches
- Pride or rainbow dragonflies for gifts, pins, or backpack charms
- Butterflies or moths by adapting body and wings
- Mini insects and animals for play sets
- Larger wall decor by using bulkier yarn
You now have an adorable, bright dragonfly perfect for Pride or any time you want to celebrate with color. The modular pieces are beginner-friendly and quick to make, and you can personalize your dragonfly with any combination of colors or yarns, making each one unique.