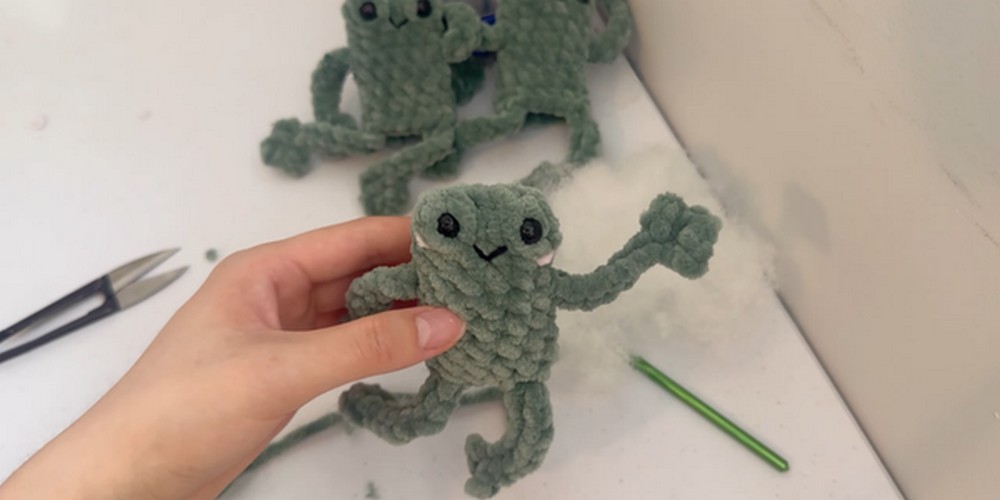
Hop into cuteness with the Crochet Mini Leggy Frog—an adorable handmade accessory perfect for gifts, decorations, or playful everyday charm!
This delightful creation marries simplicity and charm, making it perfect for all skill levels. The mini leggy frog can be used as an adorable keychain, a cute addition to your home décor, or a unique gift that shows thoughtfulness and care. Crocheted with precision, this pattern ensures that your frog comes out delightful every time.

The step-by-step guide takes you through each stitch, ensuring you can replicate the design effortlessly. Not only does this project enhance your crocheting skills, but it also provides a sense of accomplishment and joy. Step into this fun activity and add a little whimsy to your day with these stylish and innovative patterns.
Materials Needed
- Chenille Yarn: Loops and Threads chenille home slim yarn recommended (super bulky yarn).
- 5.5 mm Crochet Hook: For crocheting the frog.
- Optional:
- Pink yarn for blush
- Black yarn for the mouth
- Tapestry needle
- Safety eyes (8 to 10 mm)
Creating the Body
Step 1: Start the Chain
- Make a loop with your yarn and chain six stitches.
Step 2: Single Crochet
- Single crochet in the next four stitches, skip the first chain.
- In the last chain, create two single crochets.

Step 3: Work the Opposite Side
- Continue on the opposite side of the chains:
- Single crochet in the same space twice.
- Then single crochet four times down the line.
- In the last space, do two single crochets.
Now you should have 12 stitches in total.

Step 4: Begin Working in Rounds
- Place a stitch marker at the start of the round.
- Begin row two with a single crochet, followed by a double crochet cluster (eye) and two single crochets. Repeat for the second eye.
Creating the Eyes and Face
Step 5: Crochet Eyes
- Use a double crochet cluster to create bulging eyes on both sides, with single crochets in between and after.

Step 6: Secure the Features
- Insert safety eyes and sew on the mouth. Options for the mouth include a V-shaped or straight line.
Adding Arms and Legs
Step 7: Crochet Arms
- Chain ten for the first arm, then create three slip stitches to form fingers.
- Finish with slip stitches to complete the arm.
- Single crochet six times across the body and repeat the arm creation process for the opposite side.

Step 8: Repeat with Legs
- Repeat the process of steps 5 to 7 for crocheting legs on row nine, attaching them accordingly.
Finalizing the Frog
Step 9: Adding Details
- Add any additional blush details with pink yarn using the tapestry needle.
Step 10: Stuffing and Closing
- Stuff the frog with filling to your desired firmness.
- Using a tapestry needle, sew the base of the frog's body closed, ensuring it’s secure.
Conclusion
Once the frog is assembled and all pieces are securely attached, admire your handiwork. The author's emphasizes that this quick project is perfect for markets and brings a delightful charm to your crochet creations.