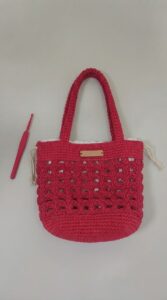
This crochet tutorial guides you through making a charming and practical accessory. Using bright colors and a simple daisy pattern, this bag is ideal for both new and experienced crocheters. The step-by-step instructions make the process easy to follow and enjoyable. The finished bag features beautiful daisy motifs on each square, adding a touch of spring to any outfit. Perfect for carrying your daily essentials, this project combines functionality with a bright, cheerful design.
How To Crochet The Pretty Daisy Square Bag

Make Your Pretty Daisy Square Bag
Materials Needed:
- Yarn in multiple colors (for squares and panels)
- Thrifted or basic sewing machine
- Sewing needle
- Crochet hook (5.0 mm recommended)
- Scrap fabric for lining
- Cardboard or thin wood for bag bottom (optional)

Step by step Instruction
- Crochet Squares:
- Create multiple crochet squares using your chosen colors.
- Assemble a panel of squares for practice first.
- The tutorial for making a square was mentioned to be in the video description, but was not included in the text provided.
- Main & Side Panels:
- Arrange squares into two main panels and two side panels.
- Use a mattress stitch for joining the squares to hide seams.
- Alternatively, you can use a slip stitch or single crochet if preferred.
- Bottom Panel:
- Create the bottom panel using a simple half-double crochet stitch.
- Start by making 25 chains plus one with a slip knot.
- Hook into the second chain from the hook and work in half-double crochet.
- Continue until the length of the bottom panel matches the width of three squares.
- Assemble Panels:
- Use single crochet to seam the panels together.
- Start with three columns for a square shape.
- Attach side panels to the main panels using the same stitching method.
- Lining & Structure:
- Cut the lining fabric one inch larger on all sides to sew it into the interior.
- Pin the panels on scrap fabric for cutting tailored fabric pieces for lining.
- Optionally, cut thin wood/cardboard for the bag bottom's interior for added structure.
- Joining Panels & Bottom:
- Use single crochet along the edges to join the main panels.
- Attach the bottom panel using the same single crochet technique to ensure uniformity.
- Final Details - Top Border and Straps:
- Add a simple single crochet border around the top of the bag, two or three rounds.
- Create the straps using Tunisian crochet.
- Attach the straps securely to the body of the bag.
- Lining and Finishing Touches:
- Sew the inside lining to hide stitching for a clean look.
- Include the sturdy bottom piece within the lining.
- Final Assembly:
- Assemble and adjust as needed to make sure everything is aligned and sturdy.
- Cut any remaining threads and tidy up the ends.
- Optional Adjustments:
- Wrap the bottom reinforcement with fabric before inserting for a seamless finish.


Notes:
- Ensure your sewing machine is in good working order prior to attempting to sew the lining.
- Customize your color scheme using scrap yarn to make unique, environmentally friendly designs.
- Be patient with the sewing process to ensure neat and sturdy seams.