Learn step-by-step to design a personalized crochet keychain wristlet that’s both fashionable and functional, ideal for crafting lovers of all skill levels.
Keys have a pesky way of disappearing into the depths of bags or falling into hard-to-reach places. The crochet keychain wristlet offers a practical yet stylish solution to this everyday problem. This charm fits comfortably around your wrist, ensuring your keys are always within reach while doubling as a fashionable accessory. With its sturdy build and unique texture, it looks great and delivers durability, making it ideal for daily use. Whether you’re heading out for errands, taking the dog for a walk, or going for a jog, this wristlet keeps your essentials close and secure.
Crochet Keychain Wristlet Tutorial

Crochet Keychain Pattern: Step-by-Step Guide
In this tutorial, you will learn how to crochet a beautiful and simple keychain using a combination of basic and intermediate crochet stitches. This versatile keychain can be adjusted to any length and is designed to hold a keyring or carabiner securely. It is an excellent project for beginners and experienced crocheters looking for a quick project. The pattern includes a repeat stitch design that adds texture and charm to your keychain.
Materials Needed
To begin this project, ensure you have the following materials:
- Yarn: Any medium-weight yarn (your choice of color). Cotton yarn is recommended for durability.
- Crochet Hook: Use a hook size suitable for your yarn. (Suggested: 4-5mm).
- Keyring, Carabiner, or Hook: For attaching the finished product.
- Yarn Needle: For sewing ends and attaching the closure.
- Scissors: To trim excess yarn.
Abbreviations Used
The following crochet abbreviations are used in this pattern:
- ch: Chain
- sc: Single Crochet
- dc: Double Crochet
- tr or trc: Treble Crochet (Triple Crochet)
- sl st: Slip Stitch
- yo: Yarn Over
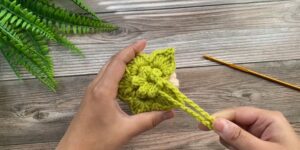
Step-by-Step Crochet Pattern
Step 1: Create the Base Chain
- Start by creating a foundation chain as long as you want the keychain to be. Add a few extra chains to allow for folding and attaching the keyring later.
- No need to count, but ensure the chain is long enough for your desired length and use.
Example: “Chain 50 or more, depending on desired length.”
- Once complete, proceed to the next step.

Step 2: Single Crochet Row
- Begin the first row with Single Crochets (sc):
- Insert your hook in the second chain from the hook, yarn over, and complete the stitch (pull yarn through two loops).
- Single crochet across the entire length of the chain.
- At the end of the row, chain 1, turn the work.

Step 3: Double Crochet Row
- For the second row, crochet Double Crochets (dc) across the length of the row:
- Yarn over, insert the hook into the stitch, yarn over, pull up a loop (3 loops on the hook), yarn over and pull through 2 loops, yarn over and pull through the remaining 2 loops.
- Repeat this process for each stitch across the row.
- At the end of the row, chain 1, turn the work.
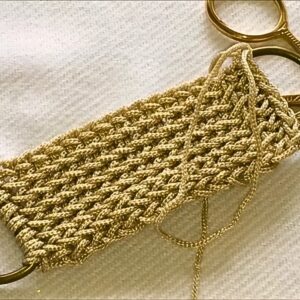
Step 4: Treble Crochet Design
This row introduces the decorative treble crochet pattern:
- Start the Row:
- Yarn over twice and skip two stitches.
- Insert your hook into the third stitch, yarn over, pull up a loop (4 loops on hook). Yarn over and pull through two loops at a time until one loop remains on the hook.
- Add 3 Single Crochets:
- Make three consecutive single crochets in the next three stitches.
- Repeat the Treble Crochet:
- Yarn over twice and insert the hook into the same stitch where you worked the previous treble crochet. Complete the treble crochet stitch.
- Skip 3-4 Stitches:
- Skip ahead to the 3rd or 4th stitch and repeat the pattern:
- Treble Crochet, 3 Single Crochets, Treble Crochet.
- Continue this sequence across the row.
- Skip ahead to the 3rd or 4th stitch and repeat the pattern:

Pattern at a glance: (Treble Crochet, 3 Single Crochets, Treble Crochet). Skip to next set and repeat.
- End the row with single crochets if there are extra stitches remaining.

Step 5: Finish the Keychain
- Work a final row of Single Crochets for a clean edge.
- Leave a tail long enough to sew the keychain closed or attach to the ring.
- Chain one and pull the yarn through to secure the end.
Step 6: Attach the Keyring or Closure
- Fold the finished crochet piece so both ends meet.
- Insert the keyring or carabiner hook into the folded end.
- Use a yarn needle to sew securely along the folded edge:
- Work through both layers of the crochet fabric until secure.
- Tie a knot if necessary and weave in excess yarn tails with the needle to hide them.

Conclusion
Congratulations! You’ve created a beautiful and customizable crochet keychain. This pattern is simple yet elegant, allowing for personalization in length, color, and hook choice. Whether you're making it for personal use, as a gift, or to sell, this keychain is both practical and stylish. Add flair by experimenting with different stitches or embellishments. Enjoy your handmade creation!