
Redefine cozy style with unique crochet jackets—perfect for any season, handcrafted patterns, and endless inspiration to elevate your wardrobe today.
Born out of tradition and creativity, crochet jackets have become a timeless staple in wardrobes worldwide. With roots in handmade artistry, these versatile garments combine style with practicality, offering a layer of warmth without sacrificing elegance. Ideal for every season, crochet jackets can be lightweight and breezy for spring or thick and cozy for winter, making them a year-round favorite.
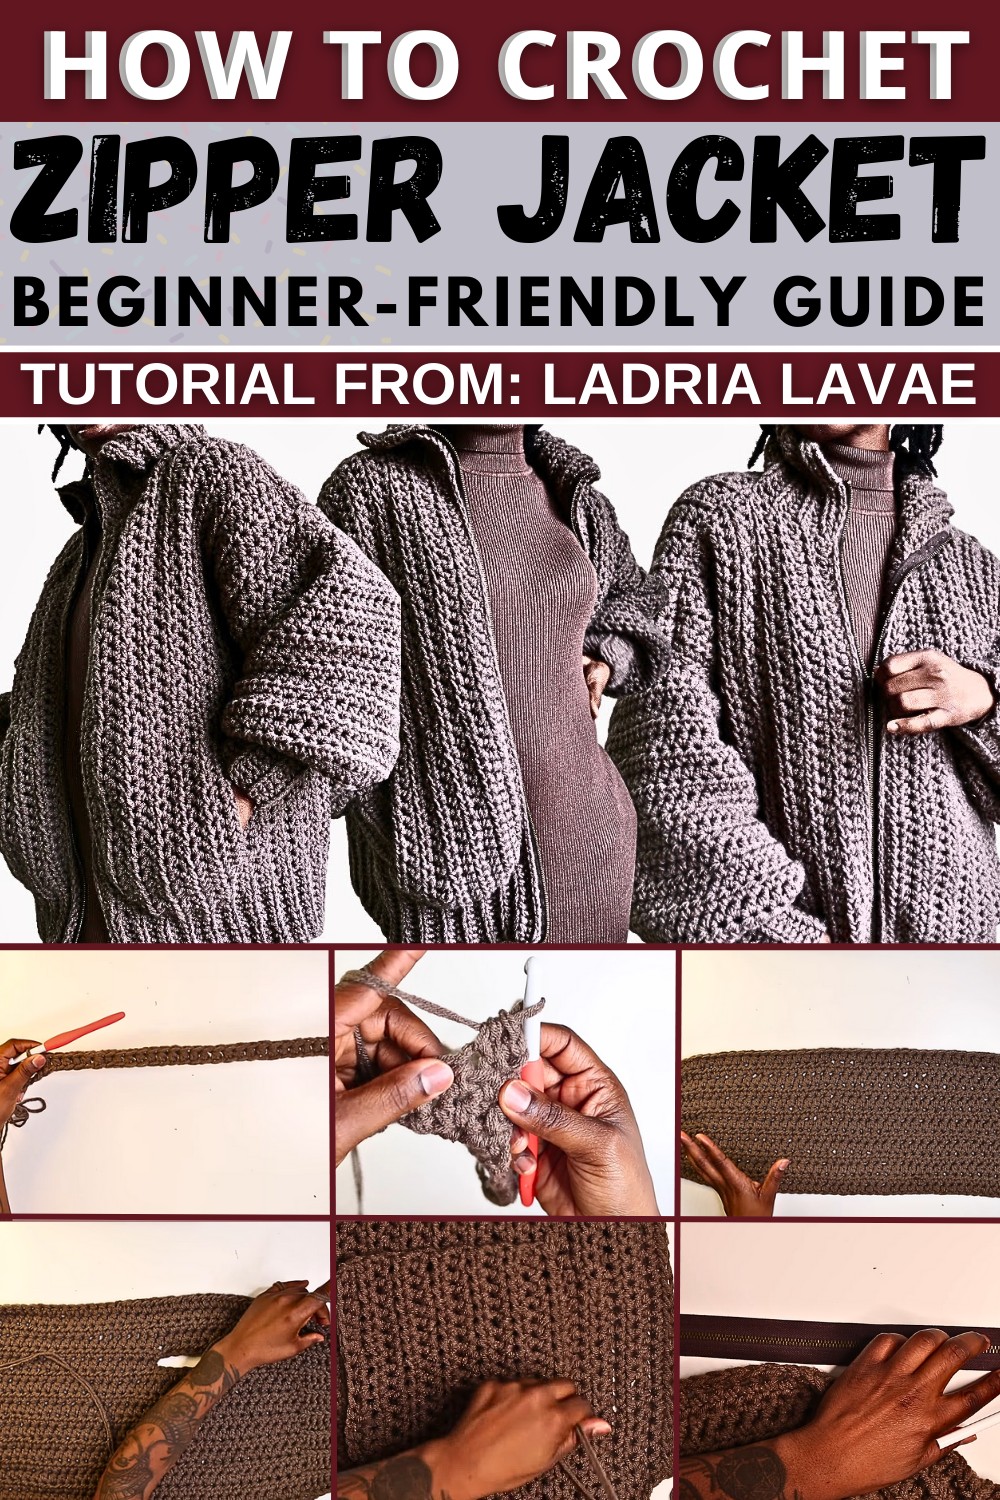
Detailed Crochet Jacket Tutorial: Including Pockets and Zipper Installation
The charm lies in their adaptability—they pair effortlessly with jeans for a casual outing or add a unique touch to formal wear. Beyond their fashion appeal, these jackets also stand out for their durability and eco-friendliness, often made from sustainable yarns. The intricate stitches showcase the skill and passion woven into each piece, making them feel as meaningful as they are beautiful.
Beyond aesthetics, crochet jackets offer functionality. The breathable fabric ensures comfort, while the open weave design allows flexibility and freedom of movement. Whether used as a statement piece for special events or as an everyday essential to pull together an outfit, they balance practicality and charm perfectly. Timeless, handmade, and endlessly versatile, these jackets are more than an item of clothing—they’re an expression of personal style and a celebration of careful artistry.
Step-by-Step Instructions for Making the Crochet Jacket with Zipper and Pockets
Step 1: Introduction
- The video tutorial, created by Regina Bay, teaches how to make a crochet jacket with pockets and a zipper, all without requiring a sewing machine.
- The project is paired with a detailed written pattern (available for purchase), which is over 25 pages long and includes pictorials and sizing guides for sizes ranging from Extra Small to 3XL.
- The measurements allow for customization to ensure the perfect fit.
Step 2: Materials Needed
- Yarn: Two strands of weight-4 yarn held together.
- Hook: 9mm crochet hook.
- Additional Tools: Stitch markers, tapestry/sewing needle, zipper (a separating zipper is required), ruler for measurements.
- Other Details: The instructor uses a 30-inch zipper for her jacket but explains how to measure for the correct length based on your project.
Step 3: Starting the Front Panel
- For the Size Small, chain 51 stitches. Adjust as per the written pattern for your size.
- After chaining, work in the back loops of the chain to create a clean edge using half double crochet (HDC) stitches.
- After completing HDC in most stitches, finish the last 10 stitches with slip stitches to form a ribbing border.
- Rows 2 and 3: Alternate between HDC stitches and slip stitches (for the ribbing) as described. Repeat until row counts match your size.

Step 4: Working on the Pockets
- At the row designated for the pocket, chain 12 stitches and skip those chains, leaving an opening for the pocket.
- Continue working HDC stitches, ensuring the skipped chains align properly.
- Create the pocket piece separately by attaching additional yarn and creating rows of HDC stitches. Seam the pocket to the main fabric using an invisible stitch method (whip stitch through loops closest to you).

Step 5: Back Panel
- The back panel is a simple rectangle following similar steps to the front panels.
- Chain stitches as directed for your size and repeat rows alternating HDC and slip stitches until the total rows match the written pattern.
- Seam the back panel and front panels together along the sides to create the body of the jacket.

Step 6: Ribbed Collar
- Create the ribbed collar using the same slip stitch technique as the ribbing on the panels.
- Measure the collar to ensure it fits around the neckline opening.
- Seam the collar to the neckline using a whip stitch while keeping the edges aligned and stitched properly.

Step 7: Adding the Zipper
- Mark the placement of the zipper using stitch markers, ensuring symmetry on both front panels.
- Important Note: Use a separating zipper for this project.
- Use yarn and a large eye sewing needle to attach the zipper manually, ensuring the marks match the stitches on the crochet fabric.
- Follow the method demonstrated for threading yarn through zipper slots while maintaining even tension. Once complete, secure and weave in the ends.

Step 8: Sleeves
- Beginning the Sleeve:
- Make a ribbed cuff first using slip stitch rows. Repeat until the cuff measures the appropriate number of rows for your size.
- Add HDC stitches to create the body of the sleeve, increasing stitches according to the sizing directions.
- Seaming the Sleeves:
- Fold each sleeve and seam the edges to form a tube, then attach the sleeve to the armhole of the jacket.
- Finishing Up:
- Repeat the above steps for the second sleeve and seam it onto the other armhole. Once complete, weave in all loose ends.

Special Features
- No Sewing Machine Required: The jacket can be made entirely by hand using crochet techniques, even the zipper attachment.
- Invisible Pocket Design: The stitching technique keeps the pocket seam clean and discreet.
- Customizable Sizes: The project works for Extra Small to 3XL and allows for adjustments based on personal measurements.
- Detailed Written Pattern: The companion 25-page pattern includes diagrams, pictures, and guides to simplify the process.
Level of Difficulty
- Intermediate: This project requires familiarity with crochet basics like chain, slip stitches, HDC, and seam techniques. Beginners can attempt it, but the zipper and pocket sections may be challenging without prior experience.
Tutor’s Suggestions
- Use stitch markers to keep track of rows and placements.
- Constantly refer to your written pattern (if purchased) to ensure accuracy while stitching.
- Count your stitches to avoid mistakes during ribbing, pockets, or seams.
- When measuring for the zipper, ensure it aligns perfectly with the stitch markers to avoid misplacements.
Uses
- Fashion Item: Stylish crochet jacket perfect for layering during fall or winter.
- Practicality: Includes pockets for storage and a zipper for closure.
- Gift Idea: Handmade, customizable gifts for friends and family.
Tip for Success:
When attaching the zipper, choose a yarn color that matches the zipper for a more polished look. Always work with consistent tension while stitching to prevent the fabric or zipper from puckering. Measure all edges carefully before attaching accessories like the zipper or collar.
This tutorial combines style and practicality, making it an excellent project for crocheters wanting to challenge themselves and learn techniques like seam work and zipper attachment.


