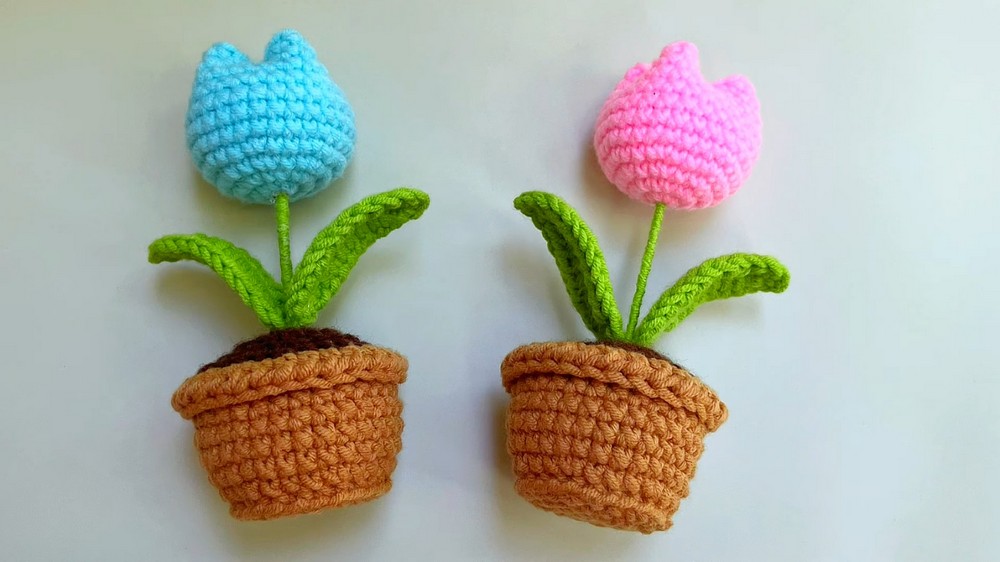
Make a tiny pot with vibrant tulips blooming from it, all made from yarn through the charming art of crochet. This Crochet Mini Tulip Pot Flower is a delightful addition to any space, adding a splash of color and handmade charm. The small size is perfect for desks, shelves, or as a sweet gift to brighten someone's day.
Cute Crochet Mini Tulip Pot Flower

Crafting this diminutive flowerpot lets you weave a bit of nature's beauty with the simplicity of crochet stitches, creating a lasting and adorable decorative piece without the need for watering or sun!
To Create the Pot:

Start with the Pot:
- Row 1: Create a magic ring. Crochet six single crochets into the magic ring. Tighten the yarn and make a slip stitch into the first stitch. Chain one to start the next row.
- Row 2: Increase in every stitch by making two single crochets into each stitch for a total of six times. Finish with a slip stitch into the first stitch.
- Row 3: Chain one. Make one single crochet into the next stitch, then an increase. Repeat this sequence five more times. Slip stitch into the first stitch to conclude the row.
- Row 4: Chain one. For the first two stitches, make one single crochet into each. Then, make one increase and repeat this for five more times. Finish with a slip stitch.
- Row 5: Chain one and crochet in the back loops only for this row. Make 24 slip stitches using the back loops only. Conclude with a slip stitch into the first stitch.

- Row 6: Chain one. Into the next stitch, make one single crochet. Follow up with one increase and repeat this pattern five more times. Slip stitch into the first stitch to finish.
- Row 7: Chain one. Make one single crochet in each stitch around for a total of 30 single crochets. Conclude with a slip stitch into the first stitch.
- Rows 8 to 11: Repeat the instructions for Row 7.
- Row 12: Chain two. This row is worked in the front loops only. Make one half double crochet in each stitch around in the front loops. Conclude with a slip stitch into the first stitch.
To Create the Soil:

Beginning the Soil:
- Row 1: In a magic ring, crochet six single crochets. While tightening the loop, leave a small hole; this will be where the flower is inserted later. Conclude with a slip stitch into the first stitch.
Follow the pattern: The next rows mirror the pot’s initial pattern. Fasten off once completed, leaving a long tail for sewing. Use some cotton to stuff the pot. Sew the soil and pot together.
To Create the Tulip Bud:
Starting with the Bud:
- Row 1: Make a magic ring and crochet seven single crochets into it. Tighten the yarn.
- Row 2: Work in continuous rounds. Increase in every stitch around for a total of seven increases.
- Row 3: Make one single crochet in the first stitch, then an increase in the next stitch. Repeat this pattern six more times around.
- Row 4: In the first stitch, make a single crochet. In the next stitch, make another single crochet, then an increase. Repeat this sequence of two single crochets followed by an increase seven times in total.
- Row 5: Crochet one single crochet in each stitch around for a total of 28 single crochets.
- Rows 6 to 11: Repeat the pattern from Row 5, making 28 single crochets in each row. Fasten off, leaving a long tail for sewing. Stuff the tulip bud with some cotton.
Creating the Leaves:
Leaf Creation:
Start with a slip knot and crochet 12 chains. Prepare a 15 cm wire piece.
- Position the wire alongside the working yarn beneath the hook. Insert your hook into the second chain from the hook, yarn over and pull through. Crochet one single crochet into the next chain, followed by one half double crochet into the subsequent seven chains. In the last two chains, make one single crochet into each.
- Chain two and work back into the same stitch, make another single crochet, and then work on the other side of the chains, carrying the yarn tail to avoid weaving ends later. Make one half double crochet into the next 8 chains, carry the yarn tail, and finally, make one single crochet into the last chain. Slip stitch into the first stitch and fasten off.
- Wrap the yarn around the wire, tying a knot to secure. Make two leaves. Prepare an 8-10 cm branch, apply some glue on it, and insert it through the center of the tulip bud. Wrap green yarn around the branch for 3-4 cm, attach the leaves to the branch, and wrap yarn around the whole branch. Apply glue to secure the end.