Magical Crochet Baby Blanket Pattern That Melt Hearts
With countless options for colors and textures, you can easily match it to a nursery theme or personalize it with your own unique touch. More than just a necessity, a handmade baby blanket becomes a keepsake filled with love and care, perfect for a baby shower gift or your own little one.
Materials Needed
- Yarn:
- Number 4 medium-weight yarn (choose any soft and durable yarn, suitable for blankets).
- Crochet Hook:
- 5mm crochet hook.
- Scissors:
- For trimming yarn tails.
- Tapestry Needle:
- For weaving in yarn ends.
Abbreviations
- ch: Chain
- sc: Single Crochet
- dc: Double Crochet
- st: Stitch
- sl st: Slip Stitch
- v-stitch: (1 dc, ch 1, 1 dc into the same stitch)
- shell: 7 double crochets into the same stitch/space
Crochet Baby Blanket FREE Pattern
This detailed pattern explains how to create a crochet blanket starting from the center and working outward. The shell and v-stitch pattern provides a textured, elegant design suitable for a baby blanket or any size blanket you desire.
The instructions are structured step-by-step for clarity and accessibility.
Detailed Steps
Round 1: Magic Ring and Initial V-Stitches
- Create a magic ring:
- Hold the yarn tail with your thumb and wrap the working yarn around your two fingers, crossing it in front.
- Insert the hook into the first loop and pull up a loop using the working yarn.
- Chain 1 to secure the ring.
- Note: If you find the magic ring challenging, chain 4 and sl st into the first chain to form a starting loop.
- Chain 4 (this counts as the first dc and a ch 1).
- Into the magic ring, work:
- 1 dc, ch 2 (this is your first v-stitch)
- (1 dc, ch 1, 1 dc, ch 2) three more times
- You should now have four v-stitches separated by four ch 2 spaces
- Close the round with a sl st into the third chain of the beginning ch 4. Pull the yarn tail to tighten the magic ring.
Round 2: Shells
- Ch 1, then work 1 sc into the same stitch where the sl st was made.
- In each ch 1 space of the v-stitches, work 7 dc (this creates a shell).
- Into each ch 2 space, work 1 sc.
- Repeat this process around:
- 4 shells (7 dc each) in the v-stitch ch 1 spaces
- 4 sc in the ch 2 spaces
- At the end of the round, sl st into the first sc to close.
Round 3: V-Stitches (Corners)
- Ch 4 (counts as 1 dc + 1 ch), then work 1 dc into the same stitch. This makes the first v-stitch.
- Ch 5 and skip to the next sc from the previous round.
- Into the sc, work your corner:
- (1 dc, ch 1, 1 dc, ch 2, 1 dc, ch 1, 1 dc)
- This creates a “double v-stitch corner.”
- Chain 5, skip to the next sc, and work:
- 1 v-stitch (1 dc, ch 1, 1 dc)
- Repeat steps 2-4 around. You should now have 4 corners (with double v-stitches) separated by chain 5 spaces.
End the round with 1 dc, ch 1 in the starting space and join with a sl st into the third chain of the starting ch 4.
Round 4: Shells
- Ch 1, then work 1 sc into the same stitch where the sl st was made.
- Into each ch 1 space of the v-stitches, work 7 dc (shell stitches).
- Into each ch 5 space, count the fourth double crochet (center of the chain 5 cluster) and work 1 sc on top while picking up the chain itself (to ensure the structure remains sturdy).
- At the corners (the chain 2 spaces from the double v-stitches), work:
- 7 dc, 1 sc, 7 dc
- Repeat the pattern around:
- Shells in v-stitches
- Center sc in chain 5 spaces
- Corner shells grouped together
- End the round with a sl st into the first sc.
Round 5 and Beyond: Repeat Pattern
- Alternate between v-stitch rounds and shell rounds.
- Pay attention to the corners, which always follow this pattern:
- V-Stitch Rounds: Double v-stitch in corners (1 dc, ch 1, 1 dc, ch 2, 1 dc, ch 1, 1 dc).
- Shell Rounds: Corner grouping of (7 dc, 1 sc, 7 dc)
- The number of v-stitches, chain 5 spaces, and shells will increase with each round as the blanket grows outward.
Final Round
- Once your blanket reaches the desired size (e.g., 38 rounds for a baby blanket):
- End on a shell round for a neat and decorative edge.
- After finishing the final round, fasten off and cut the yarn.
Weave in all ends using your tapestry needle.
Tips for Success
- Tension: Maintain even tension throughout to ensure your blanket lies flat without curling or rippling.
- Stitch Markers: Use markers to identify corners, especially as the blanket grows and rounds increase.
- Check Your Stitches: Double-check the number of stitches in each round to ensure consistent growth.
- Blocking: Block the blanket after completion to smooth out any irregularities.
Customization Ideas
Color Variations
- Striped Design: Alternate yarn colors every few rounds for a striped effect.
- Ombre Gradient: Use an ombre or gradient yarn cake to create a smooth transition of colors.
Sizes
- Baby Blanket: Follow the original 38-round design for a compact, portable size.
- Throw Blanket: Work up to 50-60 rounds for a sofa-sized throw.
- Full-Sized Blanket: Continue the repeat pattern until the blanket covers your bed.
Yarn Choices
- Opt for soft acrylic yarns for easy care or luxurious natural fibers (such as wool or cotton) for added warmth and comfort.
Conclusion
This center-out shell and v-stitch blanket is an elegant and versatile project suitable for all skill levels. Its repetitive yet varying pattern of shells and v-stitches offers both texture and beauty, making it an excellent gift or personal decor piece.
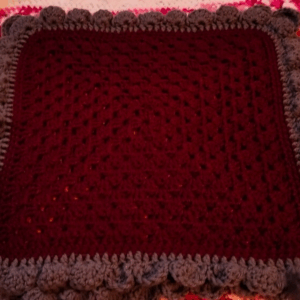
Finished Look:
The blanket features concentric shells and decorative v-stitch corners, creating a beautiful geometric pattern. Whether you make it for a baby, as a throw, or as a bedspread, this blanket will be cherished for its handmade warmth.