Tie on charm with this free crochet square floral bandana pattern that feels light, pretty and suits daily wear outdoor trips and warm days.
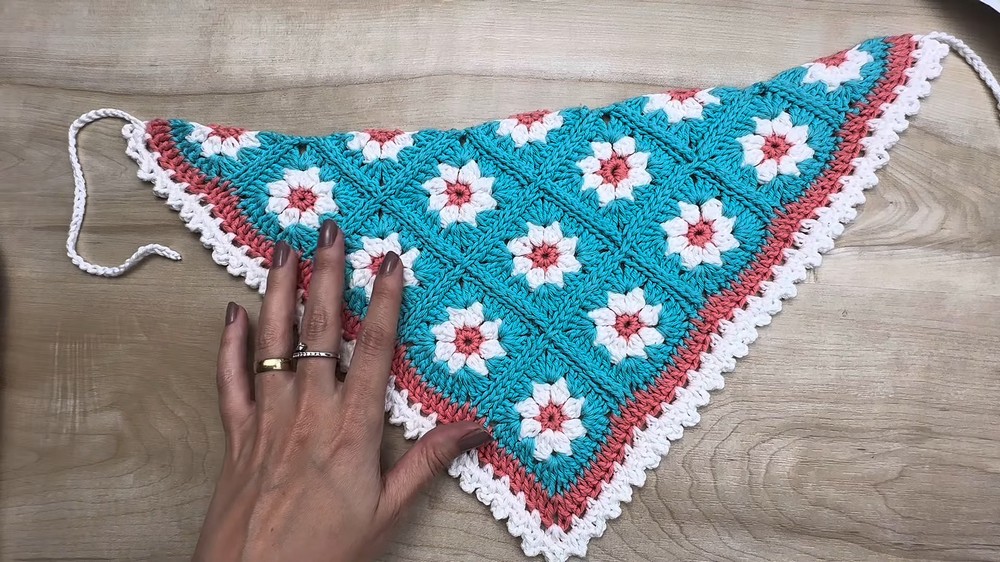
A simple idea grows into a lovely accessory that feels soft and full of charm. The Crochet Square Floral Bandana pattern creates a neat square piece with a delicate flower design that adds a fresh and pretty look. It sits gently on the head and feels light which makes it easy to wear for long hours without discomfort. This bandana is useful for daily wear outdoor walks travel or keeping hair in place in a stylish way. Its smooth texture feels kind on the skin and its firm shape helps it stay neat even after many uses.
Your Next Favorite Floral Bandana Pattern is Free to Try
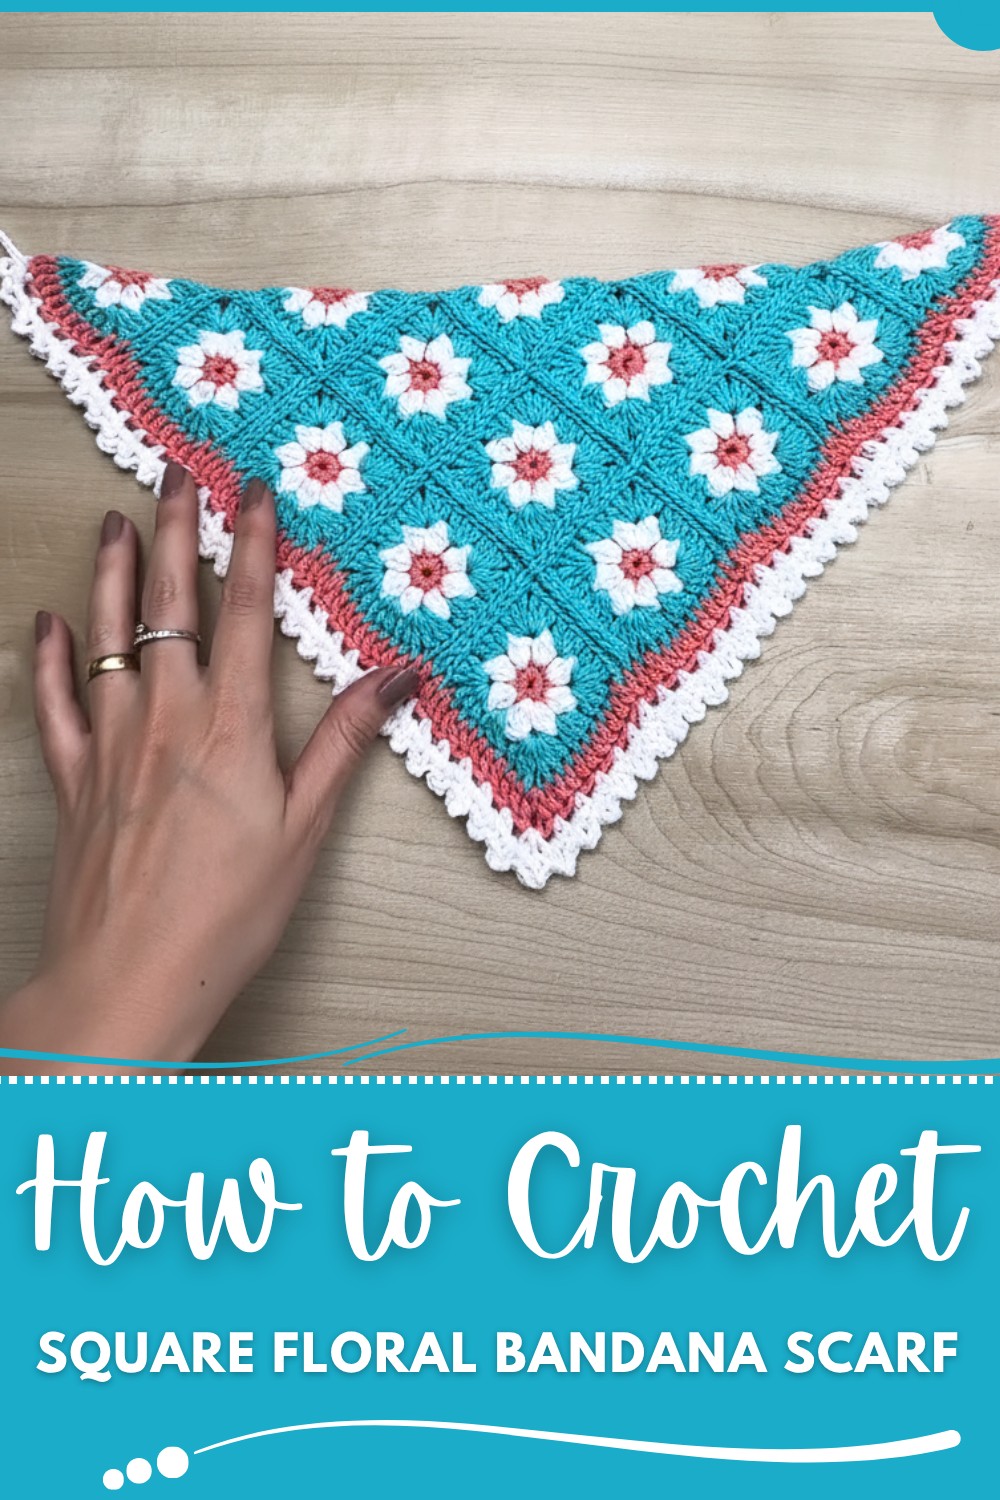
One special benefit is its easy making steps which help beginners learn with confidence and enjoy the process. You can choose soft or bright shades to match your mood and outfit making each piece unique. It also makes a sweet handmade gift filled with care and creativity. Crochet Square Floral Bandana pattern turns simple work into a beautiful accessory that adds comfort style and a gentle handmade touch to everyday life in a calm and happy way.
Granny Square Crochet Bandana Pattern
Materials
- Yarn:
- Cisne Natural Algodomis Cabos (100% cotton), or any DK (light 3) weight cotton.
- Main bandana: Approx. 56 g in total
- Color A: Central color (e.g., salmon pink, “0047”)
- Color B: Main/contrast (e.g., white, “00B”)
- Color C: Outer/contrast (e.g., blue, “00186”)
- Crochet Hook: 3.5 mm (E-4)
- Smaller hook (for finishing): e.g., 2 mm
- Tapestry/Yarn Needle: for weaving/seaming
- Scissors
- Fast-drying fabric glue (optional, for extra security on yarn ends)
- Blocking mat/spray bottle/iron (for finishing—see below)
Key Abbreviations (US Terms)
| Abbreviation | Meaning |
|---|---|
| MR | magic ring |
| ch | chain |
| sc | single crochet |
| hdc | half double crochet |
| dc | double crochet |
| sl st | slip stitch |
| st(s) | stitch(es) |
| sp | space |
| rep | repeat |
| “head” | head of stitch/next st |
| RS/WS | right/wrong side |
Special Notes
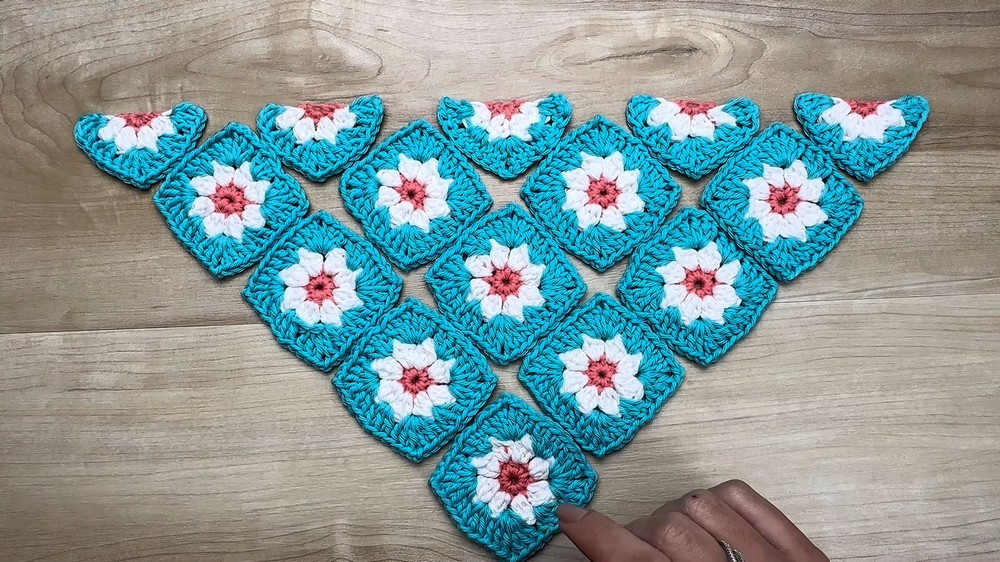
- Finished Size: Approx. 45 cm wide x 23 cm tall (before border/blocking).
- Each full square: Approx. 6 cm side.
- This sample uses 10 full squares and 5 half (pointed) squares.
- You may increase or decrease the number of squares for a larger or smaller scarf/shawl.
- Yarn and square numbers may be adjusted as needed.
Step-By-Step Pattern
1. Full Granny Square
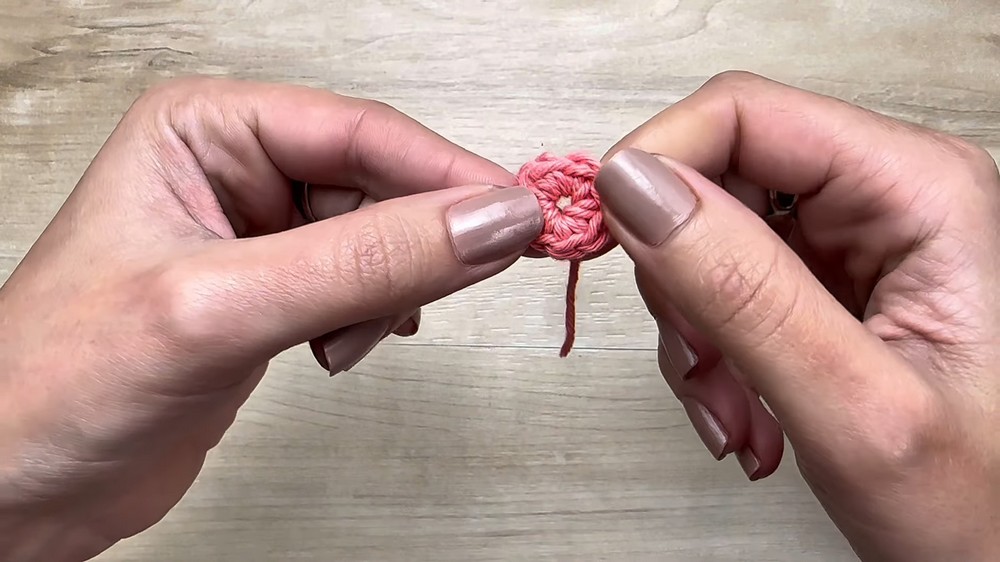
With Color A (center color, e.g., pink):
- MR (Magic ring).
- [Make 8 sc in the ring.] (You will have 8 "heads" of stitches showing—count to confirm.)
- Pull MR to close, but do not close it tightly—a small hole should stay in the center for an airy effect.
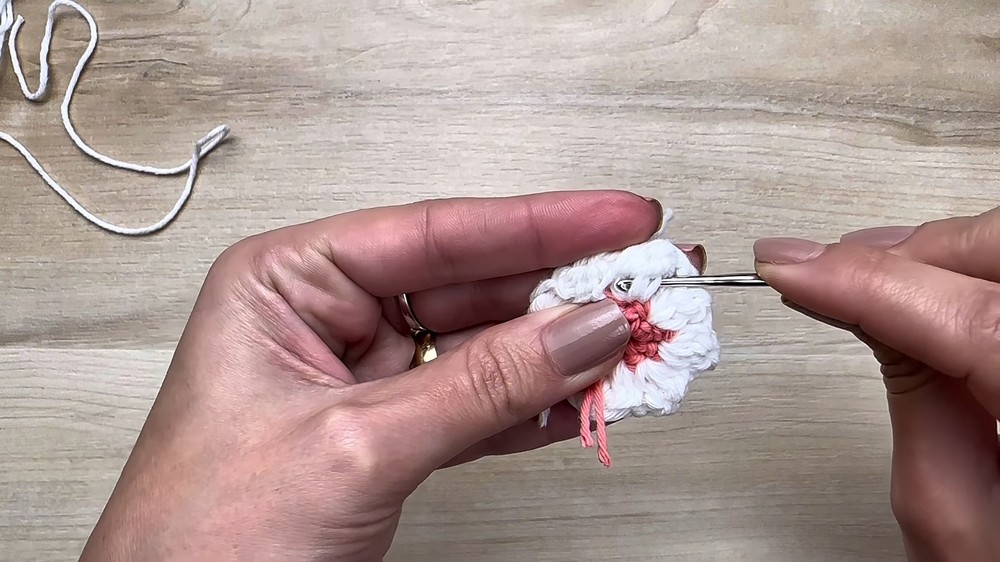
- Break yarn, leaving a tail for finishing.Finishing Seamless Join:
- Thread tail to yarn needle.
- Pass needle under both loops of stitch 2 (“head”), from back to front.
- Bring tail back through the center of last stitch to the back.
- Adjust so join matches the other "head" stitches.
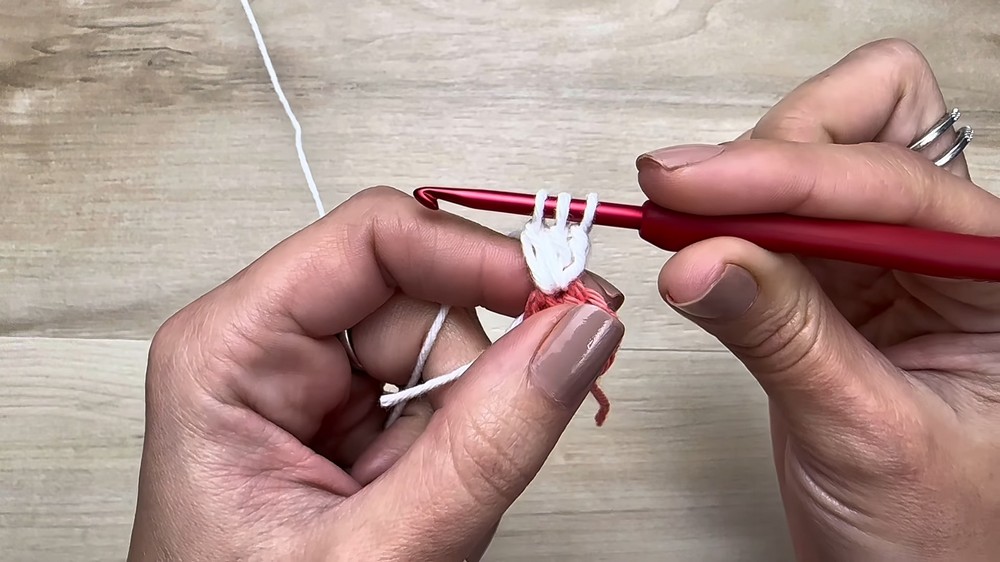
2. Petal Round
With Color B (white):
- Attach yarn in any stitch of the center round.
- (Ch 2, 3-dc cluster in same st: [yo, insert, pull up a loop, yo, draw through 2] repeat 3 times, then yo, pull through all loops on hook], ch 1) = Petal.
- Repeat one petal in each of the 8 sts, each separated by ch 1.
- Break yarn, finish as for center.
3. Square Formation Round
With Color C (e.g., blue):
- Attach yarn in any space between petals.
- (3 dc in first space)
- (In next sp: [3 dc, ch 2, 3 dc]) = First corner.
- Alternate sides and corners:
- Sides: (3 dc in sp)
- Corners: (3 dc, ch 2, 3 dc) in same sp
- Continue around to make 4 corners and 4 sides.
- Join and finish yarn neatly.
Each full square is made!
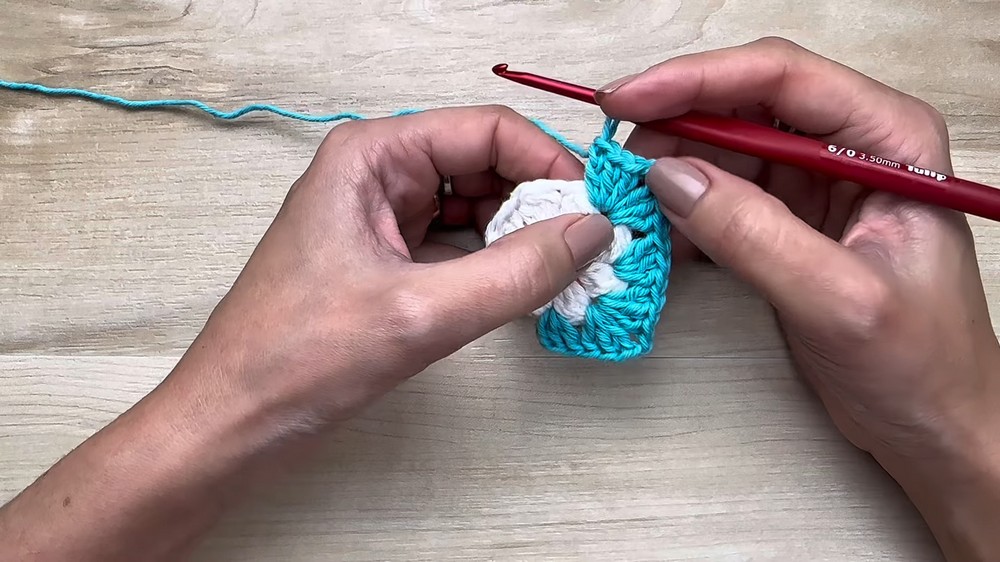
4. Half (Pointed) Square
With Color A (center):
- MR, make 4 sc into the ring.
- Pull tail to gently close (do not close too tightly).[Finish tail as for full square.]
With Color B (petals):
- On each sc:
- (Ch 2, 3-dc cluster in same st, ch 1)
- Repeat on all 4 sc for four petals.
With Color C (edge):
- Attach yarn to side of any petal.
- (3 dc in sp between petals) (work for all 4 spaces)
- (In tip or “corner” sp between two petals: [3 dc, ch 2, 3 dc])
- You’ll have a triangle with a slightly pronounced ‘point’.
5. Arrangement
- Layout:
- First row: 1 full square
- Second: 2 full squares
- Third: 3 full squares
- Fourth: 4 full squares
- Fifth: 5 half-squares (point toward “point” of bandana at bottom)
- Adjust for size as desired.
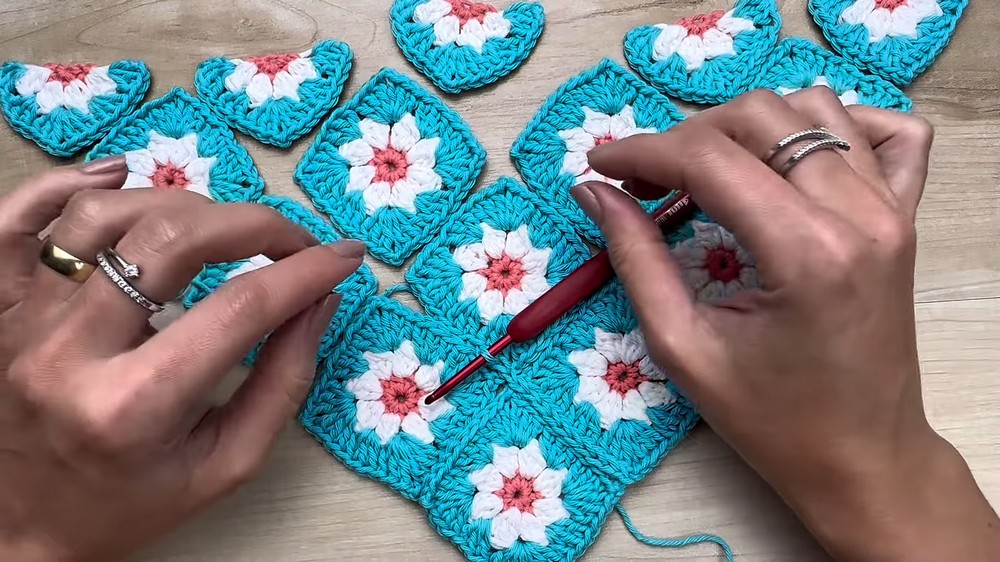
6. Seaming/JOINING
- Prepare all motifs before seaming.
- Place motifs with RS facing up in the correct layout.
- Use outer edge color (e.g., blue), and 3.5 mm hook.
- Join motifs (block by block) with sl st seam through the inside loops of edge sts of both squares:
- Insert hook through back loop only of each adjacent motif’s stitch (“inside V”).
- Work along the edge, sl st through both together, to seam.
- Take care to keep motifs and rows/columns aligned.
- Join all full and half squares according to layout.
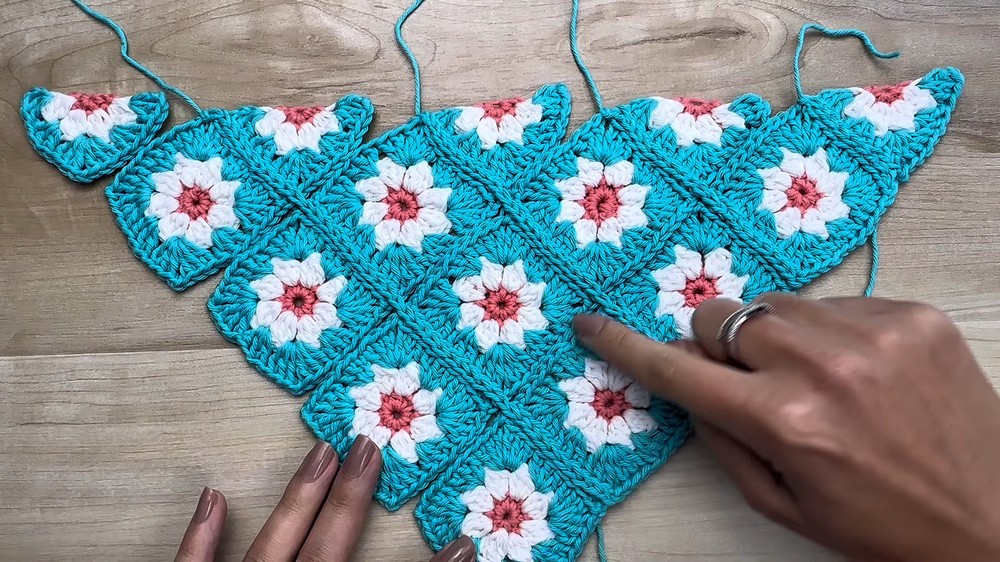
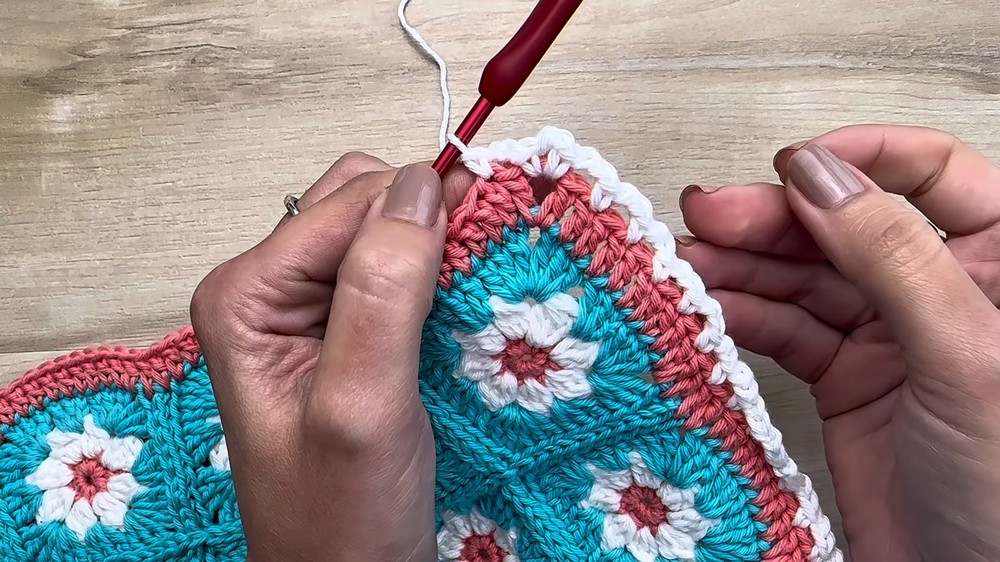
7. Main Border
With Color B (e.g., pink) or as desired:
- Begin at the base of the triangle (not top flat edge).
- (Ch 2, dc) in first available st.
- Dc in each st and into ch spaces across panels *
- At squares’ joins, make 1 dc in the seam between motifs (to keep edge even).
- When reaching corners, (dc, ch 2, dc) in corner sp for neat point.
- For the "peaks" at half-square points, ensure there is a dc in the tip for symmetry.
- Continue border across both slanted sides and point. End at opposite top corner.
8. Lace Edging
With Color A (e.g., white):
- Attach at first dc of border.
- (Ch 2, sk next st, sc in next st), rep to corner.
- At corner: [ch 2, sc in corner sp, ch 2, sc in same sp]
- Continue along entire lower edge.
- Fasten off and weave ends.
Optional:
- Work a second round: (Ch 3, sc in each ch-2 sp) around, sc in sc from prior row, for a scalloped edge.
9. Add Ties
On each upper corner:
- Join Color A or desired color to corner st or chain space.
- Ch 40 (or until tie measures your preferred length—about 20 cm).
- Break yarn, pull end through and tighten.
- Secure with a tiny drop of glue if desired.
- Repeat for opposite corner.
10. Finishing & Blocking
- Weave all ends into motif/within color section.
- Secure with a tiny dot of fabric glue for maximum durability.
- Block finished scarf:
- Mix: 1 part fabric softener : 1 part water : 1 part alcohol in a spray bottle.
- Spray entire scarf until damp, shape to desired dimensions, pin out on a mat or soft board.
- Air dry (shade), or use steam (hovering, not touching) for stubborn curves/edges.
Conclusion
You have created a trendy, delicate, and highly customizable granny square scarf or bandana. This project allows you to practice basic motif techniques, seaming, neat color changes, and finishing methods including blocking for professional results.
Pattern Corrections & Tips
- Correction: Always verify you have 8 (full) or 4 (half) stitches in centers before starting next rounds.
- Tip: Work all motifs before joining for efficient assembly.
- Tip: Block your finished scarf—fabric softener plus alcohol makes cotton extra soft and flexible.
- Tip: Use a matching or contrasting border color for a subtle or bold look.
- Tip: Adjust number of motifs and color order to customize size or create a shawl.