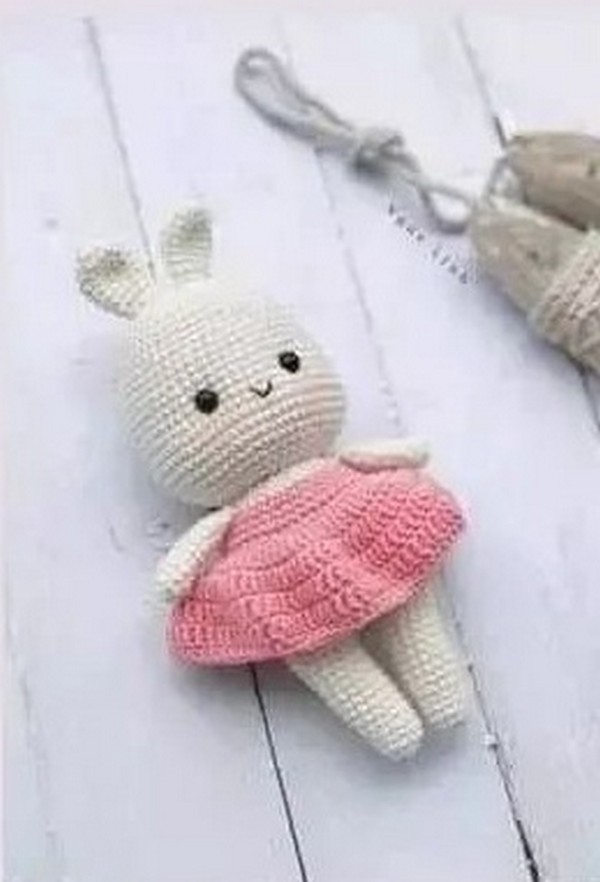
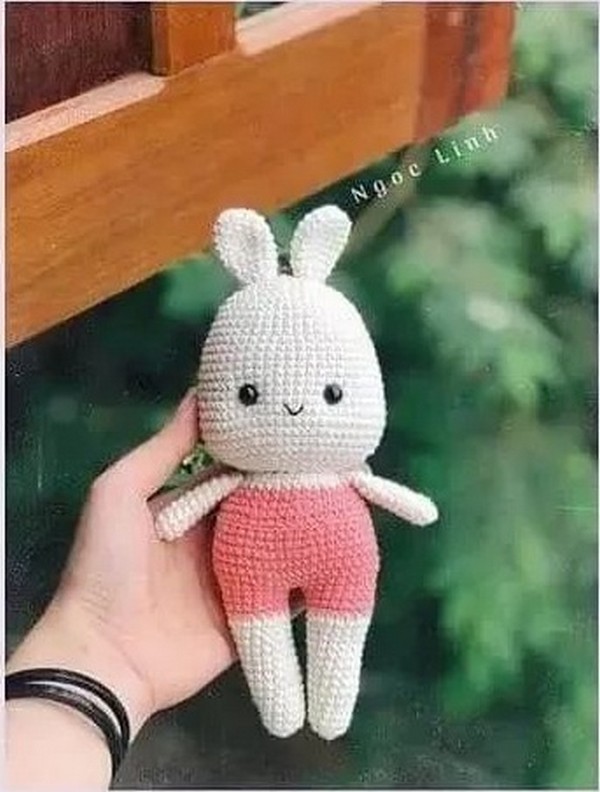
Today, I'm excited to tell you about a fun and easy project for your kids' toy collection. It is called "Crochet Nina The Little Bunny." Nina is a cute bunny you can make with yarn and a crochet hook. She will be a wonderful friend for your kids to play with. Making Nina is not only fun, but it's also a cool activity to try. So, get ready! Here, we'll show you how to make your own Nina the Little Bunny amigurumi step-by-step. It will be great fun, and I can't wait to share it with you.
Crochet Nina The Little Bunny
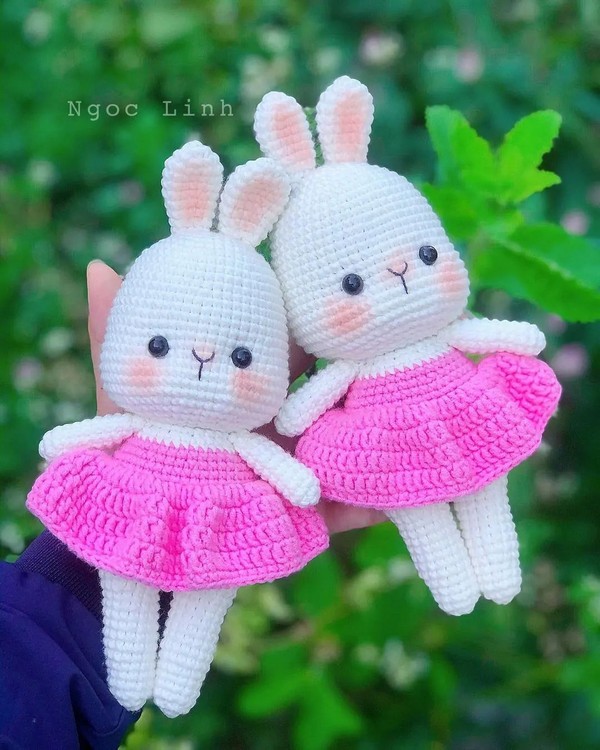
Design and pattern by @ngoc_linh_0805
Nina The Little Bunny
Materials:
- Yarn: Jeans (Yarn Art) color 03 for head & body
- Crochet hook size 2.0mm.
- One pair of black safety eyes size 8mm.
- Fiberfill,
- Stitch maker,
- Scissors,
- Yarn needle Black embroidery thread to make the mouth
Abbreviations:
- MR: magic ring
- ch: chain
- slst(s): slip stitch(s)
- rnd(s): round(s)/rows
- sc: single stitch
- inc: increase (2 single crochet in indicate stitch) dec: decrease (single crochet 2 stitches together)
- BLO: back loop only FLO: front loop only dc: double crochet
- F.o: fasten off
Head:
- Rnd 1: 6sc into MR (6)
- Rnd 2: 6inc (12)
- Rnd 3: (sc, inc) x6 (18)
- Rnd 4: (sc, inc, sc) x6 (24)
- Rnd 5: (3sc, inc) x6 (30)
- Rnd 6: (2sc, inc, 2sc) x6 (36)
- Rnd 8: (3sc, inc, 3sc) x6 (48)
- Rnd 9-11: (3 rnds) 48sc
- Rnd 12: (11sc, inc) x4 (52)
- Rnd 13-15: (3 rnds) 52sc
- Rnd 16: (6sc, inc, 6sc) x4 (56)
- Rnd 17: 56sc
- Rnd 18: 23sc, maker for the first eye, 9sc, maker for the second eye, 24sc
- Rnd 19: 12sc, (2sc, inc) x4, 8sc, (inc, 2sc) x4, 12sc (64)
- Rnd 20-23: (4 rnds) 64sc
- Rnd 24: (3sc, dec, sc) x8 (56)
- Rnd 25: (5sc, dec) x8 (48)
- Rnd 26: (2sc, dec, 2sc) x8 (40)
- Rnd 27: (3sc, dec) x8 (32)
- Rnd 28: (sc, dec, sc) x8 (24)
F.o, leave a long tail for sewing. Stuff the head with fiberfill.
Legs: (make 2)
The first leg:
- Rnd 1: 6sc into MR (6)
- Rnd 2: 6inc (12)
- Rnd 3-5: (3 rnds) 12sc
- Rnd 6: 3sc, (sc, inc) x3, 3sc (15)
- Rnd 7-13: (7 rnds) 15sc
- Rnd 14: 3sc, (sc, inc, sc) x3, 3sc (18)
- Rnd 15-16: 18sc
Change dress's color yarn:
- Rnd 17-18: 18sc, slst. Fasten off.
Make the second leg: repeating rounds 1-18, but do not cut the yarn as we join the legs together to make the body. Stuff both legs firmly.
Body:
- From second leg make a chain of 1 ch.
- Rnd 19: 18sc on next 18 stitches of first leg (start from the slst of first leg), sc on the chain, 18sc on 18 stitches of second leg, sc on the other side of the chain. (38)
Continue working the body:
- Rnd 20: (5sc, inc) x3, sc, (5sc, inc) x3, sc (44)
- Rnd 21: (3sc, inc, 3sc) x3, sc, (3sc, inc, 3sc) x3, sc (50)
- Rnd 22-24: (3 rnds) 50sc
- Rnd 25: sc, (2sc, dec, 2sc) x8, sc (42)
- Rnd 26: 42sc
Change body's color yarn:
- Rnd 27: BLO 42sc
- Rnd 28: 42sc
- Rnd 29: sc, (3sc, dec) x8, sc (34)
- Rnd 30-31: (2 rnds) 34sc Rnd 32: 2sc, (sc, dec) x10, 2sc (24) Rnd 33: 24sc, slst.
Leave a long tail for sewing. Stuff the head with fiberfill.
Ears (make 2):
- Rnd 1: 5sc into MR (5)
- Rnd 2: 5inc (10)
- Rnd 3: (sc, inc) x5 (15)
- Rnd 4-6: (3 rnds) 15sc
- Rnd 7: (3sc, dec) x3 (12)
- Rnd 8-9: (2 rnds) 12sc
- Rnd 10: (sc, dec) x4 (8)
Do not stuff; flatten and fold the top of the ear and sew the 2 opposed stitches. F.o, leave a long tail for sewing.
Dress:
- Rnd 1: At rnd 27 of the body: FLO and 3ch, (dc, 2dc in one stitch). Repeat on (...) more 21 times, slst.
- Rnd 2: 3ch, (2dc, 2dc in one stitch) x21, slst. Have 84 stitches in total.
- Rnd 3-4: (2 rnds) 3ch, 84dc, slst.
- Rnd 5: 1ch, 84sc, slst.
Arm: (make 2)
- Rnd 1: 5sc into MR (5)
- Rnd 2: 5inc (10)
- Rnd 3-5: (3 rnds) 10sc
- Rnd 6: (4sc, inc) x2 (12)
- Rnd 7-10: (4 rnds) 12sc
- Rnd 11: (sc, dec) x4 (8)
Do not stuff; flatten and fold the top of the arm and sew the 2 opposed stitches. F.o, leave a long tail for sewing.