• Skip to primary navigation
  • Skip to main content
  • Skip to primary sidebar
Crochet Patterns logo
  • Home
  • Free Crochet Patterns
    • Amigurumi Patterns
    • Crochet Accessories
    • Crochet Hat Patterns
    • Crochet Bag Patterns
    • Crochet Top Patterns
    • Crochet Cardigan Patterns
    • Crochet Scarf Patterns
    • Crochet Blanket Pattern
    • Crochet Pillows
    • Crochet Shawl Patterns
    • Crochet Sweater Patterns
  • Contact Us
  • About Us
menu icon
go to homepage
search icon
Homepage link
  • Home
  • Free Crochet Patterns
    • Amigurumi Patterns
    • Crochet Accessories
    • Crochet Hat Patterns
    • Crochet Bag Patterns
    • Crochet Top Patterns
    • Crochet Cardigan Patterns
    • Crochet Scarf Patterns
    • Crochet Blanket Pattern
    • Crochet Pillows
    • Crochet Shawl Patterns
    • Crochet Sweater Patterns
  • Contact Us
  • About Us
×

Crochet House Boots Pattern Made From One Granny Square

Step into cozy comfort with these delightful crochet house boots! In this tutorial, creator walks you through crafting these versatile and stylish boots featuring a vibrant granny square pattern. These boots can be worn in two styles – as long boots for extra warmth or as short booties for a casual look. Crafted from colorful yarn scraps and joined with black acrylic yarn, these boots cater to various foot sizes, ensuring a perfect fit. So, make these adorable

Crochet House Boots From One Granny Square Part How To Crochet House Slippers With Easy Pattern Save

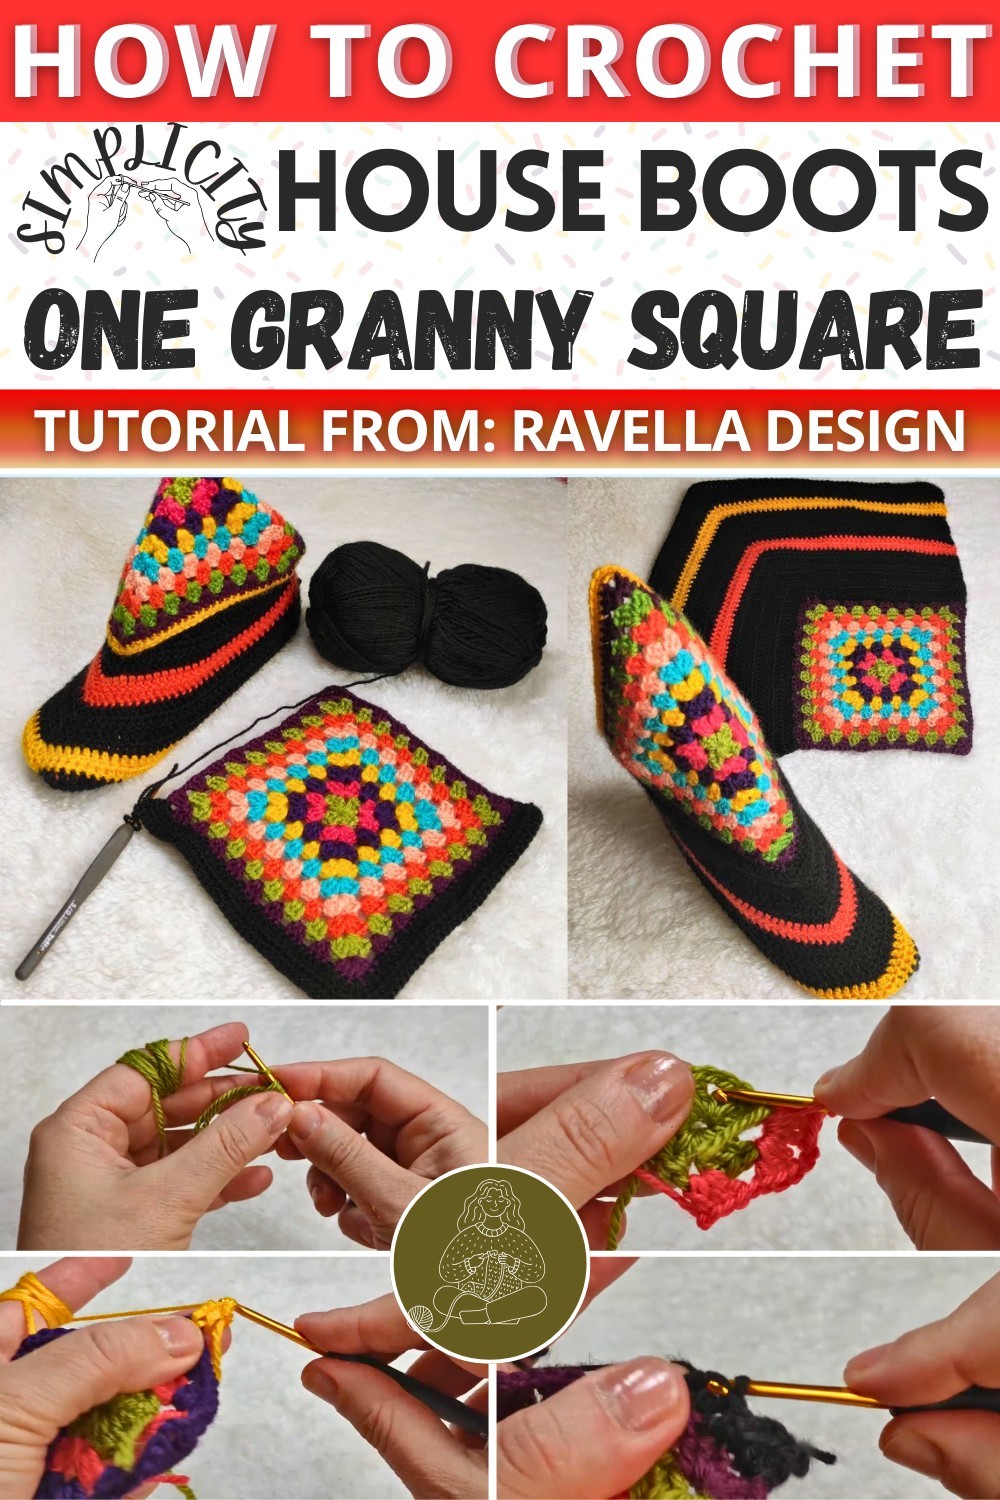
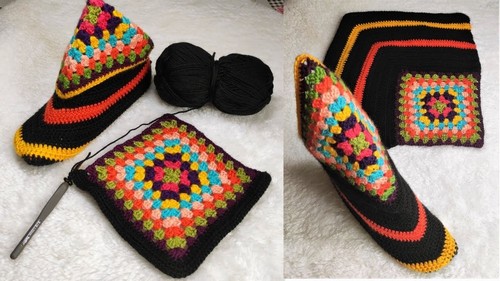
How To Crochet Booties Pattern

Materials Needed:

  • Multiple colors of yarn (acrylic or cotton blend)
  • Black yarn for the boot's main body
  • 3mm crochet hook
  • Darning needle
  • Scissors

Save

Abbreviations:

  • ch: chain
  • dc: double crochet
  • sl st: slip stitch
  • sc: single crochet
  • st: stitch

Step by step Pattern
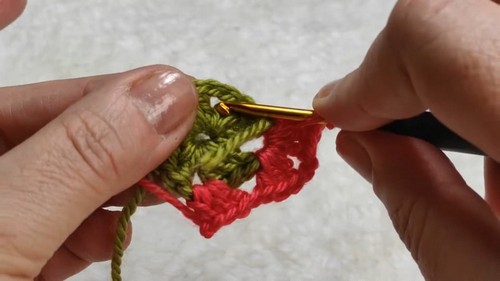
Granny Square:

  1. Center (Green Color)
    1. Start with a magic ring.
    2. Ch 3 (counts as first dc), and make 2 more dc into the ring.
    3. Ch 2.
    4. Make 3 dc into the ring.
    5. Ch 2, repeat step 4 two more times.
    6. Pull the yarn ring tight, sl st into the top of the starting ch 3 to close the round.
    7. Fasten off and change color.
    8. Save
  2. Second Round (Pink Color)
    1. Make a slip knot and join the new color in any corner space.
    2. Ch 3, make 2 dc in the same space.
    3. Ch 1, 3 dc in next space, ch 2, 3 dc in the same space.
    4. Repeat from * to * around.
    5. Ch 1, sl st into the top of the starting ch 3.
    6. Fasten off and change color.
  3. Subsequent Rounds
    1. Repeat the instructions, joining a new color each round, making sure to place 1 ch between dc groups along the sides, and 2 ch in the corner spaces.
    2. Make a total of 9 rounds, ending with the same crochet instructions.
    3. Save

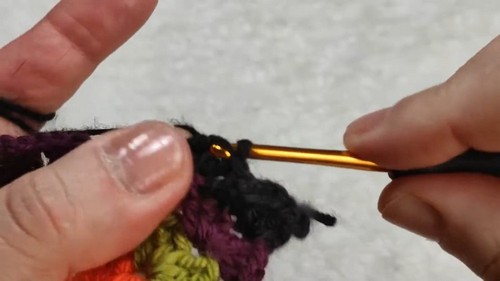
Transition to the Main Part:

  1. Black Yarn
    1. Attach black yarn in any corner.
    2. Ch 3, dc around, placing 3 dc in each corner space.
    3. For every corner stitch of subsequent rows, place 3 dc in the middle dc of the three dc corner stitches from the previous row.
  2. Continue with Black Yarn
    1. Continue the black yarn until you have completed 7 rows, changing the colors as follows:
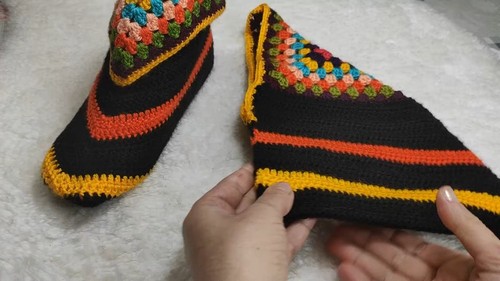
      • 8th-9th Row: Orange
      • 10th-13th Row: Black
      • 14th-15th Row: Yellow
      • 16th-18th Row: Black.
  3. Size Adjusting
    1. Measure continuously, ensuring that 18 rows fit your foot. Adjust by adding more rows as needed.
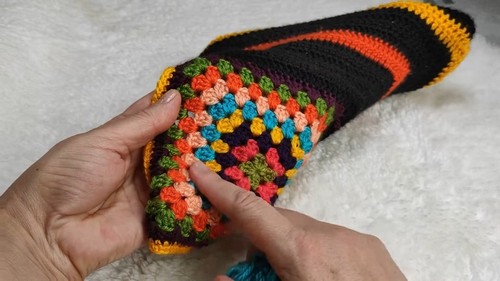
    2. Save

Assembly:

  1. Sew the Bootie
    1. Fold the granny square as shown in the video.
    2. Using black yarn and a darning needle, sew the sides together based on the folding.
    3. Secure the folded toe area with stitches, ensuring the shape of a boot unfolds.
  2. Edging with Single Crochet
    1. Use yellow yarn to create 2 rounds of single crochet around the top edge of the boot.
    2. Ensure to sc evenly ensuring there is no stretching, by making two sts in larger spaces if required.
    3. Save

Final Touch:

  1. Weave in all loose ends with a darning needle.
  2. Trim excess yarn for a cleaner look.

Finished Product:

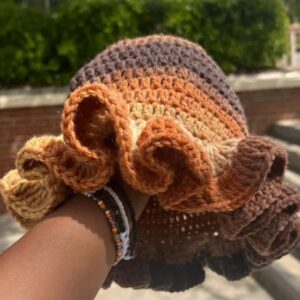
Once all the steps are completed, you should have a beautiful pair of crochet booties that can be worn in two different ways – as short booties or as tall, folded down booties!

Save

Notes:

  • Watch the tension and ensure you are not making stitches too tight or too loose.
  • Always try the bootie on your foot while crocheting to ensure a perfect fit.

Enjoy your new crochet booties!

YouTube

Pin2
2 Shares

More Crochet Accessories

  • How To Crochet Baby Booties Worked Flat - Simple Pattern
  • Crochet Keychain wristlet Tutorial
    Crochet Keychain Wristlet Pattern For Daily Use
  • Bag Handle Crochet
    Upgrade Your Bags with This FREE Crochet Bag Handle Guide
  • How To Make Crochet Headphone Covers For Daily Use

Primary Sidebar

Latest Post

  • 25 Free Crochet Kimono Patterns
    25 Free Crochet Kimono Patterns
  • Crochet Lacy Poncho Patterns
    15 Crochet Lacy Poncho Patterns To Stylize
  • 15 Free Crochet Coat Patterns For Winter
    15 Free Crochet Coat Patterns For Winter
  • 14 Free Crochet Chunky Cardigan Patterns
    19 Free Crochet Chunky Cardigan Patterns

Footer

↑ back to top

About Us

Crochet patterns is an online community where you can find and download the best crochet-free patterns. Learn to crochet or expand your crochet skills with our free crochet tutorials and easy-to-follow step-by-step instructions. Plus, we also provide crochet stitch tutorials so you can learn to crochet or expand your crochet skills

Copyright © 2023 Crochet Patterns

Contact Us | Privacy Policy | About Us