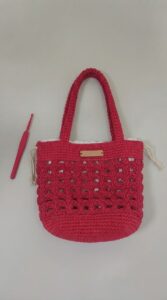
In this tutorial you will learn to crochet a vibrant and functional granny square shoulder bag from scratch. Using colorful nylon yarn and a 3mm hook, you will create eye-catching squares joined seamlessly with a zigzag slip stitch.

The completed bag features 10 colorful squares, with black and white rounds for a striking contrast. Perfect for everyday use or as a handmade gift, this stylish square bag is both practical and trendy, making it a fun project for crochet enthusiasts of all skill levels.
Granny Square Shoulder Bag Pattern
Materials:
- Colorful nylon yarn in size D27 or any yarn of your choice.
- 3 mm crochet hook (Size 5 in Japanese chart).
- Scissors.
- Markers.
- Tape stre needle.
- Optional: Magnetic clip.
Abbreviations:
- ch: Chain
- dc: Double Crochet
- sl st: Slip Stitch
Instructions:
Making the Granny Square
- Magic Circle:
- Start by making a magic circle: Wrap the yarn around your two fingers, place it on top of the other yarn, insert your hook and grab the yarn on the left side, pull it out to the side and twist it. Yarn over on the left side and make chain one.
- Round 1:
- Ch 3 (counts as first dc), then make two additional chains.
- 3 dc into the magic circle. This forms the first side of the square.
- Ch 1 (forms the first corner).
- Pull the magic circle a bit to make it smaller.
- 4 dc into the magic circle. This forms the second side of the square.
- Ch 1 and repeat until you have 4 sides.
- Pull the magic circle tight to close the center.
- Ch 1 for the last corner, remove marker, sl st into the third chain to join the round.
- Pull the yarn and cut it. Melt the end of the nylon yarn to prevent fraying (optional).

- Round 2:
- Start in any corner space. Make a slip knot.
- Ch 3 (counts as first dc) and 1 dc into the same corner space.
- Make dc in between previous round dc’s rather than under "V".
- At each corner: 2 dc, ch 1, 2 dc.
- Join with sl st in the third chain.

- Round 3:
- Repeat Round 2 using a new yarn color, continuing to work dc in every stitch and in between dc stitches from the previous round.
- Work corners as: 2 dc, ch 1, 2 dc.

Repeat until completing 7 rounds, using your desired color order.

Joining the Squares
- Aligning squares:
- Make a slip knot and start by joining two squares corner to corner using zigzag slip stitch.
- Slip stitch in each corner space and the stitches along the side, alternating between squares.
- Complete the join:
- Continue to join all squares (10 pieces needed for this bag). Work 4 main squares for the center and then add additional squares for the sides.
- Joining Separate Panels:
- Fold your larger panel and attach the sides using the zigzag slip stitch method.

Creating the Bag Handles
- Mark handle positions:
- Mark 6-7 stitches from the side on both sides of the bag.
- Handle:
- Attach the yarn at the marked positions, make a slip knot.
- Ch 90 or desired length and sl st at the next marked position (ensuring no twists).
- Repeat for other side.
- Reinforce handles:
- For a more firm handle, slip stitch across black portion of the handle.

Final Touches:
- Slip Stitch Edging:
- To prevent curling, slip stitch across the top portion of the granny squares.
- Magnetic Clip:
- Add magnetic clips if desired, for securing the bag.
Tips:
- Hide all yarn ends using a tapestry needle.
- Adjust the handle length according to your preference.

With the chosen colors and diligent construction, your Granny Square Shoulder Bag will be complete! If you have any questions or encounter difficulties, feel free to ask for further clarification. Happy crocheting!