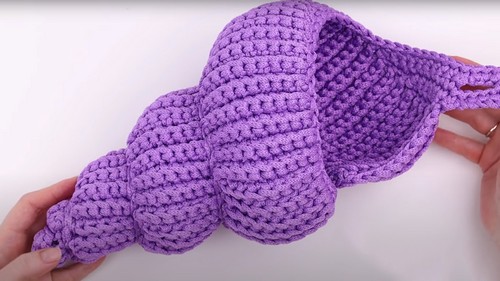
If you're charmed by the beauty of seashells and have a soft spot for crochet, then this giant spiral shell pattern is something you'll adore. This craft project cleverly copies the beautiful shapes of a sea shell. There are countless ways to appreciate this crochet sea shell, such as using it as a decorative piece, stuffing it to make a pillow, or treasuring it as a memento for a marine lover. It could also be a prop in photography, in themes related to sea, summer, or creative projects. So, whether you plan to use this intriguing crochet charm in the ways mentioned above, as a goods container, or as a plant hanger, grab your hook and start creating!
Making Your Crochet Giant Spiral Shell Pattern
Materials Needed:
- 2 skeins of polyester yarn, 5mm width, each skein about 80 meters long (the example uses purple)
- 6mm crochet hook (a 5mm hook can be used for a tighter fabric)
- Stitch marker
Skill Level:
Intermediate to Advanced (familiar with single and double crochets, increases, and decreases)
Step by step Pattern (Summary)
Starting the Shell:
- Start with a slip knot.
- Make 6 single crochets into the loop.
- Join to form a circle.
- Start the first round with 3 chain stitches, and then crochet 6 single crochets and 6 double crochets into the circle. This forms a small cup shape that is the base of your shell.
Creating the Whorls:
- Begin to create the shell whorls in spiral rounds.
- For the first whorl, chain 2, then single crochet into the first chain. Join this row to the cup.
- Turn, make a chain stitch, then work single crochets back and forth, joining each part to the cup with a slip stitch.
- The first section (whorl) involves making 3 single crochets and 1 slip stitch per row, gradually increasing the number of single crochets in later rows as the whorl widens.
Building the Shell:
- Each subsequent whorl increases in size by adding more single crochets per row according to the pattern increment.
- Continue adding whorls, increasing the stitch count as needed for each section, and working in pairs of rows. Use a stitch marker to mark the beginning of new sections.
Joining Rows:
- Employ a joining technique where rows are alternated between joining in the same stitch (for two rows) and the next stitch (for one row), creating a seamless join.
Completing the Shell Body:
- Continue following the pattern, increasing the number of single crochets by 1 for each new section until the desired size of the shell is reached.
Transition to Hook:
- To create the hook part of the shell, transition smoothly from the body by decreasing stitch counts over several rows.
- The hook itself begins by chaining out, then decreasing down to form the hook shape, ending with a loop.
Finishing Touches:
- Once the shell body and hook are complete, work single crochets around the entire edge to smooth and define the shell’s edges.
- Add slip stitches between the rows of each whorl for a detailed finish.
- Cut yarn, pull through last stitch securely, and weave in ends.
Additional Tips:
- Steam iron the hook gently for a neater finish.
- Experiment with different yarn colors and hook sizes for varied shell sizes and textures.

Video Tutorial:
Designer: @annasakhno8539