Meet the adorable Crochet Bee Amigurumi! Make a tiny, soft bee that fits right in the palm of your hand. Crafted with love from colorful threads, this little bee brings a big smile. With its stripey yellow and black body, tiny wings, and a cute smile, it's not just a toy but a bundle of joy.
Crochet Bee Amigurumi

Perfect for hugging or decorating your space, it's a small treasure that buzzes with the warmth of handmade charm. Whether you're a fan of all things cute or looking for the perfect gift, this crochet bee is sure to brighten your day!
Materials Needed:
- Yellow yarn
- Black yarn
- White yarn (for the wings)
- 6 mm crochet hook
- Safety eyes
- Fiber fill (stuffing)
- Stitch marker
- Tapestry needle
Abbreviations:
- MR: Magic Ring
- ch: Chain
- sc: Single Crochet
- inc: Single Crochet Increase (2 single crochets in the same stitch)
- dec: Single Crochet Decrease
- sl st: Slip Stitch
Bee Body and Head:

Row 1:
- Start with a magic ring.
- Chain 2, then make 6 single crochets in the magic ring (6 sc).
Row 2:
- Make 1 increase in each stitch around (12 sc).
For Row 3:
- 1 sc, 1 inc repeat around (18 sc).
Row 4:
- 2 sc, 1 inc repeat around (24 sc).
Row 5:
- Make 1 sc in each stitch around (24 sc).

Color Change:
- Attach black yarn.
- Continue with 1 row of single crochets (24 sc).
- On the last stitch, change back to yellow yarn.
- Make 2 rows of single crochets (24 sc).

Repeat Stripes:
- Repeat the stripe pattern (black, yellow) until Row 10:
- For a classic bee: use black and yellow yarn.
- For a rainbow bee: change to different colors every row.
Row 11:
- 1 row of 24 single crochets (24 sc).
Row 12:
- 2 sc, 1 dec repeat around (18 sc).

For Row 13:
- 1 sc, 1 dec repeat around (12 sc).
Row 14:
- Make 2-3 decreases.
Cut yarn, pull through, and sew the hole closed.
Optional: You can add safety eyes between rows 3 and 4 before finishing the head.
Wings:

Wing 1:
- Start with a magic ring.
- Make 6 single crochets in the magic ring.
- 1 sc, 1 inc repeat around (12 sc).
- 2 sc, 1 inc repeat around (18 sc).
End with a slip stitch, cut the yarn, and leave a long tail for sewing.
Wing 2:
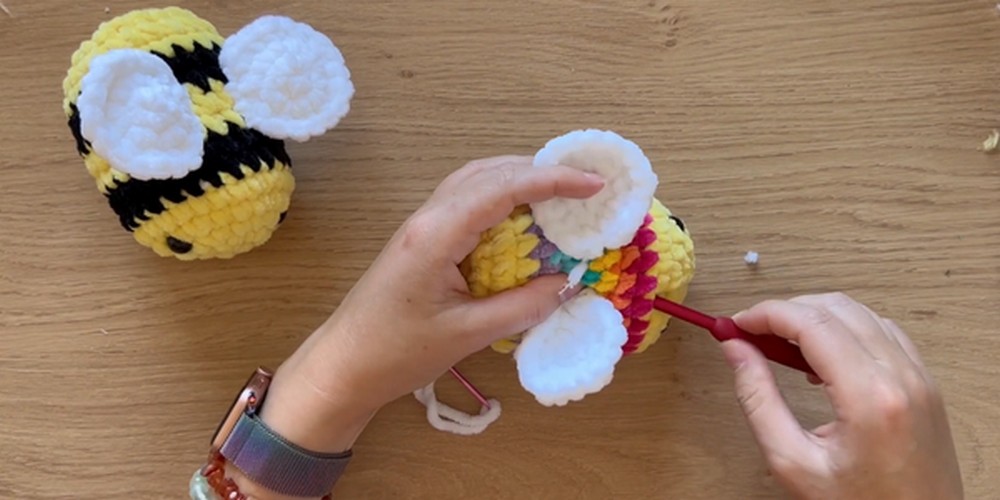
- Repeat the steps for Wing 1.
- Assembly:
Attach the Wings:
- Sew the wings onto the back of the bee, leaving two stitches between them.
- Use the long tail to securely attach each wing.
Details:
- Optionally, use light pink yarn to create small cheeks by stitching simple ovals on either side of the bee's face.
Conclusion:
Your cute little bee is now complete! Enjoy your new amigurumi friend.