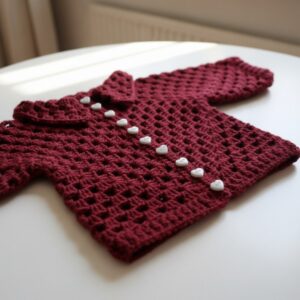
Elevate your wardrobe with this crochet vest for women pattern—simple yet stylish, perfect for layering and adding a personal handmade touch to any outfit!
The perfect blend of style and comfort, crochet vests for women have become a staple in modern wardrobes. Ideal for layering, these lightweight patterns are versatile and add a unique handmade touch to any outfit. Whether paired with a dress for a polished look or worn casually with jeans and a tee, a crochet vest effortlessly elevates your style.
Chic and Comfortable Crochet Vest for Women

This pattern is designed to be user-friendly, making it a great choice for beginners and experienced crocheters alike. Using simple stitches, you can create a vest that fits your personality through your choice of yarn textures and colors. The adaptability of these patterns means you can adjust them to fit perfectly, ensuring comfort alongside style.
Beyond their aesthetic value, crochet vests are practical for all seasons. They add warmth during chilly days yet remain breathable for warmer weather. Plus, they’re an eco-friendly alternative to fast fashion, allowing you to design pieces you’ll cherish for years. Handmade vests also make thoughtful gifts, showcasing care and effort while being fashion-forward. This pattern offers not only satisfaction in completing a project but also the joy of wearing something functional, beautiful, and entirely personal. A crochet vest truly combines practicality with self-expression in the most delightful way.
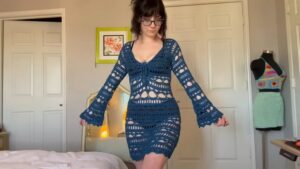
Step-by-Step Overview of the Video: Crochet Cardigan for Women Tutorial
Using the scraped text you provided, here's a summary of the video content, including special features, difficulty level, tutor's suggestions, uses, materials, and tips.
1. Introduction
The video tutorial focuses on making a crochet cardigan designed for women, worked from side-to-side rather than bottom-up. The design allows for adjustable length, but the length must be decided before starting as it cannot be altered later. The cardigan uses a combination of double crochet (DC) and V-stitch techniques for its creation.
- Main Material:
Yarn used is Stitch Studio by Nicole Storybook Lullaby (Robin Egg), with a size 5mm hook instead of the recommended 4mm for added flexibility. - Sizing Advice:
For size small (4-6), 192 chains are used as the starting point, but the number of chains must always be divisible by 3.
2. Step-by-Step Guide to Making the Cardigan
- Base Row:
Begin with a foundation chain (192 for small size); these chains represent the full width of your cardigan. Add double crochets to each chain for the first row.

- Pattern Stitches:
Rows alternate between regular V-stitches (double crochet, chain 1, double crochet) and inverted V-stitches (worked by inserting the hook into both legs of previous V-stitches). - Panel Width Adjustment:
Continue repeating rows, alternating V-stitches and inverted V-stitches, to create the desired panel width. Panels can be wider for off-the-shoulder styles or smaller to stick to shoulder width.

- Back Section:
After completing the front panels, fold the work in half to locate the center. Crochet only halfway across from the center to form the back neckline.
3. Special Features of the Cardigan Pattern
- Seamless Design:
The alternation between right-side and wrong-side rows ensures a clean visual pattern throughout. - Versatility in Style:
The design allows you to make adjustments for neck width, shoulder coverage, and overall fit.

- Add Borders:
Optional rows of double crochet or V-stitches can be added to the borders for increased width and aesthetic design.

4. Materials
- Yarn: Stitch Studio by Nicole Storybook Lullaby (Robin Egg).
→ Approximately 2 skeins for sizes XS–Medium, 3 skeins for Small–Large, and 4 skeins for sizes above Large. - Crochet Hook: 5mm hook for flexibility.
- Other Tools: Stitch markers for locating the center and measuring tape for accurate panel widths and lengths.
5. Tutor’s Suggestions
- Work Smartly: Always complete rows with double crochet or inverted V-stitches to keep the edges neat.
- Border Placement: When adding borders, test the cardigan on for fit after adding one or two rows to avoid unnecessary bulk.
- Customizable Options: For added flair, you can incorporate ties by chaining lengths of yarn to secure the cardigan at different points.
6. Uses of the Cardigan
- Fashion Accessory: Perfect for layering over different outfits, ranging from casual jeans to dresses.
- Seasonal Uses: Lightweight for spring/summer and can be paired with warmer layers for cooler months.
- Gift Option: A thoughtful handmade gift that offers comfort and personalization.
7. Difficulty Level
Intermediate: While beginners can attempt it, familiarity with basic crochet stitches (such as chaining, double crochet, and V-stitches) is recommended. The unique shape and alternating patterns, combined with panel width adjustments, may pose challenges for those new to crochet.
8. Final Tip
Blocking Your Cardigan: After completing your project, block the cardigan (wet it slightly and shape it flat) to ensure the edges are straight and the panels align perfectly. This step enhances the professional, finished look of your cardigan.
This step-by-step interpretation of the scraped video aligns with the tutorial content for making a functional and stylish cardigan while keeping the process straightforward and practical! 🙂