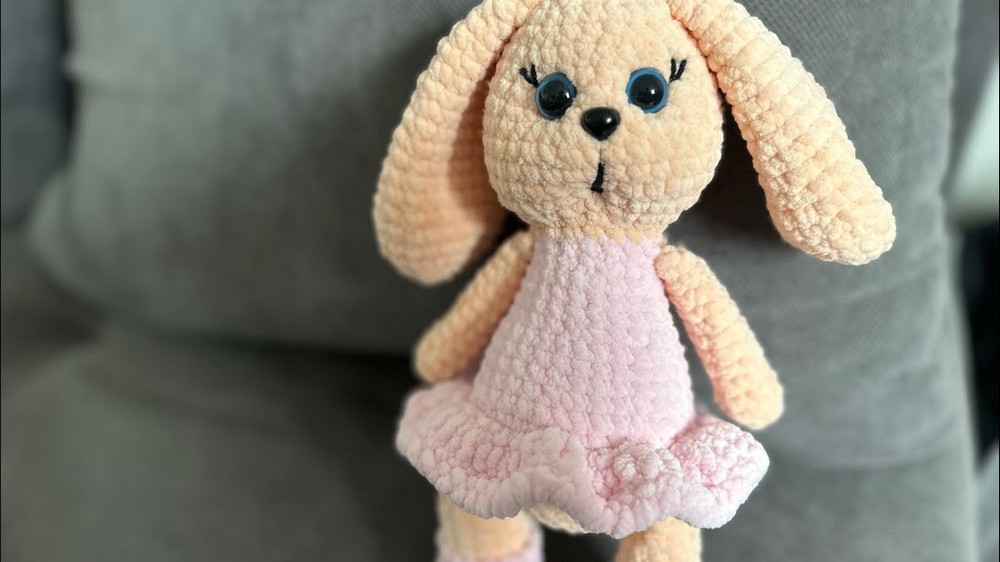
Make a soft, cuddly little bunny, crafted by your own hands with love and care. This Crochet Bunny Amigurumi is a charming, small toy made from yarn, with adorable floppy ears, bright eyes, and a sweet little dress. You can make it in your favorite colors, and each stitch you add brings the bunny to life.
Crochet Bunny Amigurumi

As you hold your crochet hook and work through the pattern, you create not just a toy, but a delightful friend that could bring smiles to anyone who holds it. It's a perfect gift, a gentle companion to hug at night, or a cheerful buddy to sit on your desk. This bunny is more than just stitches and yarn; it's a dash of joy in every loop.
Materials Needed:
- Yarn: Janard Dolce in Peach (color code 773) for the body, and an additional color for the dress (color code 750).
- Hook: Size 4.
- Filler.
- Scissors.
- Needle.

Legs (Make 2):
- Start: Chain 5, in the second chain from the hook, make 3 SC in one stitch, then 2 SC, 3 SC in the next, 2 SC on the other side, and finish with 2 SC.

- Row 2: 3 increases, 2 SC, 3 increases, 2 SC.
- Row 3: (1 SC, 1 increase) repeat 3 times, 2 SC, repeat (1 SC, 1 increase) two times, finish with 2 SC repeated three times.
- Repeat the above sequence for 3 more rows with 22 stitches each, then start decreases as follows: 3 decreases in a row, 2 SC, (1 SC, 1 decrease) repeat 3 times.

- Change the color to the body color at the back of the feet for less visibility. Crochet 12 SC all around with the new color.
Body:

Start with the Head: Create a magic circle and follow increases until you reach 36 stitches.
- Integrate Legs: Sew or crochet the legs to the body, making sure they face outward correctly.
- Creating the Body: After attaching the legs, crochet in rounds, focusing on decreases to shape the body. Incorporate the arms by crocheting them directly into the body, ensuring they align with the legs.
- Finish the Head: Continue with head shaping by making a series of decreases by row.

Facial Details: Use a black yarn for facial features. The eyes are positioned between rows 7 and 8, approximately three stitches apart. Embroider the nose between the eyes and add any desired facial expressions.
Hands (Make 2):

- Chain 2, 4 SC in the second chain from the hook.
- Make 4 increases, then crochet 10 rounds with 8 stitches each.
- Flatten and sew or crochet the opening to close.
Ears (Make 2):

- Chain 2, then 6 SC in the second chain from the hook.
- Follow an increase pattern until you have 24 stitches. After reaching 24 stitches, crochet 2 rows without increases.
- Begin gradual decreases to shape the ear, interspersed with rows without decrease to elongate the ear.
- Once you reach the desired length, fold in half and crochet the edges together.
Dress:

- Pick up stitches around the bunny's waistline with your dress color yarn.
- Start with a row of increases, then continue with several rows of double crochet (DC).
- To add flare to the dress, you can alternate between rows of DC and increases.
- Finish the hem with a special stitch or a simple SC border for a frilly look.
Final Assembly:
- Sew/crochet ears to the top of the head.
- Make sure all limbs and the head are securely attached.
- Use filler to shape the bunny as you go, especially before closing each part.
- Add any additional accessories or features as desired (e.g., a tail, a bow).
Notes:
- Keep filling relatively firm to maintain the bunny's shape but avoid overstuffing.
- Adjust stitch counts as needed for symmetry and overall appearance.
- Safety eyes or embroidered eyes can be used based on the intended recipient.