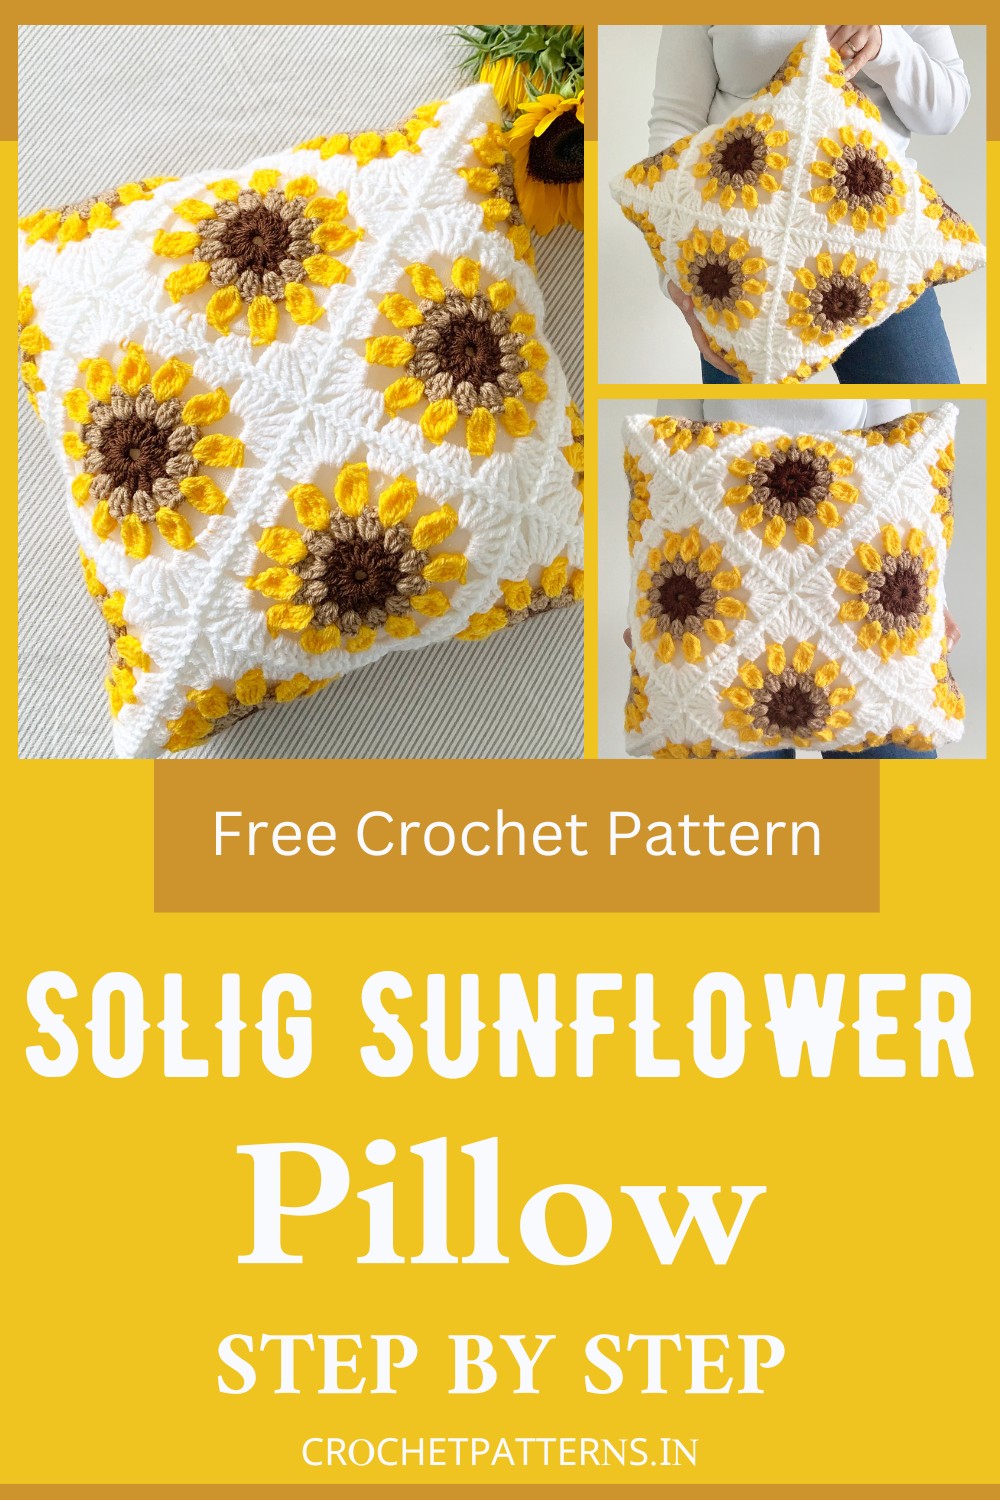
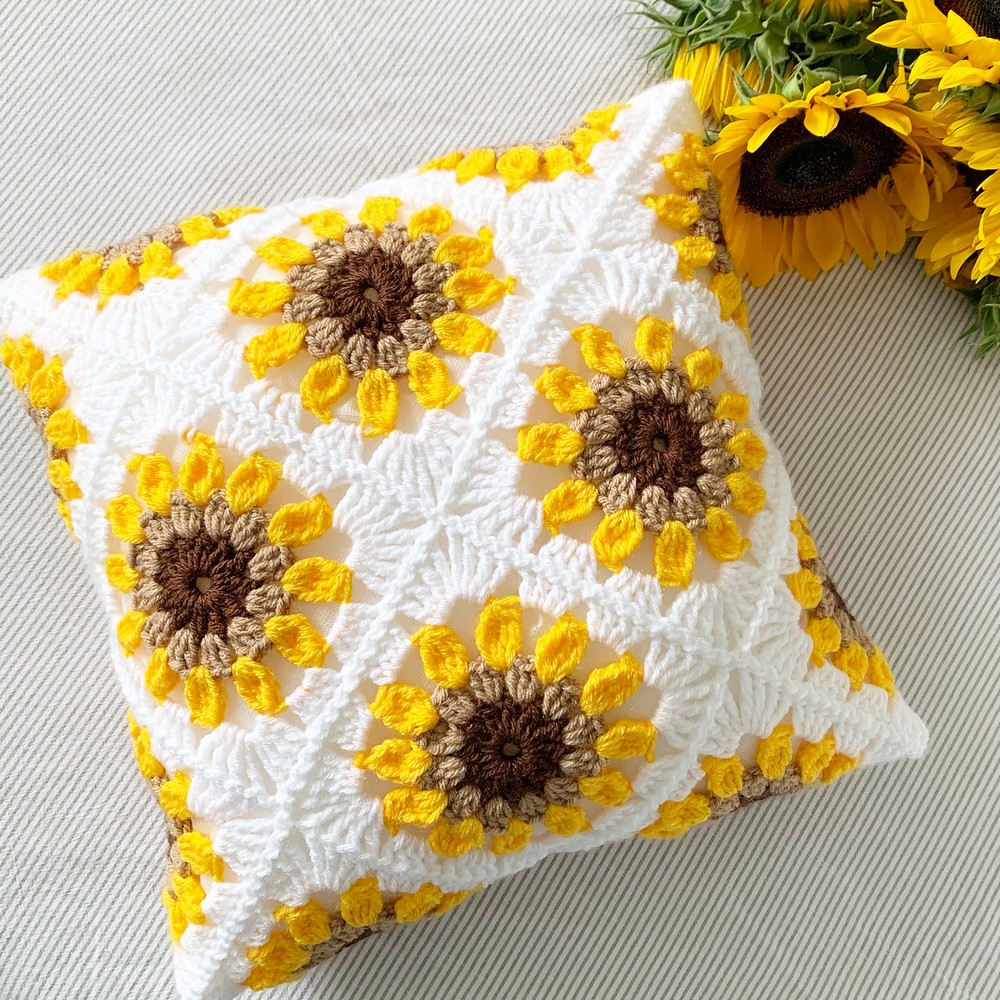
Sunflowers are like little suns on Earth, brightening up any place with their cheerful yellow petals. Imagine you could bring not just one but a whole bunch of these sunny flowers into your home, without even needing a vase. The Solig Sunflower Pillow gives you just that. This free crochet pattern allows you to create a pillow full of sunny blooms that will lighten up any room, no matter the time of year. Designed for beginners and experienced crocheters alike, this crochet pillow pattern uses simple supplies like a crochet hook, yarn in sunny colors, and a regular pillow insert to create a cozy piece of home decor. With clear instructions and helpful tips, you’ll enjoy bringing each sunflower to life, making your space feel like a sunny garden.
Solig Sunflower Pillow
Making Your Solig Sunflower Pillow
Notions
- US 5.00 mm (size H) crochet hook
- Needle for weaving in ends
- Scissors
- 16”x 16” washable pillow form (insert)
Yarn
- WeCrochet (or Knit Picks) Brava Worsted (218yds/100g):
- Colour A: White (168yds/77g)
- Colour B: Canary (155yds/71g)
- Colour C: Almond (77yds/35g)
- Colour D: Sienna (66yds/30g)
Gauge
- 4 rnd sunflower square= 4.75” square
Finished Size
- 16”x 16” pillow
Glossary (using US Crochet Terminology)
- st(s)- stitch(es)
- ch- chain
- ch-sp- chain space
- sl st- slip stitch
- YO- yarn over
- SC- single crochet
- DC- double crochet
- tr- treble crochet
- cl st(s)- cluster stitch(es)
- 2 DC cl – 2 double crochet cluster stitch
- 4 tr cl- 4 treble cluster stitch
- 5 tr cl- 5 treble cluster stitch
- CJAYG- continuous join as you go
- DC shell- a group of DC stitches
Step by step Pattern
Solig Sunflower Granny Square Pattern
Materials Needed:
- Yarn in Colour D (Yellow for the Sunflower Centre), Colour C (Brown for the Middle Round), Colour B (Green for the Petal Base), and Colour A (Any color of your choice for the Square's Frame).
- Crochet Hook (size recommended for your yarn)
- Scissors
- Yarn Needle
Granny Square Pattern:
Make 16 Sunflower Centres
Rnd 1:
- With Colour D, chain (ch) 5.
- Slip stitch (sl st) into the 5th chain from the hook to create a center ring.
- Ch 2 (counts as first cluster stitch [cl st]).
- 1 Double Crochet (DC) into the center ring, ch 1.
- Work eleven 2 DC cluster stitches (cl sts) into the center of the ring.
- Join with sl st to the ch-1 space (sp) between the first and second cluster stitches.
- Fasten off.
Rnd 2:
- Join Colour C, ch 2.
- Work 2 DC into the same space as joining.
- Work 3 DC into every chain-1 space around (36 DC stitches).
- Join round with slip stitch into the top of the first DC.
- Fasten off.
For Rnd 3:
- Join Colour B in between any two DC shells, chain 3.
- In the same space, work a [4 treble crochet cluster (4 tr cl), chain 3].
- Work a [5 treble crochet cluster (5 tr cl), chain 3] into each space between DC shells around (12 cluster stitches in total).
- Slip stitch into the chain-3 space to join.
- Fasten off.
Rnd 4:
Note: Only complete this round if you do NOT plan on using the "join as you go" (CJAYG) method.
- Join Colour A into any chain-3 space, ch 3.
- Into the same space, work [3 treble crochet (tr), chain 2, 4 treble crochet] to form the first corner.
- Work 4 double crochet into the next chain-3 space, and repeat once more.
- Work [4 treble crochet, chain 2, 4 treble crochet] into the next chain-3 space to form the next corner.
- Repeat from * to * around, and join the round with a slip stitch into the top of the first treble crochet.
- Fasten off.
Assembling Pillow Panel (CJAYG Method):
- Use Colour A for joining squares.
- Begin at the top right-hand corner, joining squares across the rows. (For example, the first row is joined from square number 4 across to square 1, and so on.)
- Follow the pattern instructions from Round 4 for joining (optionally follow along with a video tutorial for visual guidance).
- Once all squares are joined to form the panel, fasten off and weave in all ends. The final pillow panel measures 19”x19”.
Finishing the Pillow:
- Lay the pillow cover with the wrong side facing up.
- Fold the corners of the pillow cover into the center and seam together using a zig-zag slip stitch.
- On the final seam, leave room to stuff your pillow into the cover before fully seaming it shut.
- Fasten off and weave in all ends.