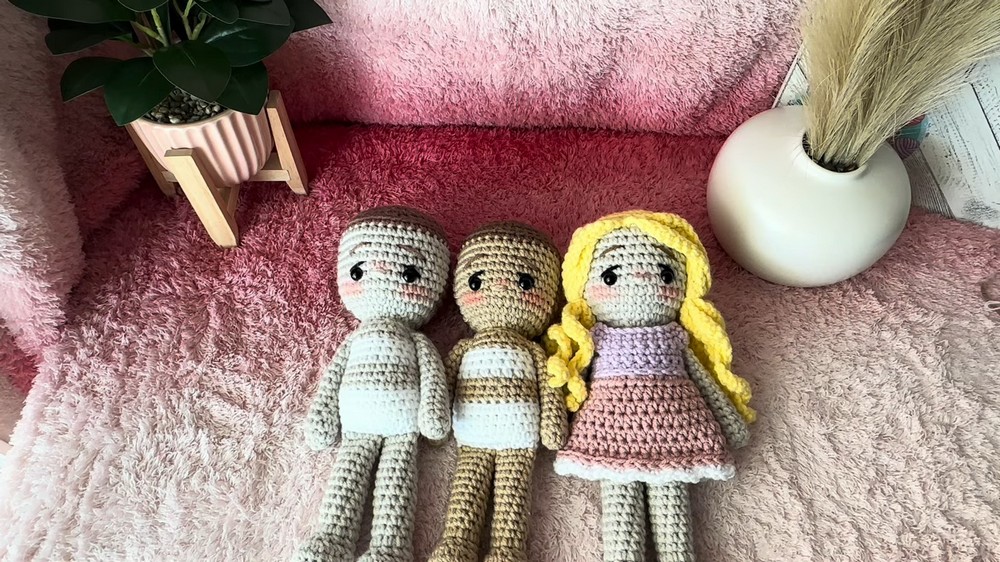
In this delightful Crochet Basic Doll Tutorial, you get to learn how to make an adorable crochet doll, step by step. From turning soft yarn into cozy arms and legs, to crafting a cute doll face that seems to smile back at you, every stitch brings you closer to bringing your own little friend to life.
Crochet A Basic Doll

Whether you're a crochet pro or picking up a hook for the first time, this guide walks you through each part with such ease, it's like magic! With each colorful yarn you choose, you get to add a piece of your personality into the doll, making it a unique treasure or a heartwarming gift for someone special.
Materials Needed
- 4 mm crochet hook
- Stitch marker
- Tapestry needle
- Polyfill for stuffing
- 10 mm safety eyes
- Four main colors of yarn: skin tone, garment color, hair color, black (for eye detail)

- Optional: blush and applicator
Arms Pattern (Make 2)

Round 1: Start with a magic circle, work 6 single crochets (sc) into the circle. Alternative: chain 3 and join, then work 6 sc into the circle.
- Round 2: Work 2 sc, then an increase into the third stitch. Repeat once more. Finish round with 8 sc.
- Round 3: Work 1 sc into each stitch all the way around, totaling 8 sc.
- Round 4: Work 6 sc, then a decrease over the last two stitches, finishing the round with a total of 7 sc.

- Round 5: Work 5 sc, then a decrease, ending with 6 stitches.
- Rounds 6-14: Work 1 sc into each stitch all the way around for each round, maintaining 6 sc per round, for a total of 10 rounds. Stuff the arm progressively as you work up to about three-quarters of its length.

To close the arm, work through both layers of the last row with 3 sc to flatten the arm. Leave a long tail for attaching to the body and secure the end by weaving it back through the arm.
Leg Pattern (Make 2)

- Round 1: Begin with a magic circle. Work 6 sc into the circle.
- Round 2: Work an increase in each stitch around, ending with 12 sc.
- Round 3: 1 sc, then 1 increase repeat around, finishing with 18 sc.
- Round 4: Work 1 sc in the back loop only of each stitch around, maintaining 18 sc.

- Round 5: 3 sc, then 6 sc decreases (work these decreases in the front loop only), followed by 1 sc in the last three stitches, ending with 12 stitches.
- Round 6: 3 sc, then 3 sc decreases, finish with 1 sc in the last three stitches, resulting in a formed foot.

After foot creation: Stuff the foot lightly, then perform a round of slip stitches around the opening to tighten and shape the ankle, but this round doesn't count towards the overall stitch count.
- Round 7+: Continue as per the provided instructions, working up the leg and decreasing as instructed to shape the leg and prepare for attachment to the doll's body.