Ready to give your home a cozy autumn update? Let's make a charming crochet pumpkin pillow with our straightforward patterns. This project is great for anyone eager to add a personal, warm touch to their space this fall.
Crochet Pumpkin Pillow

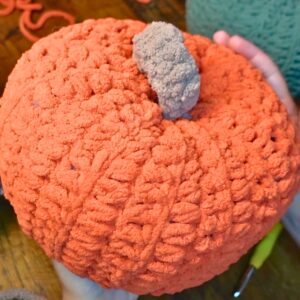
Make a cozy pillow shaped like a pumpkin, created through the art of crochet. It's soft, inviting, and adds a touch of autumn warmth to any room. Whether you're snuggling up with a book or adding a festive decoration, this pumpkin pillow is the perfect addition to your home as the leaves start to turn. Its unique, handcrafted look brings a special charm to wherever it's placed.
Supplies
- Yarn: Bernat Baby Blanket from Yarnspiration in "Orange Leaf" and "Mushroom" (for stem)
- Crochet Hook: 8 mm
- Darning Needle: With a thick eye hole for the thick yarn
- Stuffing: Polyfill or any filling of choice (e.g., ripped pillow, paper towels, tissue paper)
Abbreviations
- ch: chain
- hdc: half double crochet
- sc: single crochet
- yo: yarn over
Steps:

Step 1: Create The Pumpkin Body
Chain Foundation:
- Start with a slip knot.
- Chain 25 (Ch 25). Make sure the chains are not too tight.
Half Double Crochet Rows:
- Row 1: Skip the first stitch, yarn over (yo) and go into the second chain, yo again and pull through (3 loops on the hook), yo and pull through all three loops. Repeat for the entire row.
- Row 2: Ch 2 at the end and turn the project. Hdc into the back loop only of each stitch across.
Continue Rows:
- Repeat the pattern until you have 13 ridges on both sides of the project. (Ch 2, hdc across the row into the back loop only, then turn the project)
Step 2: Assemble The Pumpkin

Finish Off:
- With the final loop remaining on the hook, yo and pull through to create a knot. Trim a long tail for sewing.
Seam and Form:
- Fold the piece in half with the sides that will be the outside facing each other.
- Sew along the side with the darning needle.
- Once one side is sewn, weave the needle in and out along the top, then pull it tight to close like a drawstring.
Stuff the Pumpkin:
- Turn the project inside out so the sewn seam is now on the inside.
- Fill the pumpkin with stuffing.
Close the Top:
- Weave the needle in and out along the top, pull it tight to close, and ensure it’s secure.
Step 3: Shape the Pumpkin

Create Pumpkin Ridges:
- Use the remaining yarn on the needle.
- Push the needle from the top center down to the bottom center.
- Pull tight to create the indent, creating pumpkin ridges.
- Work around the entire pumpkin from top to bottom multiple times to create the desired pumpkin shape.
- Secure and trim any excess yarn.
Step 4: Create and Attach the Stem

Stem Foundation:
- Start with a slip knot.
- Chain 8 (Ch 8).

Single Crochet Rows:
Row 1:
- Sc in the second chain from the hook and in each chain across.
- Finish off by yarning over one more time and pulling through.

Attach Stem:
- Decide which part of the stem looks best as the top.
- Use the tails of the stem to tie it to the top of the pumpkin securely through the center.
- Hide the ends of the yarn into the pumpkin body.

Final Product
Enjoy your super chunky, cozy, beginner-friendly pumpkin pillow!