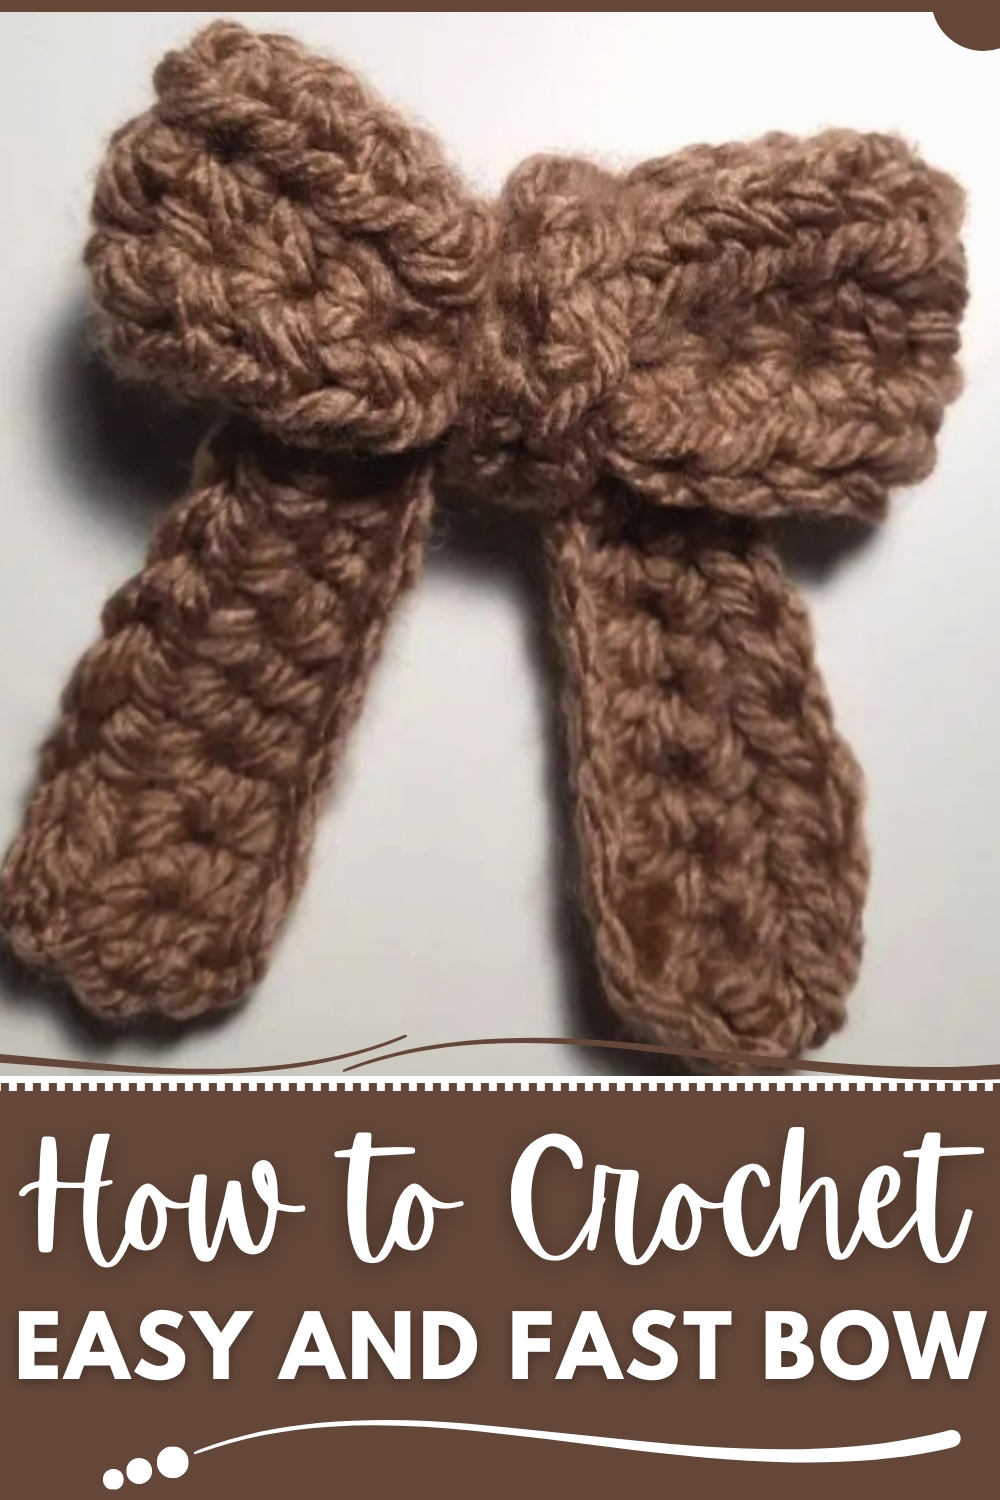
Twist playful charm into this Free Crochet Bow Pattern as a cute handmade accent perfect for hair accessories décor and charming gift embellishments
Accessories have long been used to add charm, personality, and finishing touches to everyday items, from clothing to home décor. The Free Crochet Bow pattern captures this timeless appeal, offering a simple yet versatile project that enhances a variety of objects with elegance and charm. The instructions guide through forming a neat, symmetrical bow, cinching the center, and securing edges to create a polished, structured piece. Lightweight and flexible, the finished bow can be attached to hair clips, headbands, hats, bags, or even used as decorative accents on gift wraps and home textiles.
Whimsical Crochet Bow Pattern that Brings Joyful Detail
Its subtle texture adds a handcrafted touch, while the compact form ensures it complements items without overwhelming them. Beyond its aesthetic value, the bow provides practical versatility, making it a reusable embellishment that can adapt to different occasions, outfits, or settings. Ideal as a thoughtful handmade gift or a personalized accessory, it offers both beauty and functionality.
Each completed piece reflects careful attention to detail, enhancing the items it adorns with a touch of elegance and playfulness. This simple project transforms ordinary objects into charming statements, demonstrating how a small crochet element can provide lasting visual appeal and a delightful sense of handcrafted artistry.

Materials Needed
Before you begin, gather the following materials:
- Yarn: 4 mm weight yarn (you can choose any color based on your preference).
- Crochet Hook: A 5 mm hook is recommended.
- Needle: For stitching parts together and weaving in yarn ends.
- Scissors: For cutting yarn neatly.
Step-by-Step Instructions
1. Creating Part One of the Bow
This part forms the first half of the bow's structure.
a) Foundation Row
- Start with a slip knot and chain 21 stitches.
- Begin working half double crochet (HDC) into the second chain from the hook.
- Continue working HDC into the next 8 chains (total: 9 HDC stitches).
b) Adding Slip Stitches

- Next, make 2 slip stitches in the following two chains.
c) Finishing the Row
- Return to HDC and crochet 9 more stitches till the end of the row.
d) Repeat for Rows 2 and 3
- Chain 1 and turn your work.
- Repeat the pattern:
- 9 HDC stitches, 2 slip stitches, and 9 HDC stitches.
- After completing these rows, chain 1 and cut the yarn.

2. Creating Part Two of the Bow
This part forms the other half of the bow.
a) Foundation Row
- Start with a slip knot and chain 19 stitches.
- Begin working half double crochet (HDC) into the second chain from the hook.
- Continue working HDC into the next 7 chains (total: 8 HDC stitches).
b) Adding Slip Stitches
- Next, make 2 slip stitches in the following two chains.
c) Finishing the Row
- Return to HDC and crochet 8 more stitches till the end of the row.

d) Repeat for Rows 2 and 3
- Chain 1 and turn your work.
- Repeat the pattern:
- 8 HDC stitches, 2 slip stitches, and 8 HDC stitches.
3. Joining the Two Parts
- To join the two parts, take both finished pieces and align them.
- Use the needle and yarn ends to stitch the two sides together tightly.
- Tie knots with the yarn ends to secure the structure.
4. Crocheting the Center
This will create the band that ties the bow together.
a) Foundation Row
- Start with a slip knot and chain approximately 10 stitches. The length required depends on the size of your bow.
b) Single Crochets
- Work single crochet (SC) into each stitch of the chain.
c) Additional Rows
- For additional thickness, repeat 2 more rows of SC:
- Chain 1, turn your work, and continue single crocheting in each stitch.
5. Final Assembly
- Wrap the center piece around both halves of the bow to bring the structure together.
- Use the yarn ends or a needle to stitch the center securely.
- Hide the yarn ends inside the center band or the bow using the needle to create a neat finish.
- Trim any excess yarn with scissors.

Special Features
- Elegant Design: This bow is simple yet stylish, and it can be used for various purposes like decorations, accessories, or gift wrapping.
- Customizable Size: The bow can be adjusted by increasing or decreasing the number of foundation chains.
- Quick Project: The repetitive pattern of half double crochets and slip stitches makes this project fast and easy to complete.
Level of Difficulty
- Beginner-Friendly: This project uses basic crochet stitches (HDC, SC, and slip stitch), making it ideal for beginners. Intermediate crocheters can also enjoy experimenting with variations in size or color.
Tutor’s Suggestions
- Experiment with Yarn Types: While 4 mm yarn is used in the video, using thicker or thinner yarn can create bows of different textures and sizes.
- Test Different Colors: Use contrasting or complementary colors for the bow’s halves and center for a unique look.
- Practice Slip Stitches: Keep slip stitches tight yet smooth to maintain the bow’s structure.
Uses and Applications
- Gift Decorations: Use the bow to adorn wrapped gifts or gift bags.
- Hair Accessories: Attach the bow to clips or hairbands for a cute fashion statement.
- Clothing Detail: Add bows to sweaters, scarves, or crochet hats as embellishments.
- Home Décor: Use bows in household decorations, such as garlands and wreaths.
Tip
When stitching the bow together at the end, ensure your knots are tight and secure for a sturdy structure. Use the needle to hide yarn ends cleanly inside the center piece or bow layers to enhance its overall appearance.
Conclusion
Crocheting a simple bow is a quick, fun, and rewarding project perfect for beginner and intermediate crocheters alike. Whether you’re creating stylish accessories, unique decorations, or handmade gift toppers, this bow can be personalized to match any occasion. With its straightforward design and useful application, it’s the perfect little project to add to your crochet repertoire.