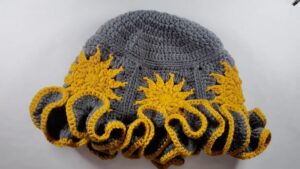
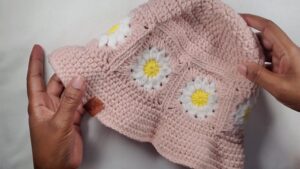
Creating your very own stylish floppy hat with just yarn and a crochet hook. This fun project lets you play with colors, turning simple yarn into a beautiful accessory that's perfect for sunny days. You start with a loop and watch as your creation grows, round by round, into a lovely hat with a wide brim that dances in the breeze.
Crochet Floppy Hat

It's not just about making something to wear; it's about bringing your own unique touch to what you create. Whether you're out for a day at the beach or just strolling through the park, your handmade crochet floppy hat is the perfect companion, adding a splash of personality and shade to your day.
Materials Needed:
- Multicolored yarn (Wine color will be the base)
- Crochet hook size 4.5mm
- Scissors
- Tapestry needle (for weaving in ends)
- Measurement tape

Pattern Steps:

Starting With Magic Ring:
- Create a magic ring.
- Chain 2 (this does not count as a stitch).
- Make 12 double crochets (DC) into the magic ring.
- Close the ring tightly by pulling the end.
- Slip stitch (SL ST) to the first DC to close the round.
Round 2 (Color Change to Brown):
- Chain 3 (counts as the first DC).
- Make another DC in the same stitch.
- Make 2 DC in each stitch around.
- You will have 24 DCs at the end of this round.
- SL ST to the top of the starting chain to close the round.

Round 3 (Granny Stitch Starts):
- Attach a new color (specified as lilac in the text).
- Chain 3 (counting as 1 DC) and then add 2 more DC in the same space to complete a granny stitch cluster.
- Skip 2 stitches, then in the next space between the previous round's stitches, make another granny stitch cluster (3 DC).
- Repeat around and SL ST to close the round.

Subsequent Rounds (Continuing with Granny Stitch and Increasing):
- Continue to follow the pattern, increasing the number of granny stitch clusters in each round according to the hat's shape and desired size.
- Keep alternating colors as described for each round to create the multicolored effect.

Creating the Floppy Brim:
- After reaching the desired size for the hat’s body, you'll work on creating the floppy brim.
- Increase the stitches in certain rounds by making 4 DC in one space instead of the usual 3 for a granny stitch cluster, creating a wider brim.
- Continue for several rounds until you achieve the desired brim width.
Finishing Touches:
- Finish off with a round of single crochet (SC) for a clean edge if desired.
- Weave in all ends with your tapestry needle.
Notes:
- Remember to count your stitches carefully to ensure your hat maintains its shape.
- The pattern mentions adjusting the hook size based on your tension; if you crochet loosely, consider using a smaller hook size.
- The final few rounds before the floppy brim are worked without increases if making the smallest size (baby size) or for anyone with a very small head.
Closure:
Slip stitch to join the final round and fasten off. Weave in any remaining ends to finish your hat.