Make your special moments unforgettable with this charming crochet mini baby cradle—a meaningful project tailored for thoughtful gestures or displays.
A tiny cradle can bring warmth to any baby shower or themed event, serving both as an adorable decoration and a symbol of care. Designed with a delicate structure, the Crochet Mini Baby Cradle pattern offers charm and utility for various occasions. Whether you want to showcase it during celebratory gatherings or use it as a keepsake, this cradle provides the perfect way to add personality to your display. It’s also an ideal gift for doll enthusiasts, as it can be used to cradle miniature dolls complete with tiny blankets and soft decor. Its sturdy design ensures durability, giving it both style and function.
Crochet Mini Baby Cradle Decoration For Baby Shower

The process of making the cradle focuses on an easy-to-follow crochet technique, ensuring a joyful experience for those with basic crochet skills. Once the base is complete, layers of intricate stitching shape the cradle while optional ruffles and vibrant borders add a colorful flair. The final product not only highlights the beauty of your craftsmanship but also serves as a visual treat for anyone who admires handmade treasures. This project is simple yet rewarding, bringing your crochet talents to life with a timeless piece.
How To Crochet Baby Cradle Easily
This adorable crochet baby cradle is perfect as a decorative item for baby showers, nursery décor, or as a gift. You can personalize it with different colors and embellishments like ribbons, tiny dolls, or blankets. This guide provides a step-by-step explanation of how to crochet your cradle, from the base to the ruffles.
Materials Needed
To crochet this baby cradle, you will need:
- Yarn: 4-ply yarn in two colors: one for the base and another for decoration.
- Crochet Hook: Size 2.5 mm.
- Plastic Base: A piece of sturdy plastic (from a milk or soda bottle) to keep the cradle’s base firm.
- Embroidery Needle: To weave in the ends.
- Scissors: For cutting yarn.
- Stitch Markers: To mark critical points while working.
Abbreviations
Here are the crochet abbreviations used in this pattern:
- ch: Chain
- sl st: Slip Stitch
- sc: Single Crochet
- hdc: Half Double Crochet
- dc: Double Crochet
- st(s): Stitch(es)
- inc: Increase (make 2 stitches in the same stitch)
- tog: Decrease (work 2 stitches together)
Pattern Instructions
Step 1: Create Oval Base (Make Two)
- Foundation Chain:
- Start with a slip knot.
- Chain 10 (ch 10).
- Row 1:
- In the second ch from the hook, work 3 hdc.
- Work 1 hdc in each of the next 7 ch.
- In the last ch, work 3 hdc.
- Turn your work and continue working on the other side of the foundation chain.
- Work 1 hdc in each of the next 7 ch on the opposite side.
- Finish the row with a sl st into the first hdc.
- Row 2:
- Chain 2 (counts as the first hdc).
- In the same st, work 1 hdc.
- In the next 2 sts, work 2 hdc (increase).
- Work 1 hdc in each of the next 7 sts.
- In the 3 corner sts, work 2 hdc in each.
- Work 1 hdc in the next 7 sts.
- Join to the top of the starting ch-2 with a sl st.
- Row 3:
- Chain 2.
- Continue with increases, following the pattern:
- Increase in the corners.
- Maintain even hdc stitches on the sides.
- Finish with a sl st.
- Create another identical oval base (you will have two ovals at the end of this step).


Step 2: Creating the Base Support
- Cut out a piece of plastic slightly smaller than the ovals.
- Sandwich the plastic between the two ovals.
- Align the edges of the two ovals with stitch markers to ensure the stitches match.
Step 3: Joining the Ovals
- With your yarn, start at one point of the oval edge.
- Work sc through both layers all around the edge to join the ovals together.
- When you reach the end, finish with a sl st into the first sc.
Step 4: Sides of the Cradle
- Row 1:
- Chain 2 (counts as the first hdc).
- Work 1 hdc in the back loops only of each st around the edge of the joined ovals.
- Finish with a sl st into the top of the starting ch-2.
- Rows 2-5:
- Chain 1.
- Work a round of sc through both loops of each st.
- Repeat this for four rows.
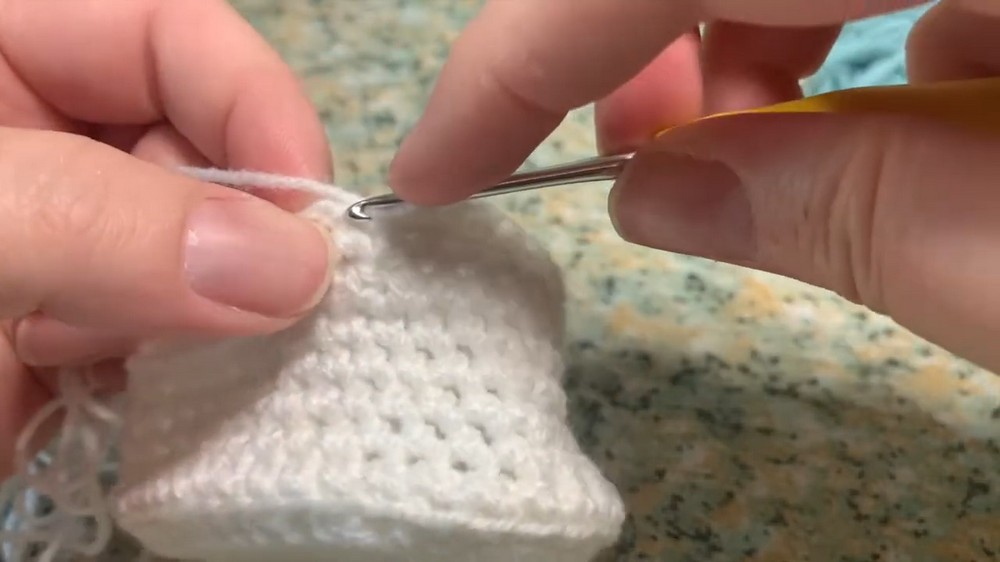
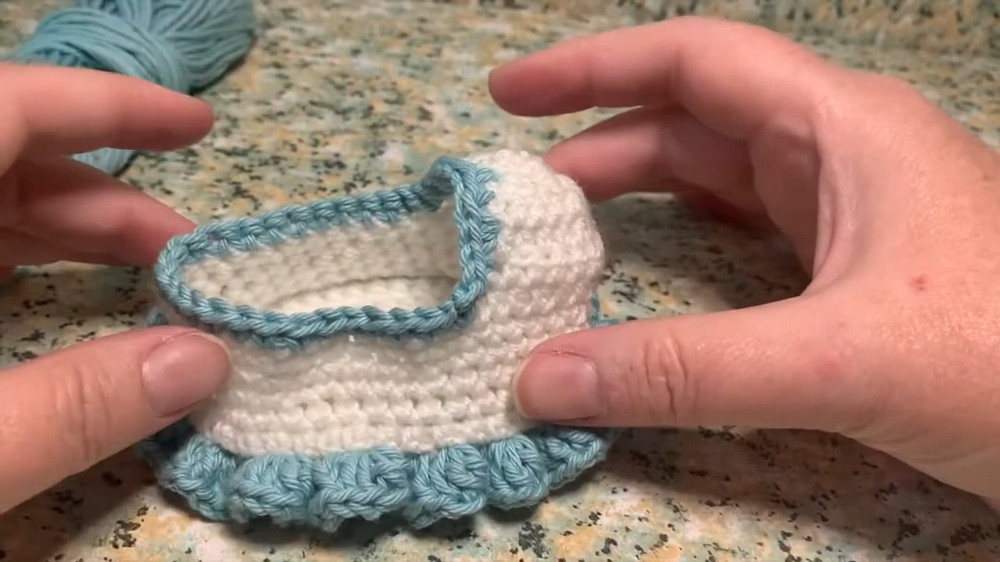
Step 5: Hood
- Identify the middle point on one short side of the oval base.
- Place stitch markers 8 sts on either side of the midpoint (16 sts total).
- Row 1:
- Chain 2.
- Work 1 hdc in each of the 16 marked sts.
- Turn.
- Row 2:
- Chain 2.
- Work 1 hdc in each of the 16 sts.
- Turn.
- Row 3:
- Chain 2.
- Work 1 hdc in the next 5 sts.
- Work two decreases (hdc2tog).
- Work 1 hdc in the next 6 sts.
- Turn.
- Row 4:
- Chain 2.
- Work 1 hdc in the next 4 sts.
- Work three decreases (hdc2tog).
- Work 1 hdc in the next 4 sts.
- Turn.
- Row 5:
- Chain 2.
- Decrease (hdc2tog) four times.
- Fasten off, leaving a long tail.
- Use the tail to sew the top of the hood together securely.

Step 6: Decorative Border
- Use your second color yarn.
- Begin at one corner of the cradle and work sc evenly around the hood and top edge.
- Finish with slip stitch and fasten off.

Step 7: Adding the Ruffle (Optional)
- With the decorative yarn, join at the back loop stitches left unworked on the base.
- Row 1:
- Chain 3 (counts as dc).
- Work 3 more dc into the same st.
- Work 4 dc into each unworked back loop around the base to create the ruffle effect.
- Finish with a sl st into the ch-3.
- Fasten off and weave in all ends.
Conclusion
Your crochet baby cradle is now complete! You can personalize it with additional accents, like tiny ribbons or small dolls with blankets inside. This decorative piece is perfect for baby showers, gifts, or as an adorable keepsake. If you enjoyed this pattern, remember to experiment with different colors and yarn textures to create a unique look.