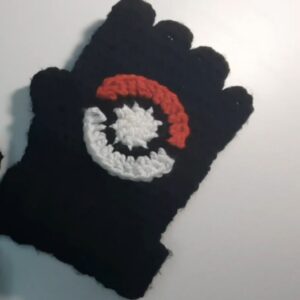
Stay stylishly warm with this Free Crochet Fingerless Gloves Pattern, that's a cozy accessory perfect for chilly days, outdoor activities, or gifts.
Throughout history, gloves have offered both protection and style, evolving from practical wear to fashion statements. Fingerless gloves, in particular, have long been favored for their ability to provide warmth while allowing dexterity, making them ideal for artisans, writers, and anyone needing mobility without sacrificing comfort. The Free Crochet Fingerless Gloves pattern brings this balance into a modern, handmade accessory that is both functional and stylish. Perfect for cooler weather, these gloves keep hands cozy while leaving fingers free for typing, texting, crafting, or outdoor activities.
Soft Crochet Fingerless Gloves Pattern that Feels Luxurious

The creation begins at the wrist, where a snug yet flexible base provides stability and comfort. Gradual increases shape the hand section, maintaining symmetry and smooth contours for a flattering fit. Midway, careful stitch work forms the opening for the thumb, ensuring mobility without compromising warmth. The finishing rounds reinforce edges and openings, producing a polished, durable piece that holds its shape over repeated wear.
Beyond practical benefits, these gloves offer versatility and timeless appeal. Soft, breathable yarn ensures comfort for extended use, while the handmade texture adds subtle elegance to any outfit. The Free Crochet Fingerless Gloves pattern transforms simple materials into a functional accessory that combines warmth, freedom of movement, and a touch of handcrafted charm for everyday life.

Materials Needed
- Yarn:
- Crafter’s Square lightweight yarn (bought from Dollar Tree).
- Suggested weight: #3 lightweight yarn (any similar yarn can be used).
- One skein is sufficient, with leftover yarn after completing both gloves.
- Crochet Hook:
- Size 3 mm crochet hook.
- Additional Tools:
- Scissors (to trim edges).
- Tapestry needle (for weaving in yarn tails).
Step-by-Step Process
Part 1: Creating the Base Rectangle
This rectangular piece forms the main body of the glove.
1. Starting with a Foundation Chain
- Make a slip knot and chain 29 loops (chain loosely to avoid tight edges).

2. Working Row One
- Skip the first three chains and work 1 double crochet into the fourth chain.
- Work one double crochet into the next chain.
- Chain 3, skip one chain, and go back into the same chain. Work another double crochet (this forms the shell pattern).
- Skip one chain, then create 3 double crochets, one in each of the following chains.
- Chain 3, work one double crochet in the same chain as the last double crochet for a new shell.
- Continue the pattern: skip a chain, work 3 double crochets into the next 3 chains, chain 3, then a double crochet in the same chain. Repeat until you reach the last three chains.
- In the last three chains, work a double crochet in each to finish Row One.

3. Continuing the Pattern (Rows 2-13)
- For Row Two, chain 5, turn your work, and skip all stitches until the first chain-3 space.
- Into the chain-3 space, work 3 double crochets.
- Chain 3, then work 1 double crochet back into the same chain-3 space.
- Go to the next chain-3 space and repeat the pattern: 3 double crochets, chain 3, and 1 double crochet in the same space.
- Repeat this for all rows until you have completed 13 rows. The resulting piece should measure approximately 7.5 inches wide by 6.5 inches long.

Part 2: Assembling the Glove
1. Folding and Aligning the Rectangle
- Fold the rectangle in half horizontally, with the right side of the work facing inward.
- Align the edges and corners as evenly as possible.
2. Joining the Edges with Single Crochets
- Begin at the bottom of the glove. Insert your hook into both layers of stitches from the fold.
- Work 2 single crochets into each section, picking up stitches on both sides.
- Move up the row by stitching into each corresponding space (such as chain-5 spaces or double crochets) and joining the edges together with single crochets.
3. Leaving the Thumb Hole
- After working 10 single crochets (leaving space for the base of the glove), stop stitching both sides together.
- From here, only crochet along the front side of the glove using single crochets. Leave the back unworked to create an opening for the thumb.
- Once the thumb hole is complete, pick up both sides again and continue single crocheting upwards to close the rest of the glove.

4. Fasten Off and Finish Edges
- Cut the yarn, weave in the tails with a tapestry needle, and trim any excess.
- If desired, you can tighten the area around the thumbhole by adding extra single crochets.
Part 3: Creating the Second Glove
- Follow the same steps to create the second fingerless glove, ensuring consistency in size and tension between the two pieces.
Special Features
- Adjustable Size: The glove size can easily be modified by increasing or decreasing the number of chains or rows.
- Quick Project: The pattern works up fast, taking only a few hours for both gloves.
- Lightweight and Comfortable: Using #3 lightweight yarn creates a soft and breathable accessory.
Level of Difficulty
Beginner to Intermediate:
- This project is beginner-friendly as it uses basic stitches like chains, double crochet, and single crochet.
- Assembling the glove and leaving a thumbhole may require intermediate-level clarity and focus.
Tutor’s Suggestions
- Keep Your Chains Loose: Chaining loosely at the beginning will prevent a tight foundation row and make it easier to crochet.
- Align Edges Properly: While joining edges, ensure the stitches on both sides align to achieve a clean, symmetrical seam.
- Use Leftover Yarn: You’ll have leftover yarn, which can be used for a matching accessory, such as a headband or scarf.
Uses
- Cold Weather Wear: These gloves are ideal for lightly chilly days when you need to keep your hands warm but your fingers free.
- Craft Fairs or Gifts: A quick and thoughtful project to sell at craft fairs or gift to family and friends.
- Everyday Use: Great for tasks requiring dexterity, such as writing, typing, or texting.
Tip for Success
Ensure Consistent Tension: Maintain an even tension throughout your stitches for consistent sizing and a polished look. Use a blocking technique (lightly steaming or ironing) for an extra neat finish if needed.
Conclusion
This tutorial demonstrates a simple yet stylish project that’s perfect for crocheters of all skill levels. By following the step-by-step guide, you’ll learn to create beautiful fingerless gloves that are both functional and fashionable.