Celebrate each day with cuteness and ease by trying out the Crochet Easy Shell Stitch Baby Dress, a basic yet graceful outfit for babies.
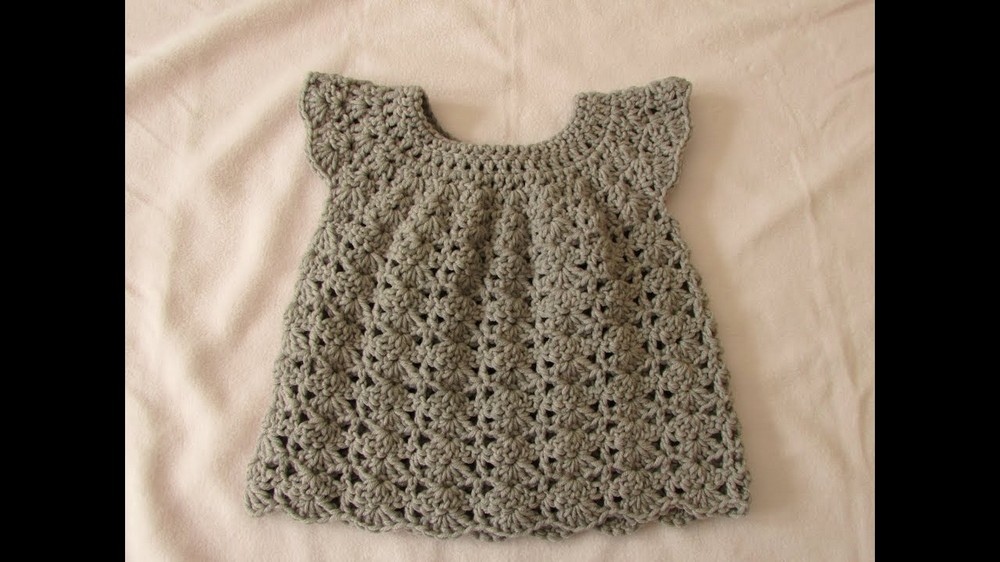
Delicate clothing for babies not only feels special but also holds emotional meaning for caregivers. The crochet easy shell stitch baby dress pattern is a wonderful blend of style and comfort. With an elegant scalloped shell stitch, this dress offers a charming aesthetic that suits any occasion, from casual outings to special events. The delicate neckline, armholes, and flowing skirt allow for easy movement while keeping the baby comfortable.
How To Crochet An Easy Shell Stitch Baby / Girl's Dress

Lightweight yet sturdy, it’s ideal for gifting or as a keepsake for cherishing those precious early years. Its breathable design also suits different seasons, proving both practical and timeless. This pattern seamlessly blends functionality with artistry for a one-of-a-kind baby outfit that stands out in beauty and usefulness.
Little Girl's Crochet Dress Pattern
This step-by-step guide will help you create a beautiful crochet dress for a little girl, using a detailed pattern from the tutorial video here. The dress is crocheted from the top down, features elegant shell stitches, and can be customized to various lengths! Perfect for beginners, this simple design offers versatility and a lovely finished product.
Materials
- Yarn: Lightweight yarn (choose a blend comfortable for wear, like cotton or acrylic; specific yarn weight is not mentioned in the video)
- Crochet Hook: Recommended size for your chosen yarn (the video does not specify, so check your yarn label)
- Button: A small decorative button for fastening the top
- Scissors
- Darning needle: For weaving in ends
Abbreviations (Common Crochet Terms)
- ch: Chain
- dc: Double Crochet
- sl st: Slip Stitch
- st: Stitch
- yo: Yarn Over
- Foundation Chain: The base of chains created to start your project
Step-by-Step Pattern
Foundation Chain
- Start with a slip knot:
- Wrap your yarn twice around your finger.
- Pull the first loop over the second loop.
- Slide the second loop off your finger and pull tight.
- Insert the crochet hook into the loop.
- Chain: Work 54 chains to create the foundation chain.
- This will be the starting point of your work.

Round 1: Double Crochet Along Foundation Chain
- Skip the first 3 chains (these count as the first double crochet) and work a dc into the 4th chain from the hook.
Steps for Double Crochet:- Yarn over.
- Insert your hook into the stitch.
- Yarn over and pull up a loop (3 loops on hook).
- Yarn over and pull through the first 2 loops (2 loops on hook).
- Yarn over and pull through the remaining 2 loops.
- Work 1 dc in every chain across. At the end of the round, ensure you have 52 double crochets, including the skipped 3 chains at the start.
- Turn your work.

Round 2: Plain Double Crochet
- Chain 3 (this counts as the first dc) and turn your work.
- Work 1 dc into each stitch along the row (52 double crochets total).
- Ensure you work into the top of the turning chain from the previous row as well.
- Turn your work.
Round 3: Start Increasing for Shell Pattern
- Chain 3 and turn (this counts as the first dc).
- Begin increasing as follows:
- Into the first stitch, work 2 dc.
- Into the next stitch, work 1 dc.
- Alternate between 2 dc and 1 dc stitches across the row.
- At the end of this row, join your work into a loop by slip stitching into the top of the chain 3 at the start of the row. Ensure your work is not twisted.

Round 4: Shell Stitch Pattern
- Chain 3 and turn (this counts as the first dc).
- Work shell stitches:
- Wherever you have a single dc, work 1 dc.
- Wherever you have 2 consecutive dc stitches, work 3 dc into the space between the 2 stitches.
- Alternate between 1 dc and 3 dc stitches across.
- Finish the round with a sl st into the top of the chain 3 from the beginning of the round.
Round 5: Further Adjust Shell Pattern
- Chain 3 and turn.
- Work shell stitches:
- Into every single dc, work 1 dc.
- Into the middle stitch of each shell (group of 3), work 4 dc.
- Alternate 1 dc, 4 dc across the row.
- Finish the round with a sl st into the top of the chain 3.

Round 6: Extend Shell Pattern
- Chain 3 and turn.
- Work shell stitches:
- Into every single dc, work 1 dc.
- Into the second stitch of each group of 4 dc, work 5 dc.
- Alternate 1 dc, 5 dc across the row.
- Finish the round with a sl st at the top of the chain 3.
Round 7: Create Armholes
- Chain 3 and turn.
- Separate your work:
- Work 4 shell sets (1 dc + 5 dc) for the back.
- Skip 5 shell sets for the armhole, and into the next single dc, work 1 dc tightly.
- Work 8 shell sets across for the front.
- Skip 5 shell sets for the second armhole, and into the next single dc, work 1 dc.
- Work 4 shell sets across for the second half of the back.
- Join the round with a sl st at the top of the chain 3.

Round 8: Repeat Shell Pattern
- Chain 3 and turn.
- Work shell stitches:
- Into every single dc, work 1 dc.
- Into the middle stitch of each shell (group of 5), work 5 dc.
- Continue working across the armholes without crocheting inside them.
- Finish the round with a sl st.
Repeating Rounds
From here, simply repeat Round 8 until your dress reaches the desired length. You can stop earlier for a shorter dress or continue for a longer gown.
Finishing
- Once you’ve reached the desired length, finish the final round with a sl st and fasten off.
- Weave in all ends using a darning needle.
- Attach a decorative button to the top opening for fastening.
Conclusion
Congratulations! You’ve just crocheted a beautiful little girl's dress. This easy-to-follow pattern is versatile for various sizes and makes for a thoughtful handmade gift. Feel free to experiment with colors and lengths to suit your preference. Thank you for trying this project, and happy crocheting!