
Style your hair with this Crochet Scrunchie pattern, adding soft texture, playful charm, and a chic handmade touch to every look.
Trends often return with renewed charm, and the scrunchie has once again taken center stage as both a practical and stylish accessory. A crochet scrunchie pattern offers a fresh approach to this timeless favorite, turning a simple hair tie into a soft and elegant piece that adds beauty to everyday hairstyles. Its gentle structure protects hair from pulling and breakage while still offering a secure hold, making it a thoughtful alternative to traditional elastics. Whether enhancing a ponytail, bun, or resting on the wrist as a fashionable accent, it balances function with style effortlessly.
How to Crochet Scrunchie for Everyday Fashion

The pattern itself focuses on ease and versatility, beginning with a strong foundation around an elastic band and expanding outward through stitches that form graceful waves or ruffled textures. Each scrunchie can be worked in different yarn weights and colors, making it adaptable for casual wear, festive occasions, or even as a personalized gift.
The appeal lies not only in its softness and durability but also in the way it elevates simple hairstyles into charming statements. Combining practicality with timeless beauty, the crochet scrunchie stands as a reliable accessory that adds personality, comfort, and a touch of elegance to everyday life.
Materials Needed
To make the crochet scrunchie, you will need:
- Yarn: Any plain yarn of your choice.
- Hair Tie: A larger-sized hair tie for flexibility and durability.
- Crochet Hook: The instructor uses a size G crochet hook.
- Scissors: For cutting the yarn.
- Yarn Needle: To sew in the tails at the end.

Step-by-Step Instructions
Step 1: Making the Slip Knot and Attaching the Yarn
- Begin by creating a slip knot. Wrap the tail end of the yarn around your fingers and push it through the loop to form the knot.
- Tighten the loop slightly and attach it to the crochet hook.
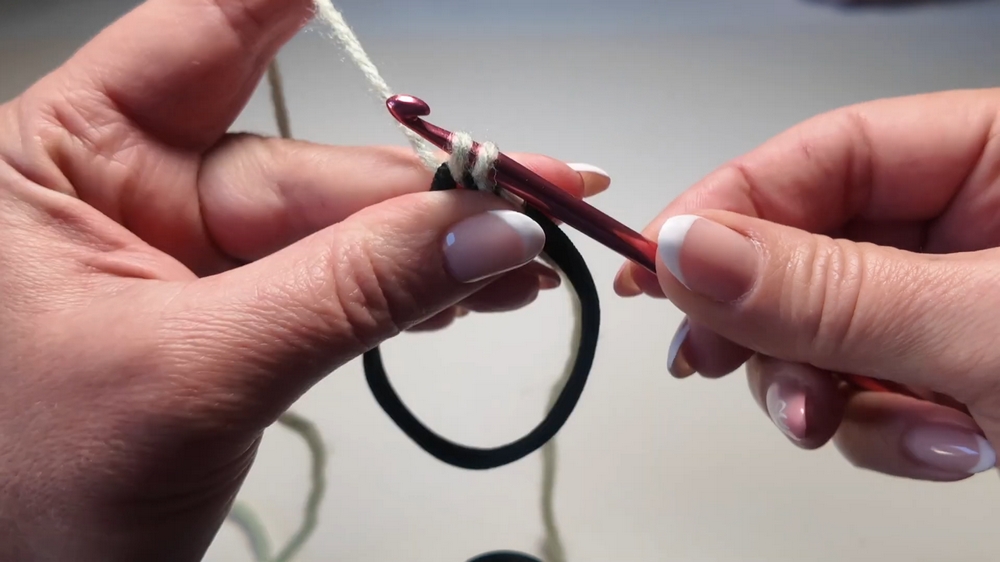
2: Starting the First Row with Single Crochets
- Position the yarn in front of the hair tie.
- Perform a single crochet:
- Insert the hook under the hair tie.
- Grab and pull the yarn back up to have two loops on the hook.
- Yarn over again and pull through both loops.
- Continue repeating single crochets around the entire hair tie. Move the yarn sideways to ensure there are no gaps, fitting approximately 38-40 single crochets to cover the hair tie fully.

3: Joining the Row
- Once the first row is complete, join the ends using a slip stitch:
- Insert your hook into the first stitch.
- Yarn over, pull through, and pull through the existing loop on the hook to secure the stitches together.
- Chain two stitches to start the next row.
4: Adding the Second Row with Double Crochets
- For the second row, crochet two double crochets into each stitch:
- Yarn over and insert the hook into the stitch.
- Yarn over, pull through to have three loops on the hook.
- Yarn over, pull through the first two loops, and yarn over again to pull through the remaining two loops.
- Repeat the double crochet twice in each stitch around, which begins to create the ruffle effect.
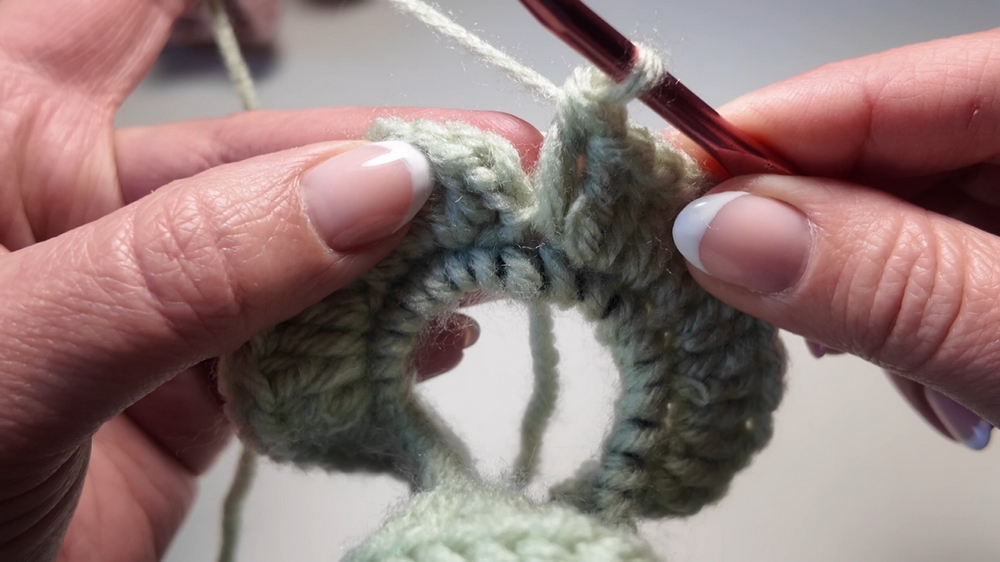
5: Creating the Final Row with Three Double Crochets
- In the last row, add even more ruffles by working three double crochets into each stitch using the same method as above.
- Continue this process until the entire row is complete, adjusting as necessary to ensure the desired texture and fullness.
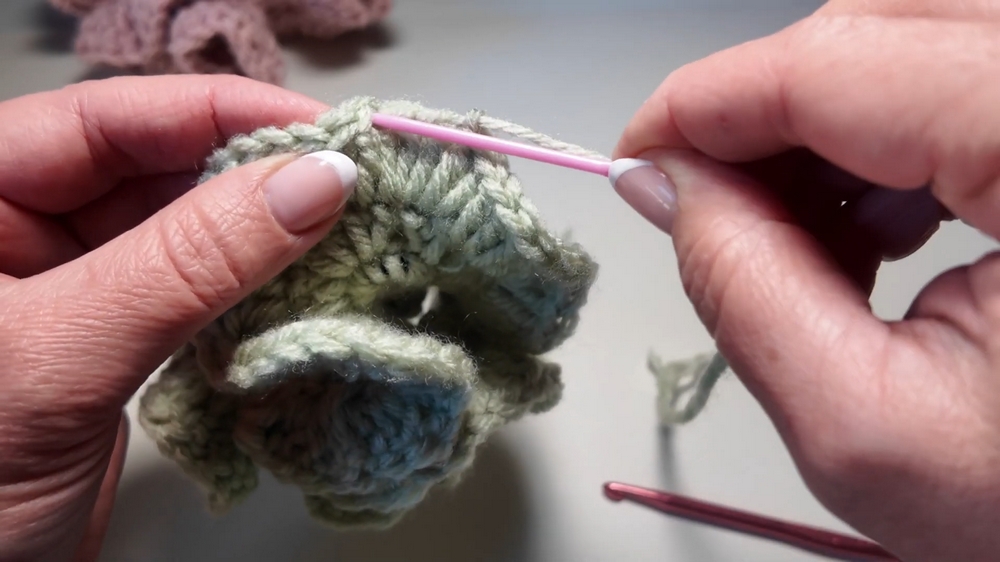
6: Finishing Off
- After completing the final row, join it using a slip stitch.
- Cut the yarn, leaving a small tail, and pull it through the final loop.
- Secure and sew in the yarn tails using a yarn needle to give the scrunchie a polished look.
Special Features
- Ruffled Texture: The ruffle effect adds a stylish, voluminous look to the scrunchie.
- Customizable: You can use different yarn colors, types, or even add embellishments for a personalized touch.
- Beginner-Friendly: Simple stitches like the single crochet and double crochet make this project a great starting point for beginners.
Tutor’s Suggestions
- Use a larger-sized hair tie for better results and flexibility.
- Ensure the stitches are evenly spaced to create a more consistent and neat appearance.
- Adjust the number of stitches as needed to fully cover the hair tie, as the exact count depends on the size of the tie and yarn thickness.
- Be patient with the first row; it’s the most challenging part but becomes easier as you progress.
Level of Difficulty
This project is beginner-friendly. The tutor works slowly and explains every step clearly, making it easy to follow even for someone holding a crochet hook for the first time. The main stitches (single crochet and double crochet) are simple to master with minimal practice.
Uses of Crochet Scrunchies
- Practical Hair Accessory: Keeps hair in place while adding a stylish flair.
- Gifting Option: A great handmade gift for friends, family, or children.
- Fashion Statement: Complements outfits in various colors and textures.
- Eco-Friendly Alternative: Reusable and made sustainably by hand.
Tip for the Best Results
Take your time with the first row of single crochets, as this step sets the base for the scrunchie. Ensuring the stitches are tight and evenly spaced will lead to a professional and polished finish.
Conclusion
By following this easy-to-understand tutorial, you can crochet a beautiful and functional scrunchie that combines style and practicality. The ruffled texture and customizable options make it a versatile and trendy accessory. Whether for personal use, as a thoughtful handmade gift, or even as part of a small crafting business, these scrunchies offer endless possibilities. With minimal materials, clear guidance, and beginner-friendly steps, this project proves that crochet can be both fun and rewarding. Try it out, and you’ll have a collection of beautiful scrunchies in no time!

