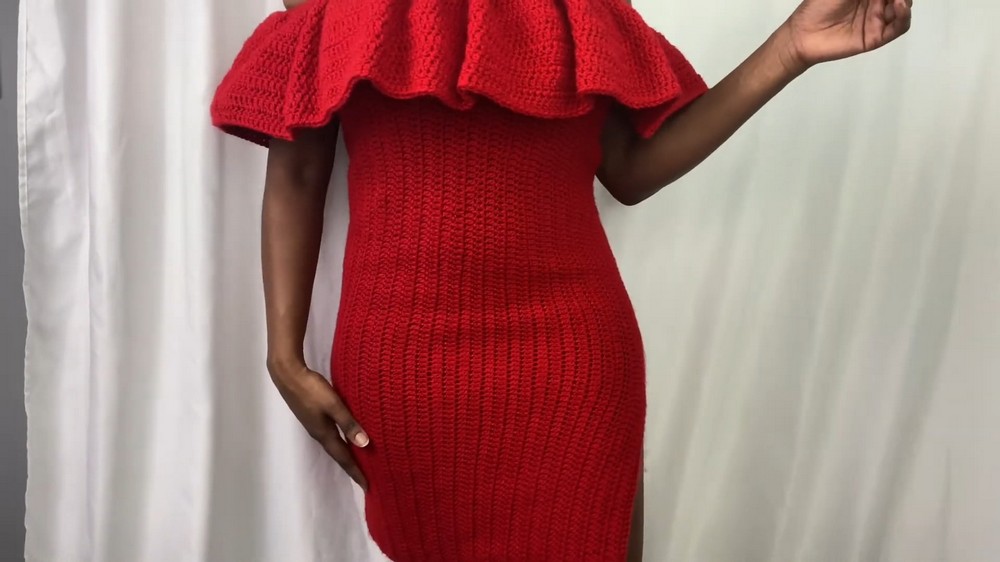
Enjoy a clever and gorgeous twist on style with this crochet ruffle dress pattern, made with precision to fit any wardrobe seamlessly.
A beautifully designed dress can make anyone feel exceptional. This crochet ruffle dress pattern brings alluring elegance combined with comfort into one versatile garment. Perfect for special occasions or casual outings, this tube dress is tailored to radiate sophistication. Its unique texture and flowing shape add character, making it a stunning addition to any wardrobe.
Enjoy The Date Night With Crochet Ruffle Dress

Crochet Beautiful Dress With Ruffle Design
This crochet pattern walks you step-by-step through the process of creating a stunning tube dress with ruffles, as described in the video tutorial. It's a simple yet beautiful design, perfect for beginners and advanced crocheters alike. The dress includes a slit detail for extra flair and optional ruffles for added texture.
Materials Needed
- Yarn: "I Love This Yarn" in the color red (or any medium-weight acrylic or cotton yarn of your choice).
- Crochet Hook: 4.5 mm crochet hook.
- Scissors: For cutting yarn.
- Measuring Tape: To ensure accurate dimensions.
- Tapestry Needle: For weaving in ends.
- Stitch Markers: Optional for marking key points like slit placement or arm strap locations.
Abbreviations
- ch: Chain.
- dc: Double Crochet.
- sc: Single Crochet.
- sl st: Slip Stitch.
- st: Stitch.
- yo: Yarn Over.
- dec: Decrease.

Pattern Overview
This pattern consists of three distinct parts:
- Creating the foundation panel (front and back).
- Assembly of the body with a slit.
- Adding ruffles, straps, and finishing touches.
Step 1: Creating the Panels
You will be making two identical rectangular panels for the body of the dress.
Foundation Row
- Create a slip knot and attach the yarn to the hook.
- Start with a foundation dc chain (preferred method) of 111 stitches.
Alternatively, chain 112, then work in the second chain from the hook. Ensure you end with 111 dc stitches.

Body Rows
- Row 1:
- Ch 2, turn your work. Do dc into the second st.
- Continue working dc across the row until you reach the end.
- Place the last dc into the top of the starting chain from the previous row.
- Rows 2–35:
- Repeat Row 1 for a total of 35 rows per panel.
- This creates two identical panels, each measuring approximately 14.5 inches wide.
Step 2: Assembling the Body
Side Seaming with a Slit
- Align the two panels with right sides facing each other.
- Ensure the wrong sides are on the outside so imperfections are hidden.
- Slip stitch seam:
- Start at the top corner and slip stitch down one full side. Leave approximately 38 stitches unworked at the bottom for a side slit.
- Use stitch markers to pin panels together for easier alignment.
- Repeat on the other side:
- Slip stitch the second side fully or leave a matching slit if desired.

Step 3: Adding Straps
- Mark Strap Placement
- Count 10 stitches inward from the edge of the dress (e.g., the side seam).
- Add a marker in the 11th, 12th, and 13th stitches for strap placement.
- Making the Straps
- Attach yarn with a slip knot at the marked stitch.
- Row 1: Ch 2, work 2 dc in each marked stitch for the strap base.
- Rows 2–26: Work dc back and forth for a total of 26 rows.
(Adjust strap length based on desired fit.)
- Connect Strap to Dress
- Fold straps so wrong sides face outward, and attach them at the opposite marked area using single crochet stitches.

Step 4: Adding Ruffles
Preparation
- Starting at the back seam intersection, create a slip knot.
- Work sl st loosely across the top edge of the dress (back of the straps to the opposite side).

Ruffle Rows
- Row 1:
- Ch 2, work 3 dc in each sl st across the front of the dress.
- Stop once you've reached the opposite end of the front area and sl st back into the starting stitch.
- Rows 2–15:
- Turn your work, ch 2, and work 1 dc in each stitch across.
- Repeat until you have 15 rows (or desired ruffle length).
Note: Cotton yarn will create more dramatic draping than acrylic yarn.

Step 5: Finishing Touches
- Weave in Ends:
- Use a tapestry needle to tuck in all loose ends and tails.
- Final Adjustments:
- Ensure proper alignment for the straps and body panels.
- Block the dress if necessary.
Conclusion
Congratulations on completing your crochet tube dress! This stunning design is perfect for casual outings or special occasions. Personalize it further with colors, yarn types, or adjustable strap lengths. This tutorial provides a great foundation for numerous style variations, so let your creativity flow. If you'd like a lightweight effect for the ruffles, consider using cotton or a lighter yarn.