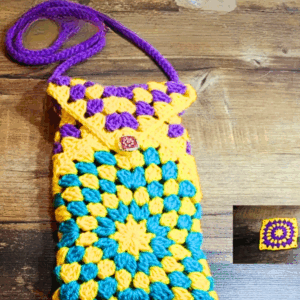
Catch the wave of creativity with this trendy crochet pattern! This pattern teaches you how to make a stylish wavy pattern pouch. With a lovely wave design created by alternating colors, this pouch is not only pretty but also practical. It’s perfect for storing small items like coins, keys, or makeup. The finished pouch is compact, durable, and unique—ideal for daily use or a thoughtful, handmade gift.
Crochet Pouch Tutorial With Written Pattern

Certainly! Here is the complete step-by-step pattern based on the information provided from the video:
Materials Needed:
- Yarn (Color of your choice)
- Crochet hook
- Stitch markers
- Yarn needle
- Scissors
- Zipper
- Pins
Instructions:
Base Chain:
- Create Chains:
- Chain 32: Twist and pull to make a loop, insert your hook, tighten (but not too tight). Yarn over and pull through to create a chain. Repeat until you have 32 chains.

Single Crochet Base:
- Single Crochet in Back Bumps:
- Identify the front V-shaped part of the chain and the back bumps.
- Skip the first bump and work in the second bump. Insert your hook into the bump, yarn over, pull through, yarn over, pull through both loops on the hook.
- Place a stitch marker in the first chain to not lose it.
- Make a second single crochet in the same stitch. Continue to make single crochets in each back bump across.
- At the last bump, place three single crochets, and turn your work to go down the opposite side.
- Continue with single crochets covering the tail in stitches.
- Slip stitch to the first stitch marked at the beginning.

Rounds:
- Round 1 & 2:
- Chain 1.
- Single crochet in each stitch around for two rounds.
- Use stitch markers to identify the first stitch of each round.
- Round 3:
- Chain 1, not counting as a stitch.
- Continue to single crochet around.
- Slip stitch at the end of the round.

Wave Pattern:
- Start Waves with New Color (Optional):
- Chain 2.
- Double crochet in the same stitch. Skip two, and make 5 double crochets in the third stitch. Skip two and single crochet in the next stitch.
- Continue this pattern of skipping two and making 5 double crochets followed by a single crochet around.
- Row with New Color:
- Change color (if desired) using the method described with a slip stitch at the end of the row.
- Chain 3, make 2 double crochets in the space between double crochet clusters.
- Chain 3 to start each round, continuing the waves with the new color or repeat the same color.

Top of Pouch:
- Final Round:
- Create a straight edge by slip stitching in each stitch around. Continue with single crochet followed by three slip stitches. Single crochet, then half double crochet, single crochet, and three slip stitches.
- Cut Yarn & Weave Ends:
- After finishing the final round, cut the yarn and weave in the ends.
- Sew the bottom of the pouch to give it shape.

Zipper Attachment:
- Pin Zipper:
- Pin the zipper onto the pouch’s opening with pins, ensuring it is aligned correctly.

- Sew Zipper:
- Thread the yarn needle with the same yarn color.
- Sew the zipper by inserting the needle through one-third of the zipper and using the back loops left when previously crocheting.
- Continue sewing around until the zipper is securely attached.

Summary:
By following these steps, you complete your crochet pouch with a unique wave pattern and a functional zipper. Make sure to keep the tension even and consistently check the work against the tutorial if needed. Happy crocheting!