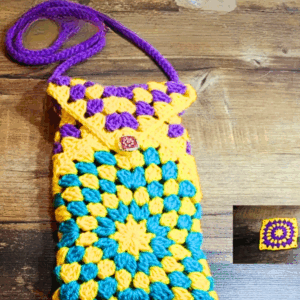
Beginner-friendly Crochet Wallet Tutorial! Stylish and easy-to-make accessory to add a handmade touch to your daily essentials.
Perfect for beginners and seasoned crocheters alike, this tutorial offers step-by-step guidance to making a stylish, personalized wallet. With just a few basic stitches and your favorite yarn, you can whip up a chic and durable wallet that’s both practical and charming. Great for organizing your cards and cash, this handmade piece will surely earn compliments. Plus, it’s a wonderful way to practice your crochet skills while creating a useful item that reflects your personal style.
Crochet Wallet Tutorial

Detailed Crochet Wallet Pattern
Materials:
- Wool yarn (primary color)
- Wool yarn (secondary color, blue)
- Wool yarn (third color, white)
- 2.5 mm crochet hook
- Sewing button (or press buttons)
- Two stitch markers
- Needle
- Scissors
- Measuring tape

Instructions:
Step 1: Base Chain
- Foundation Chain: Make a chain of 76 stitches. Ensure that this measures approximately 30 cm when completed.
Step 2: First Set of Rows
- Row 1: Skip the first chain, start from the second chain and make a single crochet in each stitch across (75 single crochets total).
- Rows 2-45: Chain 1, turn, and make a single crochet in each stitch across the row. Repeat until you have completed 45 rows in total.
- Finish Off: Cut the yarn and finish off. The piece should measure 30 cm in width and 15 cm in height.

Step 3: Cover Flap
- Change Color: Switch to the blue yarn.
- Place Markers:
- Count 25 stitches from the edge and place a marker.
- From the second marker, count another 25 stitches and place the second marker.
- Rows 1-12 of Flap:
- Reattach the blue yarn between the markers to work on the 25 stitches.
- Chain 1 and make 25 single crochets between the markers. Chain 1, turn.
- Repeat for 12 rows (the flap part should measure 10 cm in width by 4 cm in height).

Step 4: Decrease Rows
- Row 13:
- Chain 1, turn.
- Make a single crochet in the first stitch, decrease in the next stitch (single crochet two stitches together).
- Continue with single crochets across till you reach the last 3 stitches.
- Decrease (single crochet two stitches together) and make a single crochet in the last stitch.
- Rows 14-17: Repeat the decrease steps as in Row 13. Turn and make 1 chain at the beginning of each row.
- Finish Off: After 5 total decrease rows, cut the yarn and finish off.

Step 5: Assembly
- Folding: Fold the piece in half.
- Markers for Seaming:
- Count 12 side stitches from each edge and place markers.
- Repeat for the bottom and other side (you should have 12 stitches at each end that will not be seamed for the pockets).
- Seaming the Bottom:
- Use yarn and a needle to seam the bottom beginning from the 12th stitch at the side.
- Seaming the Sides:
- With the same yarn, seam from the marked points up the sides, leaving the rest unseamed for pockets.
- Final Seaming:
- Repeat for the other side, ensuring the bottom seam is included.

Step 6: Final Touches
- Edging:
- Attach white yarn to the middle of the cover flap.
- Make a single crochet border around the flap.
- When reaching the middle of the flap, create a button loop by chaining 12 stitches.
- Continue with single crochets until the end of the flap.
- Finish off.
- Button: Sew the button to the base part of the wallet using a needle and thread.

Final Notes:
Ensure to weave in all loose ends and make sure all the seams are neatly hidden. For the best results, use a thinner yarn, which will allow the wallet to close easily.