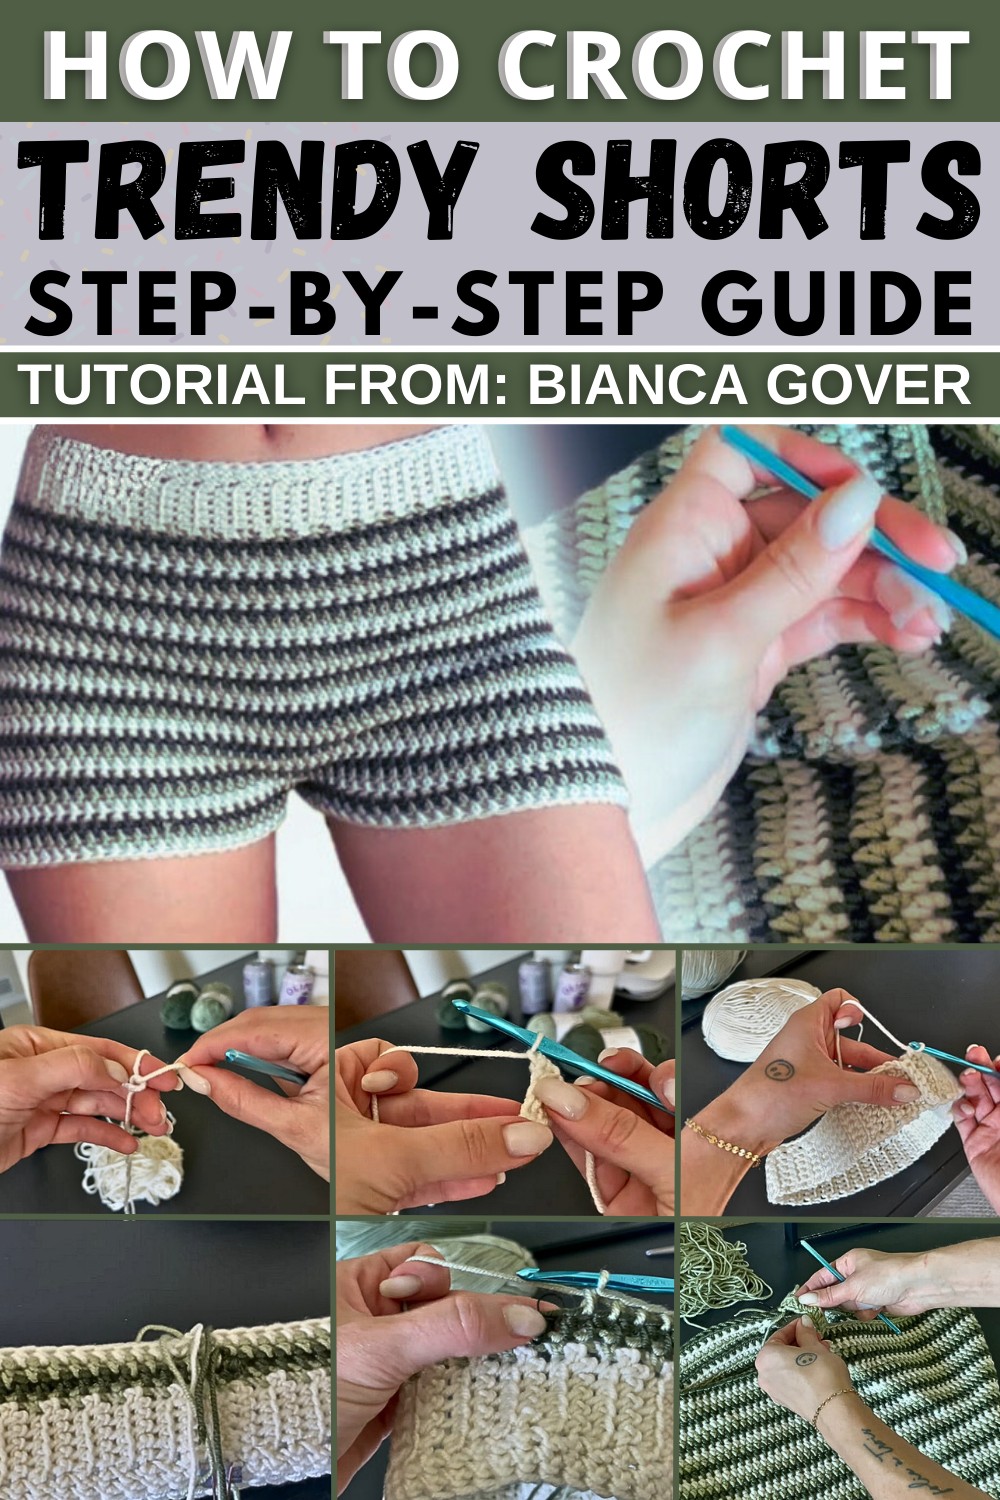
Step into creativity with FREE Crochet Trendy Shorts! Learn to craft custom, stylish high-waisted shorts with easy steps, perfect for summer vibes.
Warm summer afternoons call for outfits that balance comfort and style. Create breezy shorts that feel as light as air and look effortlessly fashionable. Crochet trendy shorts have become a favorite for their unique designs and practicality. Ideal for casual outings, relaxing at home, or beachside adventures, these shorts offer endless versatility while showcasing a chic handmade touch.
EASY Crochet Trendy SHORTS Tutorial
Designed with care and precision, they provide a comfortable fit and flexibility, making them perfect for active days or laid-back moments. Their breathable texture ensures you stay cool in the heat, while their trendy patterns allow you to express your personal style. Pair them with tank tops, oversized sweaters, or even swimwear to create looks that fit every occasion.
Beyond personal wear, crochet shorts make meaningful gifts that highlight the effort and thought behind handmade items. With free patterns available, many people find joy in trying their hand at crochet, appreciating how accessible and budget-friendly this fashion option can be. These shorts not only add style to wardrobes but also contribute to a more sustainable lifestyle by avoiding mass-produced items. Practical, stylish, and eco-conscious, crochet shorts bring charm, comfort, and more to your everyday outfits. Unique in design and purpose, they truly stand out.
How to Make Crochet Shorts: Step-by-Step Guide
Crochet shorts have gained significant popularity lately, especially as DIY projects. In this video, the creator walks us through the process of making high-waisted crochet bike shorts with a striped pattern. This tutorial, suitable for beginners and intermediate crocheters, emphasizes personalization to match individual body sizes and creative preferences. Below is a breakdown of the project along with tips, suggestions, and insights.
Short Introduction
Crochet shorts are a fun, stylish, and practical DIY project. This tutorial offers step-by-step instructions on how you can create highly customizable crochet shorts, perfect for summer wear. With basic techniques and a thoughtful approach to sizing, the project ensures an ideal fit tailored to your body shape while using durable and comfortable yarn.
Materials Needed
- Yarn: Yarn Bee Pearl Spun Low Fiber
- Colors: Matcha Mondays (light green), Moss (dark green), Pearl (neutral)
- Crochet Hook: Appropriate for yarn size (not explicitly mentioned).
- Safety Pins or Stitch Markers: For ensuring symmetry during increases.
- Scissors: For cutting yarn.
- Needle: To tuck tails and weave ends.
Special Features and Adaptability
- Uses a striped pattern for a stylish finish.
- Customized shape based on individual sizing and measurement (e.g., waist, hips, and thighs).
- High-waisted design tailored to sit below the belly button.
- Versatility to adjust the length and stripe patterns as desired.
Step-by-Step Instructions
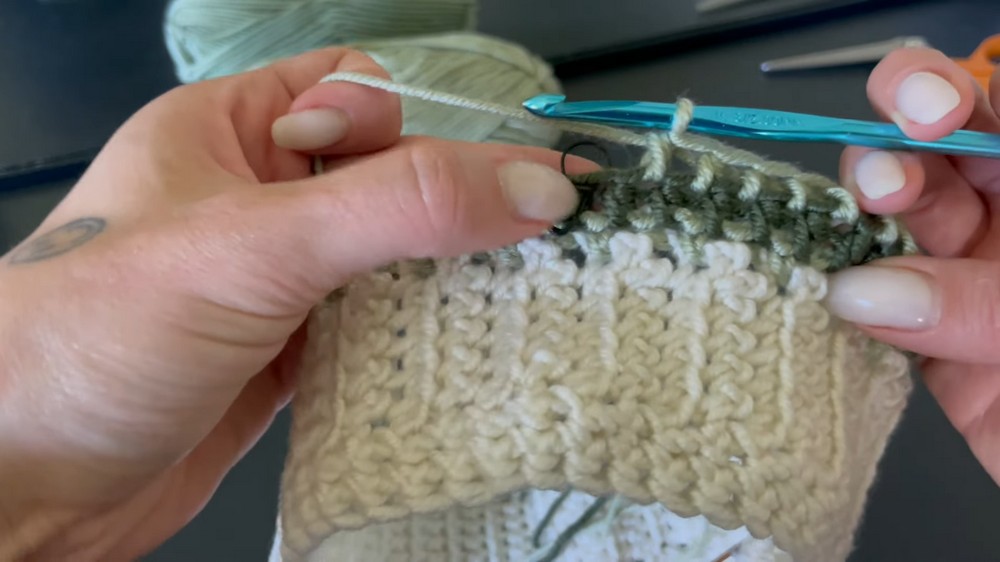
1. Waistband Creation
- Create a slip knot, chain seven stitches, and begin with single crochet stitches.
- Repeat rows until the waistband fits snugly around your waist.
- Connect both ends by crocheting all six loops together, forming a circular waistband.
2. Starting the Base
- Crochet single stitches around the perimeter of the waistband.
- Gradually add rows, ensuring spaces for hooks are evenly placed.

3. Creating Striped Rows
- Switch to lighter green yarn (Matcha Mondays) and begin single crochets around the waistband.
- Transition to darker green yarn (Moss) for a new row, performing half-double crochets to add width.
4. Increasing for Hips and Butt Area
- To accommodate body shape, increase stitches at the sides for two rows.
- For additional fit, start increasing in four spots (sides and back) to account for hip width and glutes.
5. Adjust Length
- Continue crocheting rows without increases to achieve desired length.
- Try the shorts periodically for fit and make adjustments if necessary.
6. Creating the Leg Holes
- Divide the base into two sections using safety pins to mark the center front and back.
- Chain stitches to connect the front and back crotch areas, creating symmetrical leg holes.

7. Crocheting Legs
- Continue crocheting rows around each leg hole.
- Add rows until you’re satisfied with the length of the legs.

Tutor's Suggestions
- Fit Checks: Regularly try the waistband and shorts to ensure proper sizing.
- Placement of Loops: Follow a consistent pattern to ensure stitches look tidy.
- Tail Tucking: Use a needle to weave ends back into the fabric for a clean finish.
- Markers: Position safety pins clearly for increases to maintain symmetry.
Level of Difficulty
- Beginner-Friendly: The tutorial uses simple stitches (single and half-double crochets).
- Intermediate-Level: Handling increases and color changes may require patience but are explained clearly in the video.
Uses and Benefits
- Lightweight, comfortable shorts tailored to your size.
- Versatile summer wear that doubles as a creative outlet.
- Unique and customizable design with different colors or stripe patterns.
Pro Tip
When attempting increases, be mindful of symmetry—use stitch markers and count stitches carefully to maintain balance and fit.
Conclusion
This DIY crochet short project blends creativity, comfort, and practicality. With its adaptable design and easy-to-follow techniques, it’s a perfect way to personalize your wardrobe while honing your crochet skills. Whether you're making a pair for yourself or as a thoughtful gift, this project allows endless customization and a stylish end result you'll love wearing.