Protect your pens or glasses with a functional yet gorgeous Crochet Pencil Case/Glasses Case Pattern designed for both style and durability.
Ever thought about turning a few rows of simple stitching into something both functional and delightful? A crochet pencil case or glasses case is a charming way to keep everyday essentials safe, while also adding a dash of handmade elegance to your belongings. Whether you're using it to store pencils, pens, sunglasses, or other small trinkets, its soft yet sturdy texture ensures your items are secured. Lightweight and adaptable, it fits effortlessly into your bag while being eye-catching enough to use as a standalone storage solution.
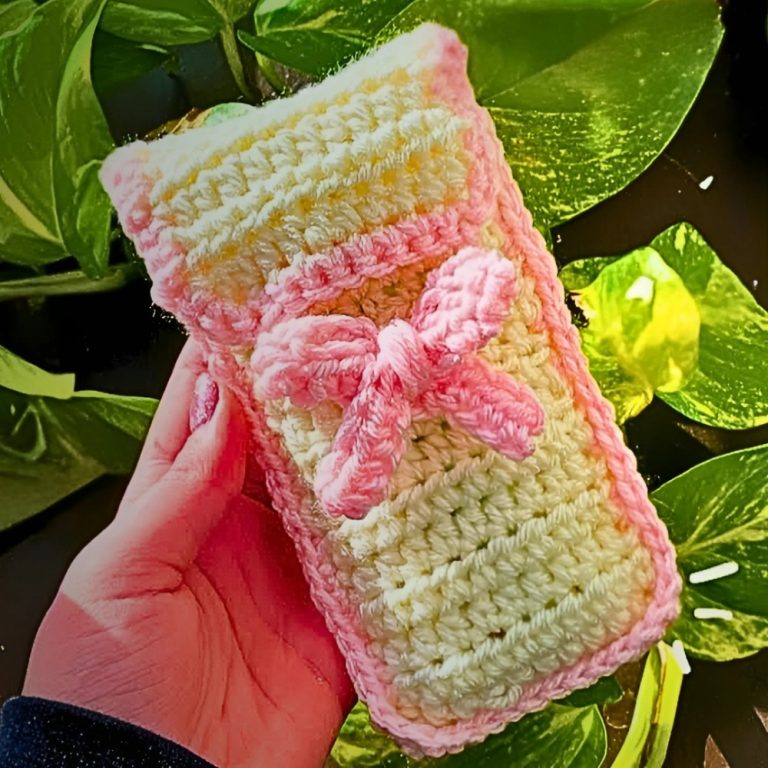
Crochet Pencil Case/Glasses Case Pattern

Crochet Pencil Case Pattern - Step-by-Step Guide
This crochet tutorial will teach you how to create a cute pencil case, which doubles as a glasses case or storage for small items. It's a beginner-friendly project using basic stitches and simple techniques. The project requires medium-weight yarn, and the result is both functional and decorative!
Materials Needed
- Yarn:
- Medium-weight acrylic yarn (for this tutorial) or medium-weight cotton yarn (optional).
- Crochet Hook:
- Hook size appropriate for your chosen yarn. Generally, size 4.0mm (G) or 5.0mm (H) works well with medium-weight yarn.
- Scissors
- Yarn Needle:
- For sewing in the loose ends and attaching the pieces.
- Pins (optional):
- To hold the pieces in place for alignment while crocheting.

Abbreviations and Stitch Glossary
- Ch: Chain
- Sl st: Slip Stitch
- HDC: Half Double Crochet
- SC: Single Crochet
This adorable crochet pencil case consists of two rectangular pieces stitched together and finished with a decorative bow and flap closure. It's the perfect project for beginners to master basic stitches such as chain, half double crochet, slip stitch, and single crochet. The step-by-step instructions below will help you make your own case effortlessly.
Step-by-Step Instructions
Step 1: Creating the Front Rectangle
- Slip Knot:
- Create a slip knot by holding the tail end of the yarn in your left hand, making a loop, inserting your fingers into the loop, and pulling the longer yarn strand through.
- Foundation Chain:
- Ch 12. If you want your pencil case wider or narrower, adjust the chain count accordingly.
- Row 1 - Half Double Crochets:
- Skip the first chain from the hook. In the second chain, work one HDC.
- Continue working one HDC in each chain across (you'll end up with 11 stitches).
- At the end of the row, Ch 1 and turn your work.
- Rows 2 to 16:
- In each row, work 1 HDC into each stitch across. Start each row by Ch 1 and turning your work.
- You can adjust the number of rows depending on the length of items you plan to store in your case (16-17 rows typically work for pens and pencils).
- Finish:
- After completing the last row, Ch 1, trim the yarn, and fasten off by pulling the loop tight.


Step 2: Creating the Back Rectangle with Flap
- Slip Knot & Foundation Chain:
- Just like Step 1, create a slip knot and foundation chain, Ch 12.
- Row 1 - Half Double Crochets:
- Skip the first chain from the hook and work one HDC in the second chain.
- Work 1 HDC in each chain across (11 stitches).
- Ch 1, turn your work.
- Rows 2 to 22 (or More for the Flap):
- Work 1 HDC into each stitch across for 22 rows.
- Adjust the flap length by adding or subtracting rows. The flap should fold over the front rectangle and cover it securely.
- Finish:
- After the final row, Ch 1, trim the yarn, and fasten off by pulling the loop tight.
Step 3: Sewing Loose Ends
- Use a yarn needle and sew in all loose ends on both rectangles to create a polished look.
Step 4: Joining the Front and Back Rectangles
- Align the Rectangles:
- Lay the smaller rectangle (front) on top of the larger rectangle (back). Make sure the stitches of both rectangles are aligned neatly.
- Attach New Yarn for Joining:
- Insert your hook through the bottom corners of both rectangles, attach a contrasting yarn (e.g., pink for the border), and secure it with a knot.
- Border with Single Crochet:
- Work SC stitches through both layers along the sides and bottom of the rectangles to join them.
- At the corners, work 2 SC stitches in each corner stitch for smooth corners.
- Complete the Flap's Border:
- Continue working SC stitches along the edges of the flap and upper portion to give the entire case a clean, finished look.

Step 5: Creating the Bow
- Foundation Chain:
- Create Ch 28.
- Row of Half Double Crochets:
- Skip the first chain from the hook. Work 1 HDC in each chain (27 HDC total).
- Ch 1, trim yarn, and fasten off.
- Shape the Bow:
- Fold the rectangle in half widthwise, then gather and compress the center to form a bow shape.
- Wrap the Bow’s Center:
- Use the long yarn tail to wrap tightly around the center multiple times to hold the bow’s shape.
- Secure by sewing the remaining tail through the bow.
- Attach Bow to the Case:
- Sew the bow onto the flap's center using the yarn needle.
Step 6: Adding the Loop Closure
- Attach Yarn:
- Insert your hook into the second stitch from the corner, attach the pink yarn, and secure with a knot.
- Chain:
- Crochet Ch 12 (or more if necessary) to form a loop that fits snugly around the bow.
- Join the Loop:
- Insert your hook into the stitch right next to the corner and secure with a slip stitch.
- Chain 1, trim yarn, and fasten off.
Final Assembly
- Sew in all remaining loose ends from the bow, border, and loop using the yarn needle.
- Fold the flap and secure the loop around the bow. Your pencil case is now complete!
Conclusion
This charming crochet pencil case or glasses case is a versatile project perfect for beginners. With simple stitches and lightweight yarn, you can create a practical yet adorable storage accessory and customize it with your own colors and embellishments. Try experimenting with different yarn textures or even adding buttons or beads for decoration!