Step-by-Step Crochet Pattern
Materials Needed:
- Yarn
- Crochet hook
- Bobby pin or stitch marker
- Yarn needle
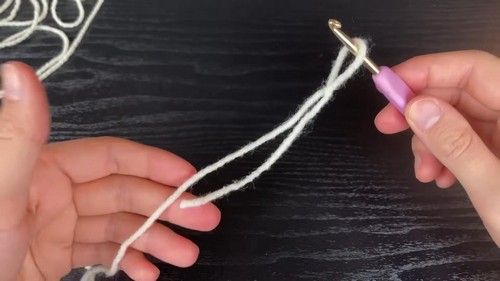
Step 1: Creating the Initial Loop
- Hold your yarn and use your two fingers to twist it.
- Grab the yarn and pull it through to create a loop.
- Insert your yarn into the loop and pull on the long string to tighten, but keep some space to avoid making it too tight.
Step 2: Creating the Foundation Chain
- Yarn over and pull through the loop to create your first chain.
- Repeat this process until the chain reaches 20 inches in length. Make sure to keep the chains relatively loose.
- Measure the chain to ensure it's 20 inches long. The number of chains might vary depending on your tension.

Step 3: Starting the First Row
- After reaching the desired length, add two extra chains for the edge.
- Turn your work to the other side. You will notice bumps along the top; these are where you will insert your hook.
- Yarn over and insert your hook into the third bump from the edge.
- Yarn over and pull through the first loop (you will have three loops on your hook), yarn over and pull through the first two loops, yarn over once more and pull through the remaining two loops. This completes one double crochet (dc).
- Mark the first stitch with a bobby pin.

Step 4: Completing the First Row
- Continue making double crochets into each bump along the chain.
- At the end of the row, count your stitches to ensure they match the number of chains.
- Chain two at the end of the row.

Step 5: Starting the Second Row
- Turn your work. This row will be double crochet back loops only.
- Yarn over and insert your hook into the back loop of the third stitch from the chain.
- Yarn over, pull through one loop, yarn over and pull through two loops, yarn over and pull through the remaining two loops. Mark the first stitch with a bobby pin.
- Continue this pattern (dc back loops only) across the row.
- Repeat this process until the length of your work measures half the circumference of your head (for example, 11 inches if your head circumference is 22 inches).

Step 6: Joining the Ends
- Fold your work in half.
- Insert your hook in the first stitch of both edges, working in the back loops only to make slip stitches.
- Yarn over, pull through both loops and the loop on the hook, continue across the row.
- Ensure the stitches are loose to prevent bunching.

Step 7: Finishing the Hat
- At the last stitch, yarn over and pull through the remaining loop.
- Cut the yarn and pull through to secure.
Step 8: Weaving in the Ends
- Use a yarn needle to weave in any loose ends.
- Turn the hat inside out to create a smoother finish.
- Fold the brim of the hat to complete the beanie.
And there you have it! This completes your Cat Ear Beanie. Enjoy your cozy new hat!