Make bedtime a delightful experience with this crochet baby sleep sack pattern, beautifully designed to keep your baby warm, cozy, and oh-so-adorable.
Even the tiniest tots deserve comfort and warmth, especially during colder seasons. A baby sleep sack is a thoughtful and cozy way to keep little ones snug, helping them feel secure while staying stylish. Here we have the crochet baby sleep sack pattern — an innovative take on baby apparel that balances softness, breathability, and a playful aesthetic. With its charming stitch design and delicate details, this pattern offers a beautiful combination of form and function, providing babies with a safe space to rest while allowing freedom of movement. Ideal for naps, stroller outings, or bedtime, its custom fit and fuss-free features make it a practical choice for parents as well.
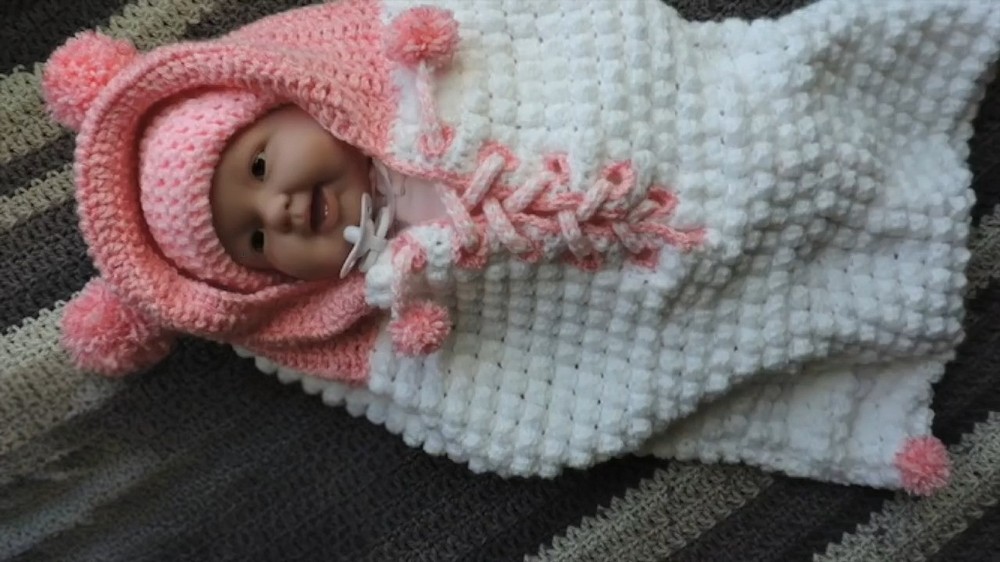
Baby Sleep Sack Super Easy For Beginners

The pattern uses box-like stitches to create a textured look, giving the item a one-of-a-kind appeal. It offers an ergonomic structure, complete with thoughtful details such as openings for easy adjustments and a gentle taper for snugness. While the process requires attention to detail, its repetitive stitch sequences make it beginner-friendly. The end result is not just a functional garment, but also a keepsake for memories, blending utility and design in every loop.
Detailed Step-by-Step Crochet Pattern For Baby Sleeping Bag
The baby sleeping bag is both comfortable and visually appealing, featuring the Box of Beads stitch for a lovely textured look. The pattern includes instructions for the base, front, back, and decorative elements of the sleeping bag, making it practical and cozy. Whether you're a beginner trying something new or an intermediate crocheter, this project will guide you step by step.
Materials Used
- Yarn: Basic #4 yarn, a small amount of white and pink colors
- Crochet Hooks: 4.25mm (main stitches) and an additional smaller hook for creating the cord
- Scissors
- Darning Needle
- Pins (for assembling pieces)
Abbreviations
- ch - chain
- sl st - slip stitch
- sc - single crochet
- hdc - half-double crochet
- dc - double crochet
- YO - yarn over
Step-by-Step Instructions
Base of the Sleeping Bag (Back Panel)
- Create Slip Knot: Wrap yarn around your finger, insert the hook through the loop, yarn over, and pull through.
- Foundation Chain: Make 49 chains.
- Row 1 – Single Crochet:
- Insert hook into the second chain from the hook.
- Yarn over, pull through, yarn over again, and pull through two loops to create a single crochet (sc).
- Continue working single crochets across the foundation chain (49 sc in total).
- Row 2 – Box of Beads Stitch:
- Chain 2 (counts as the first dc).
- Work three unfinished double crochet stitches into the next stitch. YO, pull through all 4 loops on the hook. This forms the "bead."
- Work 1 sc into the next stitch. Repeat alternating "beads" and single crochet across the row.
- Repeat Rows: Alternate rows of single crochet and Box of Beads stitch for a total of 30 rows to form the back panel.


Decreasing Rows
To shape the sleeping bag:
- Work five decrease rows using sl st and hdc at the edges to taper the top:
- Work 2 sl sts at the start and end of each row.
- Pattern remains the same between the decrease stitches.
- After five rows, set aside the back panel.
Front Panel
- Repeat steps for foundation chain, sc row, and Box of Beads row as in the back panel, but only crochet 14 rows.
- Shape openings (for the decorative cord):
- Work foundation row of single crochet.
- At the designated points, chain 2 and skip stitches to create holes for the cord.
- Continue alternating Box of Beads stitch rows and single crochet rows.
- Complete two identical front panels.

Cord Holes Panel
- Make a foundation chain of 26 stitches.
- Repeat steps for the Box of Beads stitch and create holes (via chain 2 skips) evenly spaced across this piece.
- Make two identical pieces.
Assembly
- Sew the Front and Back Panels Together:
- Use a darning needle and yarn.
- Line up one side of the front panel with the tapered top of the back panel. Sew evenly using whip stitches, leaving space for the baby’s legs at the bottom.
- Repeat for the second front panel.
- Finish the Top: Use sl st and hdc combinations to close the top and shape the hood section.
- Attach Cord Holes:
- Sew the two cord-hole panels to the front sections.
- Ensure holes align symmetrically with decorative rows.

Cord
- Make a 27-inch cord:
- Crochet chains until reaching the desired length.
- Alternatively, use another decorative cord tutorial.
- Thread the cord through the holes in the cord-hole panels.

Conclusion
The crochet baby sleeping bag with the Box of Beads stitch is a beautiful and functional project. The pattern is simple yet textured for added charm. By following the steps and assembling the panels carefully, you can create a practical, comfortable baby accessory perfect for gifting or personal use.