Experience comfort and versatility in one piece with this Crochet Adult Mittens Pattern that ensures warmth without compromising on style.
On chilly winter mornings, there’s nothing quite as comforting as a warm pair of handmade mittens. Perfectly tailored for adults, this crochet mitten pattern blends simplicity and elegance while prioritizing both functionality and style. Designed with intricate shell stitches and ribbed cuffs, these mittens gently hug your hands, keeping them warm and cozy. With their snug fit and classic design, they’re suitable for any occasion—whether you're heading outdoors, commuting, or simply wanting to keep your hands warm at home.
Crochet Adult Mittens Pattern

How To Crochet Red Mittens
This pattern will guide you through creating a beautiful pair of red mittens using shell stitches and half double crochet. The mittens are designed to be cozy, stylish, and customizable to any hand size. The tutorial focuses on using a step-by-step approach, ensuring even beginners can follow along.
Materials Needed
- Yarn: Medium weight yarn (red was used in the tutorial, but you can use any color you prefer).
- Crochet Hooks:
- 3.0 mm hook (for the cuff)
- 3.5 mm hook (for the mitten body)
- Stitch Marker
- Scissors
- Darning Needle (for weaving in ends).
Abbreviations (US Terms)
- ch: Chain
- sl st: Slip Stitch
- sc: Single Crochet
- hdc: Half Double Crochet
- dc: Double Crochet
- shell: A group of stitches worked in one space (e.g., (dc, ch, dc, ch, dc for a 3-dc shell))
- back loop sc: Single crochet worked in the back loop only.
Step-by-Step Pattern
1. Cuff
- Start the Cuff:
- Using your 3.0 mm hook, make a slip knot, and chain 8.
- Foundation Row:
- Hdc in the 2nd chain from the hook and in each chain across. (7 hdc total)
- Rows 2–32:
- Chain 1, turn.
- Work hdc in the third loop of each hdc from the previous row.
- Repeat until you’ve completed 32 rows for the cuff (adjust rows for your hand size if needed).
- The cuff should measure long enough to wrap around your wrist snugly.
- Join the Ends:
- Bring the two short ends of the cuff together.
- Use sl st to join, working through one loop from each end.


2. Mitten Body
Switch to the 3.5 mm hook for the mitten body.
Round 1: Create the Foundation
- Setup:
- Chain 1.
- Work 1 sc around the join on the cuff.
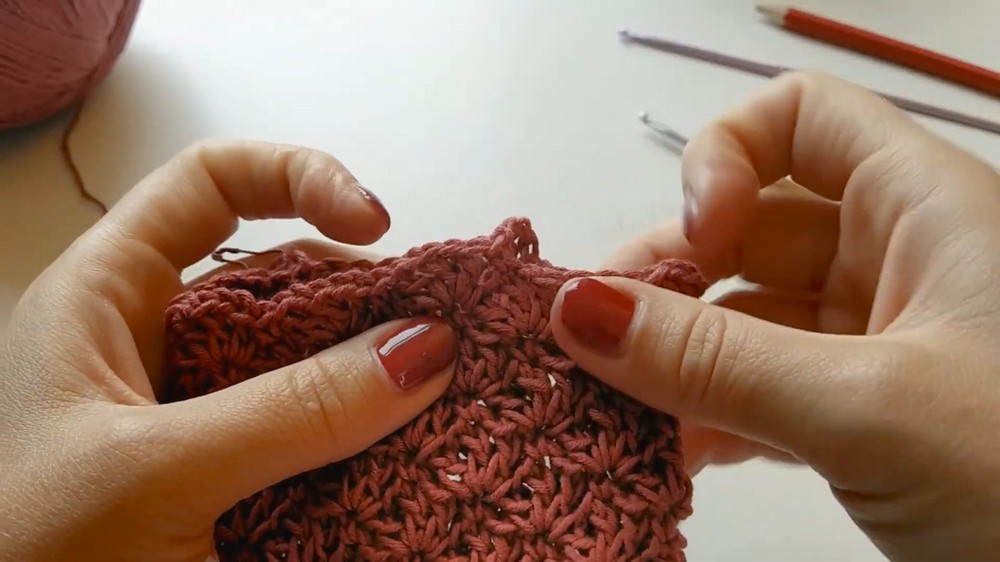
- Shell Pattern Setup:
- Work 1 shell in each ridge along the cuff. A shell consists of (dc, ch, dc, ch, dc) in the same space, followed by 1 sc in the next ridge.

Rounds 2–3: Establish the Shell Pattern
- Starting the Next Round:
- Begin with a “beginning shell”: Chain 2, work (dc, ch, dc, ch) in the same space. This replaces the first shell.
- In the following ridges, alternate:
- 1 sc in the middle of a shell.
- 1 shell in the next sc.
- Continue working this alternating single-shell pattern all the way around.
3. Thumb Hole Formation
Round 8: Increase for the Thumb
- Work the Thumb Shells:
- Work the pattern as usual, but in the fourth shell location:
- Switch to a special 4-dc shell: (dc, ch, dc, ch, dc, ch, dc).
- Work sc in each of the next stitches.
- In the following shell location, repeat the 4-dc shell.
- Work the pattern as usual, but in the fourth shell location:
- Continue the shell and single crochet pattern for the rest of the round.

Round 9: Finalize the Thumb Hole
- Bridge Thumb Gap with Chains:
- Chain 3 to bridge the thumb space created in the previous round. Skip the 3 sc and the large shell that created the thumb space.
- Continue Pattern:
- Work the regular shell-single crochet sequence around.
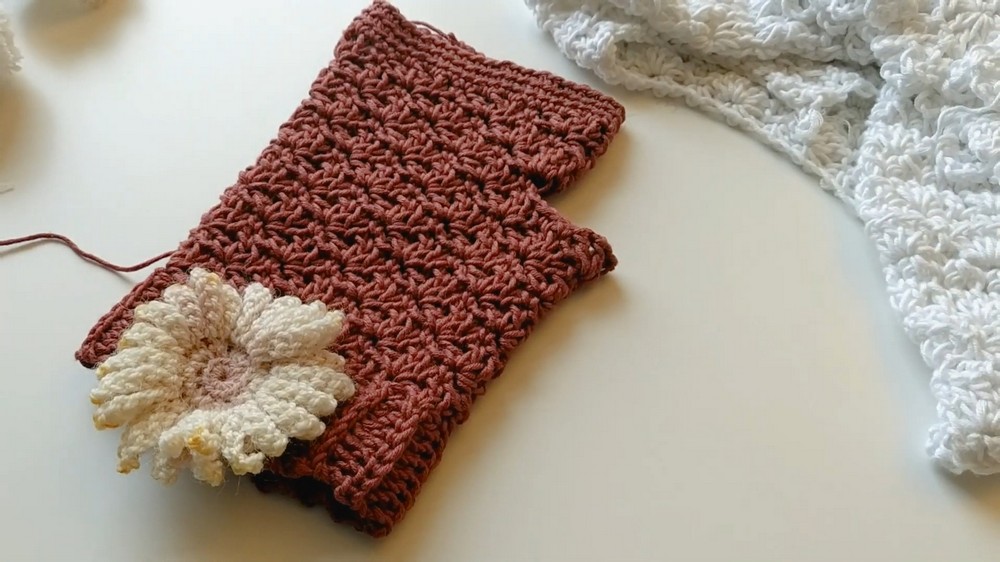
4. Finalize Mitten Shape
- Repeat Base Shell Pattern:
- Continue repeating Rounds 2 and 3 for approximately 3 more rows (R12–14). Adjust the number of rows if a longer or shorter mitten length is desired.
- Add a Back Loop Sc Trim (Optional):
- Work 2–3 rows of sc in the back loop around the edge of the mitten for a ribbed effect.
5. Thumb (Optional)
- Create the Thumb Opening:
- Use a smaller hook size (3.0 mm). Attach yarn to a stitch at the edge of the thumb gap.
- Work sc evenly around the thumb hole.
- Build Height:
- Add 2–3 additional rows of back loop sc (more if you want a longer thumb).
- Finish:
- Use an invisible join to close the round. Weave in ends.

6. Finishing Up
- Try the mitten on to ensure a good fit. Adjust the length at the cuff or body as needed.
- If desired, add extra embellishments such as pom-poms.
Conclusion
This mitten design is ideal for chilly weather, offering both warmth and style. The shell stitch adds a touch of elegance to the texture, while the cuff provides a snug fit. This pattern is simple enough for beginners but customizable for advanced crocheters. Share your creations online or with friends—the possibilities are endless!