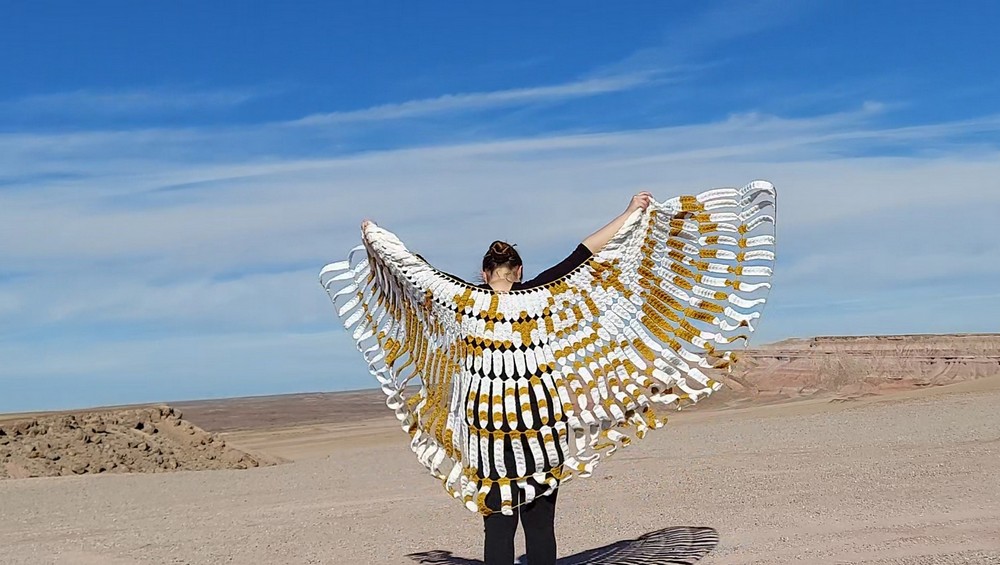
This Crochet A Runner’s Wings pattern is nothing short of a masterpiece, gracefully capturing the essence of creativity and craftsmanship. The intricate details and thoughtful design combine to create a transcendent piece that seems to flutter with life. Its aesthetic appeal showcases the artist's dedication to celebrating both beauty and utility. This pattern undoubtedly evokes the spirit of freedom and the delight of movement, much like a runner in stride, gracing any space with its metaphorical lift.
Crochet A Runner’s Wings Pattern
Materials and Info:
- Background color yarn: 8 skeins (48 oz) of Hobby Lobby Soft Secret White worsted (#4) weight
- Design color yarn: 5 skeins (30 oz) of Hobby Lobby Soft Secret Honey worsted (#4) weight
- (You can technically speaking use whatever colors and weight you like as long as your gauge matches up, but if you’re looking for something like what I have, this is what I used)
- Hook: 4mm/G or whatever hook size you need to make the gauge
- Yarn needle, to weave in ends
- Gauge: feather width x 3 rows of double crochet = 1.5 in x 1.5 in = one square in the pattern grid
Abbreviations (US crochet terminology used):
- Ch = chain
- Sl st= slip stitch
- Sc = single crochet
- Dc = double crochet
- Dc2tog = dc 2 together
- Dc3tog = dc 3 together
- Dc5tog = dc 5 together
- Sk = skip

Pattern
Foundation (does not count as a row):
- ch 10, sl st in second chain from hook, 4 sl st for a total of 5 sl st (this makes the feather shaft)
- chain 7, do not turn (note: this is for making a standalone feather, see below for instructions on how to crochet the feathers in a column together)
Row 1:
- 2 dc in 4 ch from hook, dc3tog
- dc in side of last sl st (top of feather shaft), dc3tog
- 3 dc in last ch, turn
Row 2:
- ch 3 (counts as a dc)
- 2 dc in first stitch, dc3tog, dc
- dc3tog, 3 dc in top of ch 3 from last row, turn
For Row 3 - row 6: repeat row 2
Row 7:
- ch 3, 1 dc in first stitch, dc3tog, dc, dc3tog
- 2 dc in top of ch 3 from last row, turn
Row 8:
- ch 3, sk first stitch, dc2tog, dc, dc2tog
- 1 dc in top of ch 3 from last row, turn
For Row 9:
- dc5tog, cut and fasten off
Row 1-3 = one square on grid pattern, row 4-6 = one square on grid pattern, row 7-9 = one square on grid pattern for a total of 3 squares
Large feather (6 squares of the pattern chart):
Foundation (does not count as a row):
- ch 10, sl st in second chain from hook, 4 sl st for a total of 5 sl st (this makes the feather shaft)
- chain 7, do not turn (note: this is for making a standalone feather, see below for instructions on how to crochet the feathers in a column together)
Row 1:
- 2 dc in 4 ch from hook, dc3tog
- dc in side of last sl st (top of feather shaft), dc3tog
- 3 dc in last ch, turn
Row 2:
- ch 3 (counts as a dc)
- 2 dc in first stitch, dc3tog, dc
- dc3tog, 3 dc in top of ch 3 from last row, turn
For Row 3 - row 15: repeat row 2
Row 16:
- ch 3, 1 dc in first stitch, dc3tog, dc, dc3tog
- 2 dc in top of ch 3 from last row, turn
Row 17:
- ch 3, sk first stitch, dc2tog, dc, dc2tog
- 1 dc in top of ch 3 from last row, turn
For Row 18:
- dc5tog, cut and fasten off
Row 1-3 = one square on grid pattern, row 4-6 = one square on grid pattern, row 7-9 = one square on grid pattern, row 10-12 = one square on grid pattern, row 13-15 = one square on grid pattern, row 16-18 = one square on grid pattern for a total of 6 squares
Joining feathers in a column:
After finishing the first feather at the top of a column, it’s much less work later if you crochet all 6 feathers in a column together from the start instead of sewing them together later.
To do so follow this process:
Foundation:
- ch 9
- sl st into the backside of center dc of second from last row of previous feather (row 8 on a small feather, row 17 on a large feather)
- sl st into the 9th ch you made
- 1 sl st into next ch
- 1 sl st into next ch and backside of the bottom of center dc of last row of previous feather (row 9 on a small feather, row 18 on a large feather)
- 1 sl st into next ch
- 1 sl st into next ch and backside of top of center dc of last row (row 9 on a small feather, row 18 on a large feather)
- ch 7
Joining the Feather Strands Together:
After you have created your 53 strands of 6 feathers each, reflecting the grid pattern of 27 squares tall by 53 squares wide, you'll move on to assembling the feather strands into a complete piece. Here’s how you join the strands together to form a cohesive pattern or shawl:
Preparation:
- Use a large flat surface to lay out your feather strands.
- Arrange them in the correct order to match the pattern you are following.
Joining Strands:
- Choose yarn in the color you prefer or have left over for the joining process.
- Begin at the center of the first row of dc (double crochet) on the top feather of one strand.
- Chain (ch) to the edge and slip stitch (sl st) the edge to the adjoining edge of the next feather in the strand.
- Continue this process: ch to the center of the next feather, sl st into the center dc, and proceed until all strands are connected.
Ensuring Cohesion:
- Execute the joining method on the last full row before the decrease starts at the topmost feather.
- Repeat the joining process for the second row of feathers, ensuring the edges of feathers are joined with no space between them.
Adjusting Space Between Feathers:
- For the third and fourth rows of feathers, ch 2 between each feather’s edge.
- For the fifth and sixth rows, increase the space by chaining 4 between each feather’s edge.
Bottom Tips Joining:
- At the bottom tips of your project, proceed with a single crochet (sc) in the first tip.
- Chain 15, then sc in the next tip, and continue this pattern along the bottom edge of your project.
Final Adjustments:
- If you desire the final piece to hang straight and flat, no further adjustments are needed.
- For a curved effect, akin to wings, begin at the top of the feather shaft of the first column.
- Chain 4, then single crochet (sc) at the top of the next feather shaft.
- Continue this pattern until the last feather shaft, which tightens the tension causing the piece to curve upwards.
- For additional stability, especially if you aim for a wing-like appearance, you can add a second row using the pattern sc, ch 4, sc, ch 4 across the middle of the feather shafts on the backside of the shawl.