
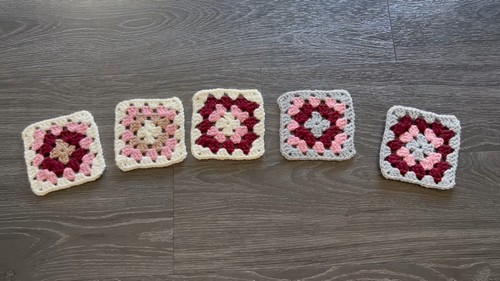
Creating a crochet granny square vest is like playing with colorful building blocks, but with yarn and a hook! Start with a small, cozy square, then another, and another, each one bursting with colors of your choice. Soon, you have a stack of these soft squares, all ready to be joined together.
Unique Crochet Granny Square Vest

With each square fitting together like a puzzle, you slowly see a trendy vest taking shape, perfect for adding a unique splash of color to any outfit.It's a fun and creative project that not only brings warmth but also a sense of accomplishment as you crochet your way to a fashionable piece of clothing made entirely by you. Whether you wear it or gift it, this granny square vest will surely turn heads and start conversations!
Supplies Needed
- Crochet hook (H8 for the given project)
- Yarn in various colors (The example used 3 to 4 colors per granny square)
- Scissors
- Approx. 38 granny squares needed (4in x 4in each), but this number may vary based on your measurements
Granny Square Pattern
Starting the Square
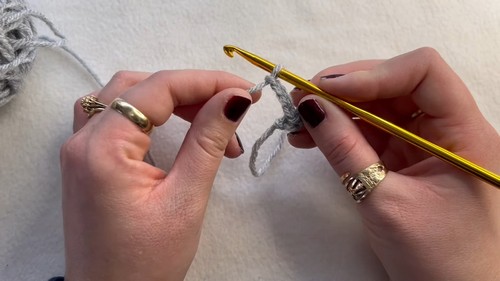
- Create a slip knot using your preferred method.
- Chain 3, then slip stitch in the first chain to form a circle.
Round 1
- Chain 4 (counts as the first double crochet and chain-1 space).
- Create a set of 3 double crochets into the center of the circle, followed by chain 2 for the corner.

Repeat step 2 three more times, adjusting the final set to two double crochets after the initial chain 4, then slip stitch into the chain space to complete the round.
Changing Colors
- Snip the yarn leaving a few centimeters and pull through the loop and tighten.
- Attach a new color with a slip knot and choose a corner to begin.
Round 2
- Chain 4 (for side and corner), make three double crochets into the gap from the first round.
- Chain 1, then another set of three double crochets in the next corner space, followed by chain 2 for the corner. Repeat around.
- Complete the round by adjusting the final set to two double crochets as before, then slip stitch to close.

Rounds 3 and Beyond
- Continue in the same pattern, with each side getting an additional set of 3 double crochets per round. Round three will have three sets per side, round four will have four, etc.
Assembly
- Lay out your granny squares in the desired pattern (e.g., 4x4 squares for front and back).
- Use the single crochet seam method to join the squares: place granny squares with wrong sides together, line up stitches, and single crochet through both layers.
- Seam together vertical strips first, then join these strips to form the vest.

Adding Ribbing
- Single crochet around the edges (e.g., armholes) to even out the surface.
- For armholes, chain 4, then create a rib pattern by single crocheting through the back loop. Skip stitches periodically to shape the armhole.
- Apply the same ribbing technique to the neckline and bottom of the vest, adjusting the stitch count for width as needed.
Final Touches
- Weave in any loose ends
- Try on the vest, making any necessary adjustments


