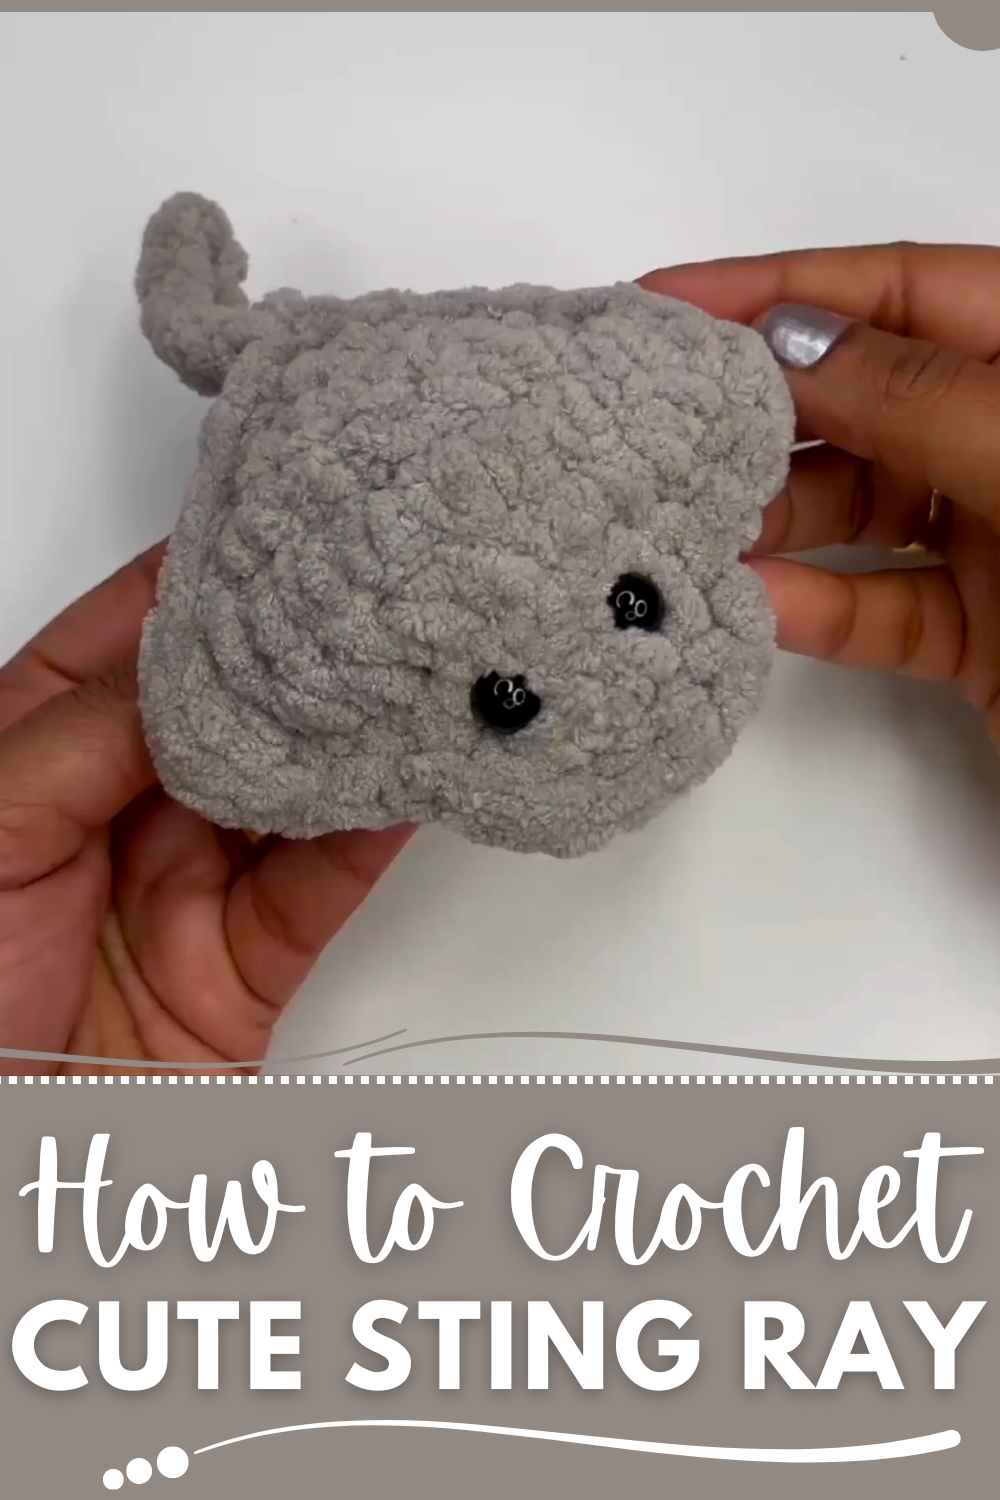
Jump into ocean vibes with this Free Crochet Sting Ray Pattern, creating a unique figure perfect for marine décor, gifts, or playful collectibles.
Stingrays have fascinated marine enthusiasts for centuries, admired for their graceful movements and sleek, flattened bodies gliding effortlessly through the ocean. This natural elegance inspires the Free Crochet Sting Ray pattern, which brings the aquatic marvel into a tangible, playful form. Perfect for children’s rooms, ocean-themed décor, or as a unique handmade gift, the piece combines visual appeal with tactile charm, offering both comfort and decorative interest.
Lovely Crochet Sting Ray Pattern which Drapes Nicely
The process begins at the center of the body, forming a sturdy yet soft base that captures the stingray’s distinctive shape. Gradual increases along the edges create smooth, flowing wings, while careful stitch placement ensures symmetry and a lifelike silhouette. Midway, subtle shaping of the tail and fin areas adds dimension, giving the stingray a dynamic, natural appearance. The final rounds reinforce edges and define details, producing a durable, resilient piece that holds its form over time.
Beyond aesthetics, this crochet creation offers practical benefits. Its soft texture makes it suitable as a plush companion for children or as a decorative accent that adds character to a space. The Free Crochet Sting Ray pattern transforms simple yarn into a charming, versatile creation that combines softness, durability, and the captivating allure of the ocean, bringing a touch of marine wonder into everyday life.
Materials Needed
- Yarn:
- Two colors: your chosen color for the body and white for the underside.
- Suggested yarn: super bulky yarn (Bernat Blanket Yarn used in the tutorial).
- Crochet Hook:
- 6.5 mm crochet hook for super bulky yarn.
- If using worsted weight yarn, use a 4.5 mm crochet hook.
- Additional Tools:
- Scissors.
- Yarn needle or tapestry needle.
- Black yarn (for embroidery) or safety eyes (5 mm for worsted weight or 10 mm for super bulky projects).
- Polyester fiberfill for stuffing the stingray.
- Keyring (if making a keychain).
Step-by-Step Process
Part 1: Crocheting Two Pieces (White and Colored)
The stingray consists of two identical pieces: one white for the underside and one in your chosen body color. The following instructions focus on creating these pieces.
Creating the Foundation and Row 1
- Start with a slip knot.
- Wrap yarn around your finger, cross it over, and form the loop. Insert your 6.5 mm hook and tighten the slip knot appropriately (not too loose or tight).
- Chain 3 chains to begin the stingray.
- In the second chain from the hook:
- Work 2 single crochets (increase).
- Move to the next chain and work 2 single crochets again.
- Row 1 Complete: You’ll have a total of 4 single crochets.
Row 2
- Chain 1 and turn the project.
- Work an increase in the first stitch (2 single crochets in the same stitch).
- Work 1 single crochet in the next 2 stitches.
- Finish this row with another increase.
- Row 2 Complete: Now you’ll have 6 single crochets.
Row 3
- Chain 1 and turn the project again.
- Begin with an increase in the first stitch.
- Work 1 single crochet in the next 4 stitches.
- End the row with another increase.
- Row 3 Complete: This row has 8 single crochets.
Row 4
- Chain 1 and turn your project.
- Start with an increase in the first stitch, followed by 1 single crochet in the next 6 stitches.
- Finish with another increase in the last stitch.
- Row 4 Complete: Now the row has 10 single crochets.
Row 5
- Chain 1 and turn the work.
- In this row, simply work 1 single crochet in each of the 10 stitches, without any increases.
- Row 5 Complete: Total of 10 single crochets.
Row 6
- Fasten off the project and leave a tail on the white piece.
- For the colored piece, do not fasten off after completing Row 6—it will be used for joining both pieces.
Part 2: Attaching Both Pieces
1. Joining the Two Pieces
- Place the white piece under the colored piece and align their edges.
- Hold the two pieces together and begin joining them with single crochets along the sides.
- Insert your hook into both layers and work single crochets across the edges.
- For each row, insert the hook between rows to estimate stitch placements.
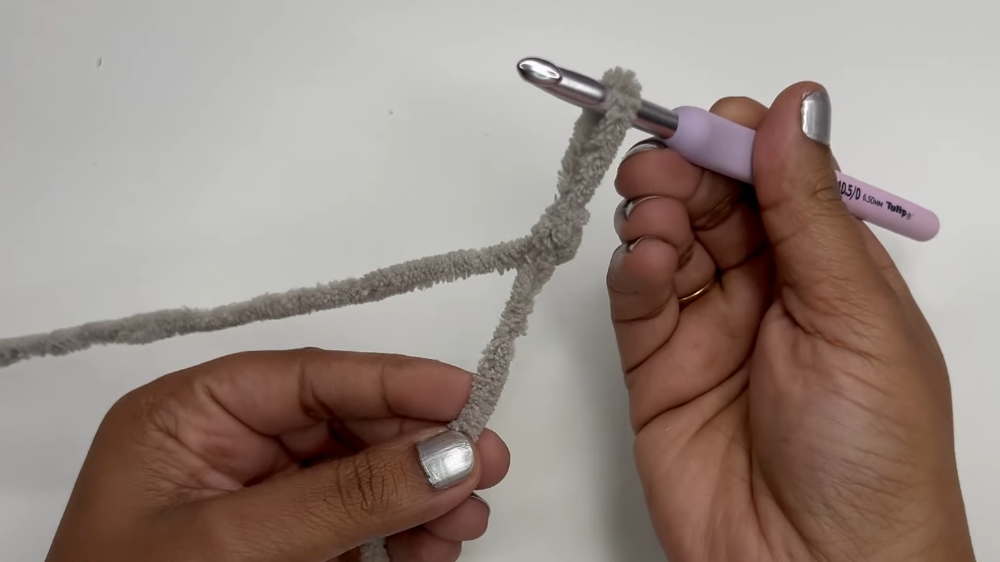
2. Adding the Stingray’s Tail
- Once the bottom side is reached, chain 8 chains to form the tail.
- Along these chains, work slip stitches starting from the second chain from the hook.
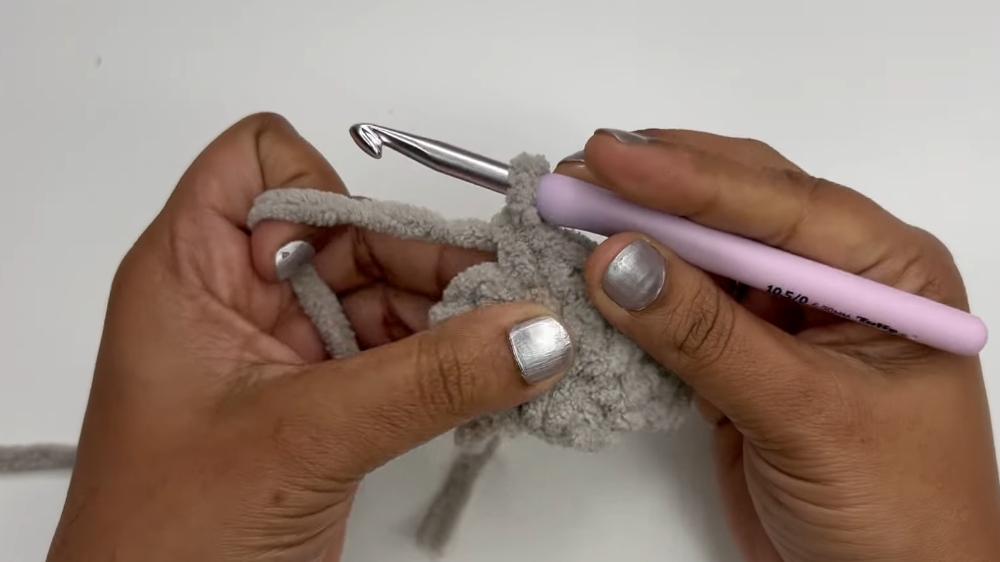
- When the slip stitches reach the base of the tail, continue with single crochets along the edge to join the remaining layers of the stingray.
Part 3: Final Touches
1. Stuffing and Adding Eyes
- Before completing the joining, stuff the stingray lightly with polyester fiberfill, focusing more on the head portion to shape it properly.
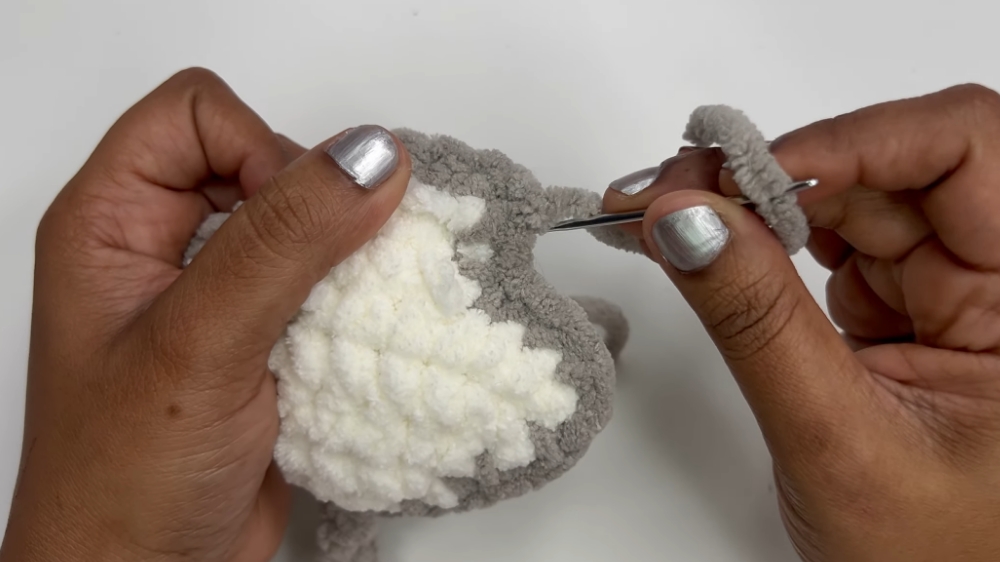
- Add eyes:
- Use safety eyes (10 mm recommended for super bulky yarn) and insert them between Row 6 and Row 7.
- Alternatively, embroider the eyes using black yarn and a needle.
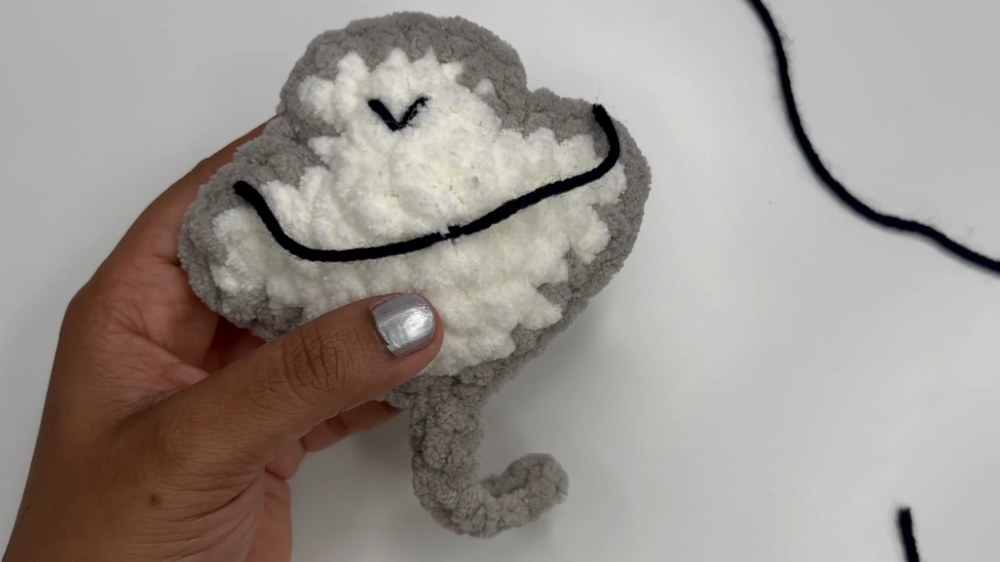
2. Embroidering the Mouth
- Flip to the underside of the stingray and use black yarn to embroider a cute little smile.
- Secure the yarn and weave in any remaining tails.
3. Completing the Project
- Once joined, fasten off the yarn and weave in all the tails.
- Trim any excess yarn to clean up the edges.
Special Features
- Beginner-Friendly and Quick: The stingray is designed for those new to crochet, with simple stitches like single crochet and slip stitch. It can be completed in just a few hours.
- Scrap Yarn Project: Perfect for using up leftover or scrap yarn from previous projects.
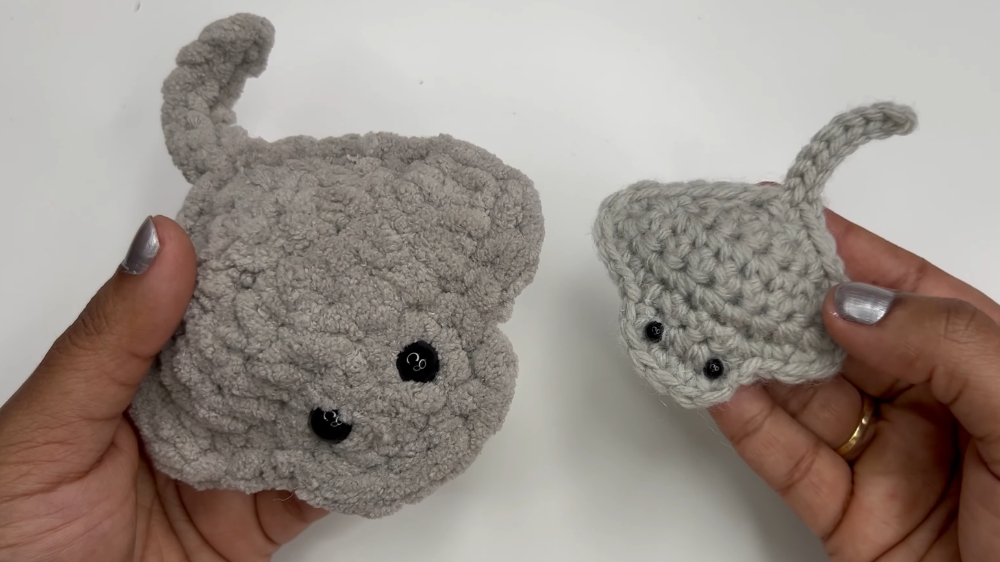
- Customizable: Use different yarn weights and hook sizes to make the stingray larger or smaller, and experiment with various colors for a fun and unique design.
- Versatile Finished Products: Create plushies, keychains, desk pets, or decorations for a mini aquarium setup.
Level of Difficulty
Beginner:
- This project primarily uses single crochets, slip stitches, and basic increases, making it highly accessible for those just starting out.
- Row-by-row instructions are straightforward, with minimal assembly required.
Tutor’s Suggestions
- Choose the Right Hook Size: For a neat and compact finish, use a crochet hook 1–2 sizes smaller than the recommended size for your chosen yarn.
- Even Tension: Maintain consistent tension in your stitches to prevent uneven shapes.
- Experiment With Yarn: Super bulky yarn creates plushies, while worsted weight yarn results in smaller, portable stingrays perfect for keychains.
- Secure Safety Eyes: Use hot glue to fasten safety eyes securely, especially if gifting to children.
Uses
- Plushies: Makes a cute addition to your collection or a thoughtful toy for kids.
- Keychains: Attach a keyring to carry a miniature stingray wherever you go.
- Desk Pets: A whimsical decoration to brighten up your workspace.
- Aquarium Decor: Add to a no-mess "aquarium" for a creative display.
Tip for Success
When finishing the project, don’t overstuff the stingray. Lightly filling the sides and emphasizing the head portion creates the perfect shape.
Conclusion
Crafting this tiny crochet stingray is both fun and rewarding. With detailed instructions, you can create a versatile and adorable accessory in no time. Whether you’re making it as a gift, a keychain, or a plushie, this project is a simple way to improve your crochet skills while creating something unique and delightful.