Carry style and functionality everywhere with this Free Crochet Aztec Boho Bag Pattern, creating a vibrant, roomy, and durable accessory for daily use.
On a bustling city street, a stylish bag swings effortlessly from a shoulder, catching the eye with its vibrant motifs and playful textures. This boho-inspired accessory combines practicality with personality, offering a roomy interior for essentials while maintaining a lightweight, easy-to-carry structure. Its bold, geometric patterns and earthy tones add a striking accent to any outfit, making it perfect for casual outings, weekend markets, or festival adventures.
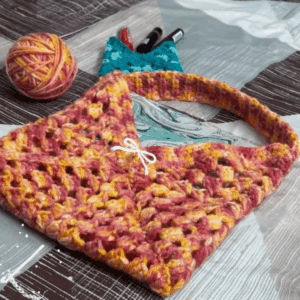
Stylish Carry Crochet Aztec Boho Bag Pattern Perfect for Essentials

The Crochet Aztec Boho Bag is a key benefits include versatility, durability, and visual appeal. Its spacious interior accommodates everyday necessities like a wallet, phone, or small notebook, while its sturdy straps ensure comfort during extended wear. The textured stitchwork provides both strength and a tactile charm, making it a functional piece that stands out. Beyond carrying essentials, it serves as a statement accessory, reflecting a bohemian spirit and a love for unique, handmade items.
Practical and stylish, this bag adapts to a variety of settings, from outdoor gatherings to city strolls. Its portable size allows it to be tucked under the arm or slung across the body, offering convenience without compromising style. Combining functionality with distinctive flair, it enhances everyday experiences, transforming simple errands or outings into opportunities to showcase thoughtful, artisanal charm.

Materials Required
- Yarn: Three different colors of medium-weight (#4) yarn (referred to as Color A, Color B, and Color C).
- Hook: A 5.5 mm crochet hook (or go a size down for tighter stitches).
- Scissors and Tapestry Needle: Essential for trimming and weaving in ends.
- Measuring Tape: Optional to ensure specific dimensions.
Step-By-Step Instructions
Step 1: Creating the Base Panel
- Foundation Row: Begin with a chain of 57 stitches using your first yarn color (Color A).
- Row 1 (Single Crochet): Single crochet into the second chain and into each stitch across, for a total of 56 single crochets.
- Rows 2-11: Repeat single crochet rows without increases—each row starting with a chain 1 and then crocheting across all stitches.
- Tip: Don’t worry if the fabric curls as you go—it will flatten out after assembly.


Step 2: Introducing Color Changes (Row 12-16)
- At the end of Row 11, switch to your second color (Color B). Cut your main color yarn and secure the transition.
- Row 12: Use Color B to single crochet across the row.
- Switch to the third color (Color C) on Row 13 and repeat the single crochet row.
- Alternating between the three colors, begin creating your Aztec-inspired geometric pattern with blocks of varying lengths (e.g., Row 14: 10 stitches in Color B, 4 stitches in Color C).

Step 3: Aztec Pattern Rows (Rows 17-25)
- Intricate color-blocking is the key feature here. Each row involves switching between Color B and Color C to form triangular and rectangular patterns.
- Work a combination of 2-stitch and 3-stitch color changes, ensuring smooth transitions to minimize gaps.
Step 4: Completing the Body Panel (Rows 26-33)
- From Row 30 onward, switch back to your main color (Color A) and work simple single crochet rows.
- Cut and secure Color B and Color C. Weave in the ends carefully to maintain a clean finish.
- Tip: Tighten any loose sections created during color changes by pulling the yarn ends gently before weaving them in.

Step 5: Assembling the Bag
- Folding and Sewing:
- Fold the finished piece in half lengthwise. The folded edge will form the bottom of the bag.
- With the wrong side facing out, whip stitch the open sides together using the same yarn color as the body panel.
- Turn the bag inside out to reveal neat seams.
- Top Border (Rounds 1-2):
- Join yarn to the top of the bag and work two rounds of single crochets around the opening for a clean border.
Step 6: Crochet the Strap
- Foundation Chain: Start the strap by chaining 169 stitches. Make sure the strap length suits your needs.
- Connecting the Strap: Skip 24 stitches along the top edge of the bag and attach the strap to the opposite side.
- Reinforcing the Strap: Work back along your foundation chain, securing with single crochets. Attach both ends firmly to the bag.
- Row Reinforcement: Add additional rows (around 3-4) to make the strap sturdy and durable.

Step 7: Adding the Final Touches
- Fringe Details:
- Create fringe pieces by cutting yarn into 4-inch lengths.
- Add two strands of fringe to each stitch along the bottom edge using slip knot techniques.
- Customize the amount of fringe to achieve your desired look.
- Finishing: After adding the fringe, trim it to even lengths for a polished look.
Special Features of the Bag
- Intricate Aztec-Inspired Design: The elegant triangular and rectangular blocks created through color changes enhance the boho aesthetic.
- Durable and Sturdy: Reinforced strap rows and tight base stitches guarantee a strong and reliable bag.
- Versatile Usage: Use it as a day bag, shopping bag, or even a beach tote.
- Customizable: Play with colors and fringe length to suit your style.
Level of Difficulty
Intermediate: The pattern involves multiple color changes, carrying yarn, and managing neat transitions. While the techniques are straightforward (single crochets and slip stitches), paying attention to clean color shifts is crucial.
Tutor's Suggestions
- Use a smaller hook if you want tighter stitches to enhance durability.
- Make yarn tails longer than needed when switching colors and weave them in securely to avoid unraveling.
- Track your rows methodically to ensure the Aztec pattern remains symmetrical.
- Be patient—color changes require careful attention to avoid uneven designs.
Pro Tip
When switching colors, always leave long yarn tails to tighten stitches later. This will prevent the fabric from puckering and ensure a smooth surface.
Conclusion
The Aztec Boho Bag is a captivating project that brings together elegance and utility. Its striking geometric design and fringe accents make it a standout accessory that you can cherish or gift. Though challenging in parts, every stitch is worthwhile, and the end result is both beautiful and practical.