Snuggle your baby in softness with the No-Sew Crochet Baby Sweater Jumper, a perfect choice for adorable looks and all-day wearable comfort.
No Sew Crochet Baby Sweater Jumper

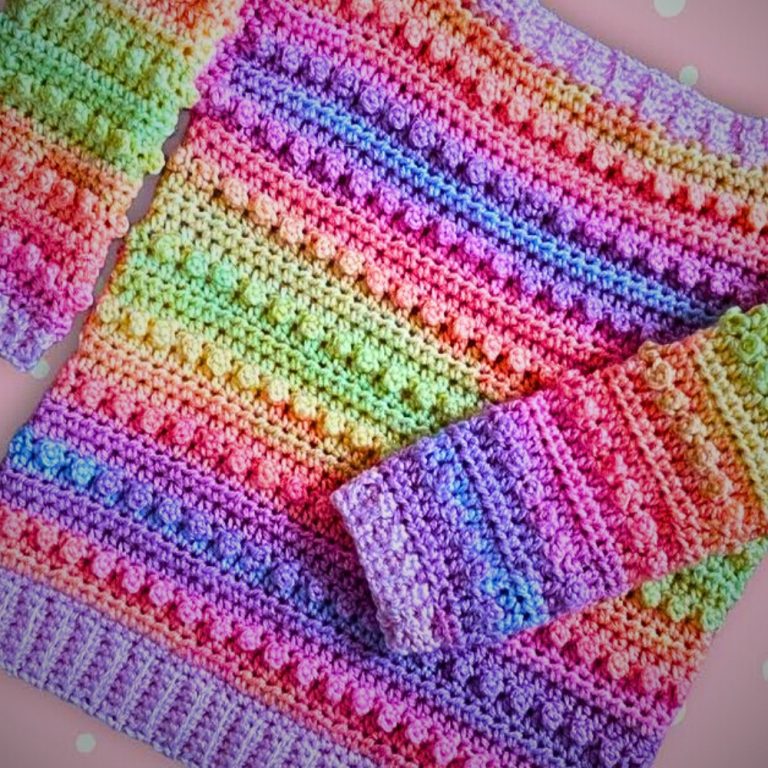
Bubbly Baby Jumper Crochet Pattern
By following this detailed guide, you’ll create an adorable, textured baby jumper (newborn size) that features micro-bobbles for a playful design and ribbed edges for a snug fit. This pattern is beginner-friendly and written step-by-step.
Materials Needed:
- Yarn: Double Knit (DK) weight yarn.
- Crochet Hooks:
- 4 mm hook (main body)
- 3 mm hook (ribbing and neckline)
- Sewing Needle: For assembly.
- Stitch Markers: To mark armholes and the neckline.
- Measuring Tape: For gauge swatch.
Gauge:
To ensure that the garment fits properly, create the following gauge swatch:
- Use the 4 mm crochet hook and your chosen yarn.
- Chain 17, then work 15 half double crochets (hdc) back into the chain.
- Work 6 rows of 15 hdc stitches.
- Your swatch should measure 3.25 inches wide by 2 inches tall.
- If your swatch is smaller: Switch to a larger hook.
- If your swatch is larger: Switch to a smaller hook.
Abbreviations:
(U.S. Terminology)
- ch: Chain
- sc: Single Crochet
- hdc: Half Double Crochet
- st(s): Stitch(es)
- yo: Yarn Over
Pattern Overview:
The jumper is worked from the bottom up:
- Ribbing for the waistband.
- Front and back torso pieces.
- Sleeves.
- Neckline ribbing.
You’ll make two identical torso pieces (front and back), join them together, and then add sleeves and neckline ribbing.
Step 1: Ribbing for the Waistband
- Using the 3 mm hook, create a slip knot and chain 7.
- Starting in the second ch from the hook, work sc into each chain for a total of 6 scs.
- Ch 1, turn. Work 6 sc into the back loop only (BLO).
- Repeat this ribbing row (Row 2) until you have 33 rows in total.
- TIP: Each "bump" or ripple on the wrong side of the ribbing counts as 2 rows.
- When the ribbing is complete, switch to the 4 mm hook.

Step 2: Torso Pieces
(Make Two Pieces)
- Attach your yarn to the top corner of the ribbing.
- Row 1: Ch 2, work 1 hdc into the side of each ribbing row, for a total of 33 hdc stitches.
- Row 2: Ch 2, turn. Work 1 hdc into each st (33 hdc).
- Row 3: Ch 2, turn. Work 1 hdc into each st (33 hdc).
- Row 4 (Micro-Bobble Row):
- Ch 1, turn. Work 1 sc, 1 micro-bobble (MB) alternately across the row. End with an sc. (33 sts total).
- Micro-Bobble Stitch (MB):
- Yo, insert hook, pull up a loop.
- Yo, pull through 1 loop (repeat this step twice more).
- Yo, pull through 2 loops, then yo and pull through final 2 loops.
- Repeat Rows 1–4 (3 rows of hdc, followed by 1 row of micro-bobbles) until you have 7 rows of micro-bobbles.
- Complete with 3 additional rows of hdc for the top.

After completing both torso pieces, sew the sides together, leaving openings for the armholes (10 rows from the top) and neckline.
Step 3: Sleeves
(Make Two Sleeves)
Sleeve Base:
- Attach yarn to the bottom of the armhole using the 4 mm hook.
- Round 1: Ch 2, work 1 hdc evenly into the side of each row around the armhole to create 28 sts total.
- Slip stitch to the first hdc to complete the round.

Sleeve Pattern:
- Work 3 rounds of hdc, alternating between the right and wrong sides.
- Work a Micro-Bobble round:
- Begin with 1 MB, then sc alternately.
- Repeat the sequence of 3 hdc rounds + 1 MB round until you have worked:
- 4 MB rows (18 rounds total).

Ribbing for Sleeves:
- Switch to the 3 mm hook.
- Ch 4, turn, and work 3 sc back into the ch.
- Attach the ribbing to the sleeve with slip stitches every 2 stitches around the sleeve opening.
- Continue working the ribbing in rows (3 sc BLO per row) until it’s complete.
- Fasten off and attach the ends of the ribbing together.
Step 4: Neckline Ribbing
- Use the 3 mm hook.
- Attach yarn to the neckline and ch 4.
- Work ribbing (3 sc BLO per row) around the neckline, creating 2 slip stitch decreases where the shoulders meet the neck for a tapered look.
- Continue working the ribbing until the neckline is complete.
- Join, fasten off, and weave in all loose ends.
Conclusion
Congratulations! You have now completed the Bubbly Baby Jumper. The charming micro-bobbles and snug ribbing make this jumper both stylish and comfortable for babies.