
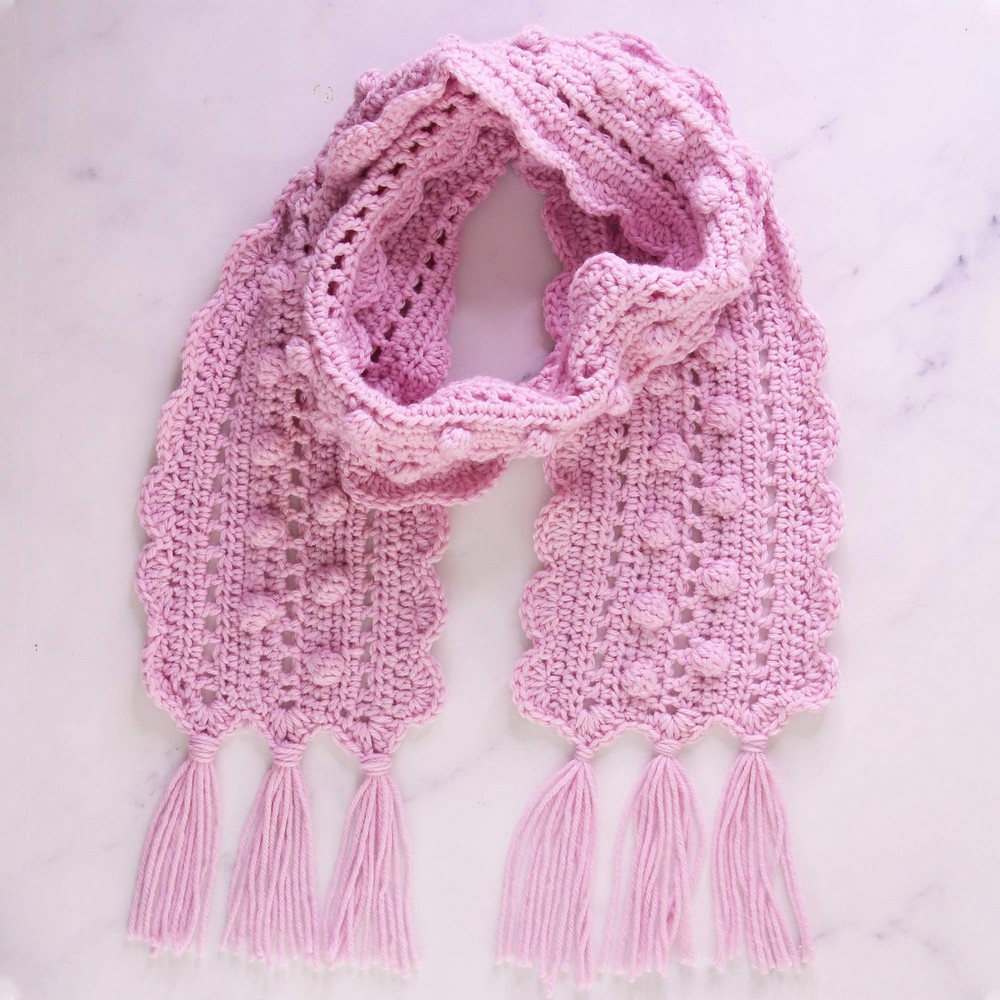
The crochet Penny Scarf reveals the delicate texture interplays with sophisticated simplicity, yielding a piece that feels both timeless and modern. The carefully chosen stitch pattern creates a gentle cascade of warmth, making it a perfect accessory for any outfit. The inherent charm of this scarf lies not just in its beauty but in the joy it brings to those who wear it. It's a testament to the designer's skillful hand and vision, delivering a touch of handmade elegance to those fortunate enough to don this crocheted masterpiece.
Crochet Penny Scarf Pattern
Supplies Needed:
- Yarn: Worsted Weight Yarn (10ply) 330m/360y
- Crochet Hook: 5mm or size to obtain gauge
- Tapestry Needle: For weaving ends
Skill Level:
- Intermediate
Gauge and Size:
Gauge is not crucial for this project. The finished scarf size, after blocking, is 6.5” by 65” (16.5x165cm), not including the fringe.
Abbreviations (US Terms):
- sc = single crochet
- hdc = half double crochet
- dc = double crochet stitch
- ch = chain stitch
- sp = space
- sk = skip
- sl st = slip stitch
- st/sts = stitch/stitches
- Bobble Stitch = Special stitch for texture

Pattern Overview:
Row 1: Chain 201. Insert hook into 3rd chain and hdc across the row into the back bumps. Turn.
Row 2: Ch 2 (counts as first hdc), hdc across row. Turn.
For Row 3 (Mesh Row): Ch 3 (counts as first dc), dc in next 2 stitches, ch1, sk1, *Dc, ch1, sk1. Repeat from * to end 3 stitches. Dc in last 3 stitches. Turn.
Row 4: Ch 2 (counts as first hdc) and hdc into first 2 stitches below. *Hdc into the chain space, hdc into the top of the dc. Repeat from * across row to last 3 stitches. Hdc into the last 3 dc stitches below. Turn.
Row 5: Ch 1 (doesn’t count as sc), sc into the base of ch1. Sc across row. Turn.
For Row 6 (Bobble Row): Ch 1 (doesn’t count as sc), sc in first 2 stitches, bobble stitch. *5sc, bobble stitch. Repeat from * to end 3 stitches. Sc into the last 3 stitches. Turn.
Continue...
Row 7: Ch 2 (counts as first hdc), hdc across row.
Row 8: Repeat the same as Row 3.
For Row 9: Repeat the same as Row 4.
Row 10 (Offset Bobble Row): Ch1 (doesn’t count as stitch), sc into first 5 stitches, bobble stitch *5sc, bobble stitch. Repeat from * to end 6 stitches. Sc into the last 7 stitches.
Continue repeating the pattern following the structure and changes outlined up to Row 15, including Border and Finishing Touches like adding a fringe.
Border and Finishing Touches:
After completing the scarf body with repeated rows up to Row 15:
Border:
- Start at the 6th stitch from the corner, ensuring the scarf bobbles face up.
- Create a pattern of skipping stitches and making dc clusters as outlined, finishing both ends and the long side with a slip stitch to join the first shell cluster.
Adding the Fringe:
- Cut 6 pieces of yarn: 12 inches long each.
- Create a loop: Fold them in half, creating a loop at the folded end.
- Insert and secure: Use a crochet hook to pull the loop through the scarf's ends and draw the loose yarn ends through the loop, securing the fringe in place.
Blocking the Scarf:
- To achieve the smoothest look and most accurate dimensions, block your scarf after finishing.


