Shine bright with this Free Crochet Star Bag Pattern that turns simple stitches into a sparkling accessory perfect for everyday use and outings.
Carrying essentials can often become a juggling act, especially when small items get lost in larger bags or backpacks. A bag that combines accessibility with a touch of charm makes daily life easier and more enjoyable. The Free Crochet Star Bag Pattern offers a creative solution, providing a functional accessory that holds items like a wallet, phone, keys, or small personal belongings securely. Its star-inspired shape adds a playful yet elegant detail, making it a standout piece for errands, casual outings, or social gatherings.
Lovely Crochet Star Bag Pattern to Gift Loved Ones
Lightweight and comfortable, the bag adjusts effortlessly to different occasions, while its durable construction ensures that belongings remain safe and organized. Color choices allow customization, letting each bag reflect personality, seasonal moods, or wardrobe preferences. Beyond personal use, it serves as a thoughtful handmade gift, showing care in both utility and style.
The flat and compact storage option enhances convenience without compromising sturdiness, making it a versatile accessory for everyday routines. With this bag, organization meets charm, offering a practical solution while also brightening the user’s daily experience. Owners enjoy easy access, reliable functionality, and a subtle statement of individuality that turns ordinary errands into moments touched with handcrafted elegance.
Special Features of the Star Bag
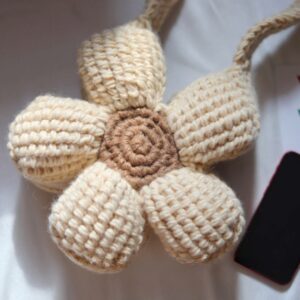
- Starfish-Inspired Design: The bag features a unique star shape with detailed textures, including the popcorn stitch, to really make it stand out.
- Durability and Functionality: The double-sided star design makes the bag both sturdy and spacious.
- Customizable Options: You can choose your own yarn colors, add a lining, and select or create your favorite strap style (metal rings, yarn straps, or fabric).
Level of Difficulty
This project is suitable for advanced beginners to intermediate crocheters. Some sections, like the popcorn stitch or constructing the star shape, may require extra attention or practice for those new to crochet, but the tutor offers clear instructions and encourages patience.
Materials Needed
- Yarn in your chosen colors (you will need at least two colors for contrast).
- A crochet hook suitable for your yarn size.
- Tapestry needle for stitching.
- Scissors.
- Blocking materials: pins, cardboard, or a towel.
- Optional: Water spray bottle for blocking.
- Optional: D-rings or other materials for the straps.
Step-by-Step Instructions to Crochet the Star Bag
1. Crochet the Base Star Shape
- Slip Knot & Initial Loop: Start with a slip knot, then chain six, and join with a slip stitch to form a small loop.
- Round 1: Chain three (counts as the first double crochet), then work 19 more double crochets into the loop for a total of 20 stitches. Join with a slip stitch.
- Round 2: Chain two (counts as the first double crochet). In the same stitch, work two more double crochets, then chain two, and work three additional double crochets in the same stitch. Skip three stitches and repeat the same sequence to form the first star point.
- Repeat until you complete five points, joining the last point with a slip stitch.
2. Adding Layers and Textures
- Thicker Yarn Effect: The next rows use double strands of yarn to create a thicker, more durable structure. Add a second strand by tying it off with a long tail to weave in later.
- Building Star Points: Each star point consists of three double crochets, two chains, and another three double crochets, worked into the large hole at the base of the point.
- Popcorn Stitch: In later rows, add texture to the star using the popcorn stitch (five double crochets in the same hole, pulling the first and fifth into a loop). Alternate the popcorn stitch with regular double crochets for a unique look.
- Continue building rows, alternating between regular and popcorn stitches, increasing the number of stitches in each star point as the rows progress.
3. Blocking the Star Shapes
- Block each star to ensure they hold their shape. Stretch the star onto a cardboard box or towel, pin it into place, and mist lightly with water. Let it dry completely, placing a book or weight on top if necessary.
4. Assemble the Bag
- Once you’ve completed two stars (one for the front and one for the back), stitch them together using a tapestry needle. Place the stars with their right sides facing each other, leaving one side open for the bag’s top.
- Turn the bag inside-out after stitching the edges.
5. Attach the Straps
- The tutor uses metal D-rings with a simple yarn chain to create the straps.
- Alternatively, you can use fabric or crocheted straps, and the tutor shows reference images for additional inspiration.
Tutor's Suggestions & Tips
- Beginner-Friendly Encouragement: The tutor suggests being patient with tricky sections like the popcorn stitch and using visuals as references. She also shares drawings throughout to help explain steps clearly.
- Yarn Usage: Experiment with multi-color yarn combinations to get a vibrant and eye-catching look.
- Blocking Advice: Don’t skip blocking—it’s essential for the star points to hold their shape and look neat.
Uses of the Star Bag
- Casual Outings: A perfect accessory for carrying essentials like keys, wallet, or phone.
- Gifting: A creative and thoughtful handmade gift for crochet lovers or anyone who appreciates unique accessories.
- Storage: Can be used decoratively at home to store yarn or other lightweight items.
Pro Tip
To weave in loose yarn ends seamlessly, use a tapestry needle to sew them into your work as you go instead of waiting until the end. This saves time and gives you a polished finish!
Conclusion
This crochet star bag tutorial is a fantastic project for anyone looking to blend creativity, skill, and functionality. With its unique starfish-inspired design, the bag is a fun challenge that results in a stunning accessory you’ll be proud to show off or gift. Follow the steps, incorporate your own style, and enjoy creating a bag that’s truly one of a kind!


